Table of Contents
Advertisement
Owner's Manual
(this document)
Read this first. It explains the basic things you need to know in order to
use the VR-3EX.
PDF Manual
(download from the Web)
• Remote Control Guide
This manual covers remote control of the unit via MIDI. It also describes MIDI
Implementations (detailed documentation of MIDI messages).
Copyright © 2013 ROLAND CORPORATION
All rights reserved. No part of this publication may be reproduced in any form without the written permission of ROLAND CORPORATION.
To obtain the PDF manual
1.
Enter the following URL in your computer.
http://www.rolandsystemsgroup.net/
2.
Choose "VR-3EX" as the product name.
Advertisement
Chapters
Table of Contents

Subscribe to Our Youtube Channel
Related Manuals for Roland VR-3EX


Summary of Contents for Roland VR-3EX
- Page 1 This manual covers remote control of the unit via MIDI. It also describes MIDI Choose “VR-3EX” as the product name. Implementations (detailed documentation of MIDI messages). Copyright © 2013 ROLAND CORPORATION All rights reserved. No part of this publication may be reproduced in any form without the written permission of ROLAND CORPORATION.
- Page 2 For the U.K. WARNING: THIS APPARATUS MUST BE EARTHED IMPORTANT: THE WIRES IN THIS MAINS LEAD ARE COLOURED IN ACCORDANCE WITH THE FOLLOWING CODE. GREEN-AND-YELLOW: EARTH, BLUE: NEUTRAL, BROWN: LIVE As the colours of the wires in the mains lead of this apparatus may not correspond with the coloured markings identifying the terminals in your plug, proceed as follows: The wire which is coloured GREEN-AND-YELLOW must be connected to the terminal in the plug which is marked by the letter E or by the safety earth symbol...
-
Page 3: Check The Included Items
Check the Included Items The VR-3EX includes the following items. Please take a moment to confirm that all of these items have been included with the VR-3EX. If you find that any item is missing, contact the nearest authorized Roland distributor in your country. -
Page 4: Using The Unit Safely
Roland Service Center, or an authorized Use only the supplied AC adaptor and the correct the power switch on the unit, then pull out the plug Roland distributor, as listed on the “Information” when: voltage from the outlet. For this reason, the outlet into which • The AC adaptor or the power cord has been... - Page 5 USING THE UNIT SAFELY CAUTION CAUTION Place in a well ventilated location Precautions concerning use of phantom power supply The unit and the AC adaptor should be located so their location or position does Always turn the phantom power off not interfere with their proper ventilation.
-
Page 6: Important Notes
Such noise could occur when • When disconnecting all cables, grasp the connector • Roland is either registered trademark or trademark of receiving or initiating a call, or while conversing. itself—never pull on the cable. This way you will... -
Page 7: Table Of Contents
Backing Up/Restoring the VR-3EX’s Settings . . . . . . . . . . . . . . . . . . -
Page 8: Panel Descriptions
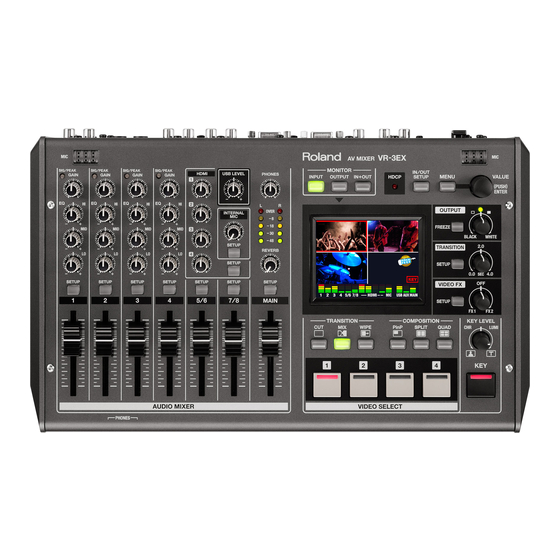
These are internal microphones for picking up ambient audio. To adjust the level, use the [INTERNAL MIC] knob. Internal Microphones p. 35 * The internal microphones are sensitive enough to pick up sounds of the VR-3EX’s buttons and faders being operated. [MENU] Button This displays the menu screen on the monitor. p. 18 This selects menu items and changes setting values. -
Page 9: Video Section
• [IN + OUT] Button (In/Out Mode) This displays the currently output video overlaid on the four-way split screen of input video. This lights up, flashes, or goes dark according to the VR-3EX’s “HDCP” setting and the connected status of HDCP- HDCP Indicator p. -
Page 10: Rear Panel/Side Panel
These output the results of audio mixing. Here you connect a video recorder or other recording equipment, or an amplifier or speakers. * The VR-3EX has two internal audio buses (the MAIN bus and the AUX bus), and you can select the audio bus to output for each individual connector. - Page 11 Security Slot You can attach a commercially available security lock here. For details, refer to the following website: SECURITY LOCK) http://www.kensington.com/ MIDI IN Connector You can connect external MIDI devices to remotely control the VR-3EX. p. 41 MIDI OUT/THRU Connector...
-
Page 12: Signal Flow
Signal Flow Signal flow inside the VR-50HD is as shown in the figure below. Video signals HDMI Frame Sync INPUT 1 480p/576p Composite Converter HDMI Frame Sync INPUT 2 480p/576p PinP Composite VIDEO FX Converter Input Chroma SPLIT Select 11types WIPE QUAD Lumi... - Page 13 Signal Flow 480p/576p HDMI Scaler OUTPUT up to 1080p RGB/ Component OUTPUT ENCODER STREAMING (Motion JPEG) PVW OUT HDMI PVW Composite Converter OUTPUT MULTI 480p/576p * Total latency: 2 frames (from Input 1–3 to Output), 3 frames (from Input 4 to Output) Built-In Monitor * Internal Processing: 480/59.94p when set to NTSC, 576/50p when set to PAL OUTPUT BUS...
-
Page 14: Connecting External Equipment
Connecting External Equipment * To prevent malfunction and equipment failure, always turn down the volume, and turn off all the units before making any connections. * Be sure to use cables and adapter plugs with the proper connectors matching those of the other devices you are using. Connecting Video Source/Output Equipment After making the connections, press the [IN/OUT SETUP] button and specify the video input connector for inputting video channels 1 through 4 (p. -
Page 15: Connecting Audio Source/Output Equipment
• Changing the orientation of the microphone(s). • Relocating microphone(s) at a greater distance from speakers. • Lowering volume levels. Using Phantom Power The VR-3EX supports phantom power. When using a condenser microphone that requires phantom power, set the [PHANTOM] switch to “ON. ” NOTE Always turn the phantom power off when connecting any device other than condenser microphones that require phantom power. -
Page 16: Connecting A Computer Via Usb
Wait for communication between the VR-3EX and the computer to be established. When communication with the computer starts, the operating system’s standard driver is automatically installed. * The VR-3EX is seen as a USB video device or USB audio device by the computer. -
Page 17: Basic Operations
Channel Channel [OUTPUT] button: Output mode This displays the video currently * The VR-3EX is equipped with a protection circuit. A brief interval being output. (a few seconds) after turning the unit on is required before it will operate normally. -
Page 18: Menu Operations
MEMO • Settings made at the menu screen and setup screens are saved in the VR-3EX’s internal memory when you quit the screen. • If you want to make the video preview disappear and display only the menu, press the currently lighted [MONITOR] button to make it go dark. -
Page 19: Supported Video Formats
PCM. PCM. NOTE Internal processing by the VR-3EX is carried out at 480p (when set to NTSC) or 576p (when set to PAL). This means that an interlaced signal that is input is internally converted to a progressive signal by the VR-3EX. The picture might appear jagged at this time. -
Page 20: Video Input/Output Settings
RGB/COMPONENT output connectors is set at “AUTO” (the setting for automatic detection). On the VR-3EX, each video channel is provided with two or three video input connectors. You assign the video input connector If you want to specify an output format of your choosing, change... -
Page 21: Adjusting The Main Output Video
Changing the Video Output from the Video Output Connectors You adjust the main output video to match the equipment receiving output from the VR-3EX. You can switch the video output of the PVW OUT connector, VIDEO MEMO output connector, and USB port between the following two types. -
Page 22: Adjusting The Input Video On Video Channel 4
Video Input/Output Settings Adjusting the Input Video on Video Channel 4 Of the input video streams on video channel 4, the RGB/COMPONENT and the HDMI inputs can have their input formats and image quality adjusted manually. NOTE Composite video (video input via the VIDEO input connector) on video channel 4 cannot be adjusted. Press the [MENU] button to display the menu screen. -
Page 23: Inputting Copyright-Protected (Hdcp) Video
Video Input/Output Settings Inputting Copyright-protected (HDCP) Video To input copyright-protected (HDCP) video from a Blu-ray Disc player or the like, follow the steps described below to change the “HDCP” setting. Output from Connectors What’s HDCP? HDCP is copyright-protection technology that prevents When “HDCP”... -
Page 24: Video Operations
Video Operations Switching the Video You can switch between the video inputs via channels 1 through 4. Use the [TRANSITION] knob to set the length of time for Switching by Touching the Screen applying the video transition. Touch the channel screen on the monitor to switch the video. Press the MONITOR [INPUT] button, making the button light up. -
Page 25: Switching Automatically
Video Operations Switching Automatically Using a Different Transition Pattern You can make the video on channels 1 through 4 switch A variety of transition patterns are available for mix and wipe automatically. transition effects. To use a different pattern, change the transition pattern assigned to MEMO the TRANSITION [MIX] or [WIPE] button. -
Page 26: Applying A Fade To The Main Output Video (Output Fade)
Stopping (Freezing) the Main Output Video (Output Fade) Video You can apply fade to the VR-3EX’s main output video. You can freeze the video on the main output. This lets you make the main output video fade to a black (or white) -
Page 27: Compositing The Video
Video Operations Compositing the Video The VR-3EX provides the following four types of video composition. Button Video composition Explanation [PinP] Picture-in-Picture This composites video in an inset screen over a background video. [SPLIT] Split This composites two video streams in a split screen. -
Page 28: Compositing Using Split (Split)
Video Operations Changing the Position and Size of the Inset Screen Compositing Using Split (SPLIT) This composites two video streams in a split screen. Press the MONITOR [OUTPUT] button, making the button light up. The video currently being output is displayed on the monitor. Touch the inset screen and drag with your finger to move the screen. -
Page 29: Compositing Four Video Streams On A Single Screen
Video Operations Compositing Using Split Making Detailed Settings for Split Composition You can make more-detailed settings, such as the cropping location Press the MONITOR [INPUT] button, making the button for the video. light up. Press the [MENU] button to display the menu screen. Touch <SPLIT>... -
Page 30: Compositing Using Luminance Key/Chroma Key
This makes a portion of the video transparent and composites it Touch <KEY CHANNEL>. with background video. With key composition on the VR-3EX, you can take video that has added transitions and compositing and further composite it with other video, logos, or text. - Page 31 Video Operations Press the [KEY] button. Compositing Using Chroma Key This composites video shot against a blue or green background onto a different background video. The [KEY] button lights up and the video on the channels you selected in steps 4 and 7 is composited. Green or Blue Turn the [KEY LEVEL] knob clockwise toward “LUMI ”...
- Page 32 Video Operations Turn the [VALUE] knob to select the channel you want to Turn the [KEY LEVEL] knob counterclockwise toward “CHR display in the foreground (CH1 through CH4). ” to adjust the degree of extraction. Select the channel shot against the blue or green background. MEMO • The selected channel (the channel shown in the foreground in key composition) is displayed on the channel screen with a KEY...
-
Page 33: Applying Effects To Video
You can apply effects to the main output video. The VR-3EX has 11 types of built-in filter effects, including Afterimage and Colorize. By factory default, “COLOR PASS” (FX1) and “SEPIA” (FX2) are assigned to the [VIDEO FX] knob. Changing the assigned effects enables you to use different ones. -
Page 34: Audio Operations
Audio Operations Adjusting the Volume Balance of Input Audio You can adjust the input sensitivity, sound position, and volume balance of audio input to the VR-3EX. NOTE Lowering the [MAIN] fader all the way results in no audio output from the output connectors assigned to the MAIN bus (p. 39). -
Page 35: Adjusting The Volume Balance
The internal microphones are sensitive enough to pick up sound quality sounds of the VR-3EX’s buttons and faders being operated. Turn the HDMI [1] through [4] knobs to adjust the volume level of HDMI audio. -
Page 36: Applying Effects To Audio
Audio Operations Applying Effects to Audio You can apply effects to audio that is input and output to adjust its sound quality. Applying Effects to Input Audio Equalizer (EQ) This adjusts the sound quality for each frequency band. You can apply effects to the audio on each channel and the audio from the internal microphones and HDMI input, thereby adjusting Setting item Explanation... -
Page 37: Applying Effects To Main Output Audio
Audio Operations Reverb (REVERB) Applying Effects to Main Output Audio This adds lingering reverberations to the audio. You can apply effects (Reverb, Equalizer, and Mastering) to main You can apply reverb to the audio on channels 1 through 4 and output audio to adjust its sound quality. -
Page 38: Hearing Only Specific Input Audio (Solo/Mute)
(Mute feature). video and audio that are out of sync. On the VR-3EX, you can delay output of the audio on the respective MEMO channels and from the internal microphones and HDMI input. -
Page 39: Using The Aux Bus
Audio Operations Using the AUX Bus The VR-3EX has two built-in audio buses (a MAIN bus and an AUX bus). You can select the audio bus to output for each individual connector. MAIN bus This receives all input audio as a group and sends it to output (main output audio). -
Page 40: Interlinking Audio Output To Video Switching (Audio Follow)
Audio Operations Interlinking Audio Output to Video Switching (Audio Follow) You can associate audio with a video switch so that when the video is switched, the specified audio alone is output automatically, and other audio is automatically muted. NOTE When the Audio Follow feature is on, only the switching for output and muting is performed automatically. The positions of volume-adjusting faders and knobs do not change automatically. -
Page 41: Operations Using A Computer
USB cable. Put the VR-3EX in a state capable of outputting video or audio. Operate the VR-3EX to get it ready to output video or audio to the computer. Operating the VR-3EX by Remote On the computer, confirm the input from the VR-3EX. -
Page 42: Other Features
Other Features Saving/Recalling Settings (Memory) You can take the current settings, including audio and video settings and the panel state, and save them as a single set in the VR-3EX’s internal memory, for later recall and use when needed. You can save four sets of settings in internal memory. -
Page 43: Backing Up/Restoring The Vr-3Ex's Settings
Other Features Backing Up/Restoring the VR-3EX’s Settings You can back up the values of settings on the VR-3EX to a computer connected via USB. You can then restore the backed-up data to the VR-3EX when needed. Preparing the Computer Restoring... -
Page 44: Turning Off The Power Automatically (Auto Off)
State (Factory Reset) Auto Off is a feature that automatically turns off the power after no You can return the values of settings on the VR-3EX to their factory operation for a specific period of time. This helps prevent wasting defaults. -
Page 45: Switching Between The Ntsc And Pal Formats
Switching Between the NTSC and PAL Formats On the VR-3EX, for the video system format, you can select either the NTSC standard used in Japan and the U.S.A. or the PAL standard used in Europe and elsewhere. Switch this to suit the application. -
Page 46: Appendices
Appendices Troubleshooting If you suspect a malfunction, please check the following points. If this does not resolve the problem, contact a nearby Roland Service Center. Problem Items to check Action Page Video-related problems Does the equipment connected at HDMI input... -
Page 47: Menu List
Appendices Menu List * The default value is printed in bold characters. Menu Screens ([MENU] button) Category Setting item Value Explanation VIDEO CH4 Of the input video streams on video channel 4, this makes the settings for the video that is input via the RGB/COMPONENT input connector and the HDMI input connector. - Page 48 OFF, 1–4 POWER ON LOAD selected memory number to be recalled at startup. MIDI For information on remote control via MIDI, download and refer to the “VR-3EX Remote Control Guide” (PDF) from the following Roland website. http://www.rolandsystemsgroup.net/ ON, OFF SETUP HDCP When set to “ON, ”...
-
Page 49: Setup Screens
Appendices Setup Screens Audio Channels 1–4 (Audio Channel 1–4 [SETUP] Buttons) Setting item Value Explanation GAIN 0–64 dB This adjusts the input sensitivity. LEVEL 0–127 This adjusts the volume level of audio channels 1 through 4. AUX SEND 0–100–127 This adjusts the send level of audio to the AUX bus. REV SEND 0–100–127 This adjusts the send level of audio to Reverb. - Page 50 Appendices HDMI Audio 1–4 (HDMI [SETUP] button g Setting item Value Explanation LEVEL 0–127 This adjusts the volume level of HDMI audio. AUX SEND 0–100–127 This adjusts the send level of audio to the AUX bus. REV SEND 0–100–127 This adjusts the send level of audio to Reverb. EQ HI -15–0–15 dB This boosts or attenuates the high band.
-
Page 51: Transition Effects
Appendices Main Output Audio (MAIN [SETUP] button) Setting item Value Explanation MAIN LEVEL 0–127 This adjusts the volume level of the main output audio. 0–127 AUX LEVEL This adjusts the volume level of audio output from the AUX bus. PHONES LVL 0–127 This adjusts the volume of headphones connected to the PHONES jacks. -
Page 52: Transition Effects List
Appendices Transition Effects List MIX (MIX, FAM, NAM) Effect Explanation In this transition, as the original picture gradually disappears, the next video is overlaid and progressively grows more visible. This is an abbreviation of “full additive mix. ” The A and B luminance levels are maintained during the transition. This is an abbreviation of “non-additive mix. - Page 53 Wipe73 Wipe74 Wipe75 Wipe76 Wipe77 Wipe78 Wipe79 Wipe80 Appendices Wipe81 Wipe82 Wipe83 Wipe84 Wipe85 Wipe86 Wipe87 Wipe88 Wipe89 Wipe90 Wipe91 Wipe92 Wipe93 Wipe94 Wipe95 Wipe96 Wipe97 Wipe98 Wipe99 Soft Edge (SWipe01–99) SWipe01 SWipe02 SWipe03 SWipe04 SWipe05 SWipe06 SWipe07 SWipe08 SWipe09 SWipe10 SWipe11 SWipe12...
- Page 54 SWipe73 SWipe74 SWipe75 SWipe76 SWipe77 SWipe78 SWipe79 SWipe80 Appendices SWipe81 SWipe82 SWipe83 SWipe84 SWipe85 SWipe86 SWipe87 SWipe88 SWipe89 SWipe90 SWipe91 SWipe92 SWipe93 SWipe94 SWipe95 SWipe96 SWipe96 SWipe97 SWipe98 SWipe99 Slide: Normal Type (Slide01–20) Slide01 Slide02 Slide03 Slide04 Slide05 Slide06 Slide07 Slide08 Slide01 Slide02...
-
Page 55: Main Specifications
Appendices Main Specifications Roland VR-3EX : AV Mixer Video Processing 4:2:2 (Y/Pb/Pr), 8 bits (Internal Processing : 480/59.94p when set to NTSC, 576/50p when set to PAL) Audio Processing Sampling Rate 24 bits/48 kHz Input Formats HDMI Video 480/59.94p (when set to NTSC) (VIDEO IN 1–3) -
Page 56: Dimensions
Appendices Signal Level and Impedance Display Input/Output Signal Level : 1.0 Vp-p (luminance) Graphic Color LCD, 320 x 240 dots, touch panel RGB/Compo- 0.7 Vp-p (chroma) Video Effects nent Input/Output Impedance : 75 ohms Video Transition Cut, Mix (3 patterns), Wipe (250 patterns) Input/Output Signal Level : 1.0 Vp-p Composite Strobe, Negative, Colorize, Findedge, Silhouette, Monochrome,... -
Page 57: Index
Index A-CENTER . . . . . . . . . . . . . . . . . . . . . . . . . . . . . . . . . . . . . . 29 Factory-default state . - Page 58 RCS (VR-3EX RCS) . . . . . . . . . . . . . . . . . . .
-
Page 59: Declaration Of Conformity
This product contains chemicals known to cause cancer, birth defects and other reproductive harm, including lead. For the USA DECLARATION OF CONFORMITY Compliance Information Statement Model Name : VR-3EX Type of Equipment : AV-Mixer Responsible Party : Roland Systems Group U.S. Address : 5100 S.Eastern Avenue, Los Angeles, CA 90040-2938, U.S.A. (323) 890-3700 Telephone :... - Page 60 For EU Countries For China...
Need help?
Do you have a question about the VR-3EX and is the answer not in the manual?
Questions and answers