Defender PX301 Instruction Manual
Digital wireless camera with long range night vision
Hide thumbs
Also See for PX301:
- Instruction manual (68 pages) ,
- Instruction manual (68 pages) ,
- Instruction manual (34 pages)
Table of Contents
Advertisement
Quick Links
Download this manual
See also:
Instruction Manual
Advertisement
Table of Contents

Related Manuals for Defender PX301


Summary of Contents for Defender PX301
- Page 1 Digital Wireless Camera with Long Range Night Vision INSTRUCTION MANUAL V1.0 www.defender-usa.com Model#: PX301...
- Page 2 This warranty does not cover shipping costs, insurance, or any other incidental charges. You MUST call Defender before sending any product back for repair. You will be sent a Return Authorization form with return instructions. When returning the product for warranty service, please pack it carefully in the original box with all supplied accessories, and enclose your original receipt or copy, and a brief explanation of the problem (include RA #).
-
Page 3: Table Of Contents
18 LEDs, you can be sure that you will never miss an unsuspected guest, no matter how dark it is. So, feel good in knowing that you are secure with your additional PX301 camera allowing you to see and hear everything. -
Page 4: What's Included
Assistance is available for you whenever you need it. Our customer support team can be reached by phone, email or live web chat services 24/7 so that you will always have access to an expert. 1. This camera is not compatible with other systems. It is exclusive to the Defender PX301 wireless system. 2. IR illumination range up to 40ft under ideal conditions. Objects at or beyond this range may be partially or completely obscured, depending on the camera application. -
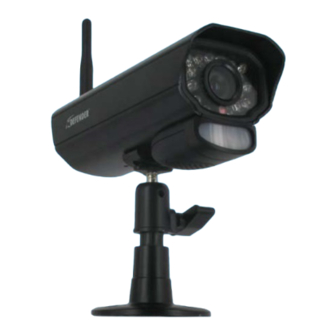
Page 5: Buttons And Connections
8. Speaker: Located under motion detection area (Two way audio compatible with 7” monitor only) 9. Camera Mount: Allows the camera to be desk or wall mounted 10. Power connection: This 3 ft. cord connects to the power adapter PX301-C... -
Page 6: Installation
• Decide whether the camera will be wall-mounted, or mounted on a desk/table top. We recommend that the mount is secured using the included screws and hardware for all installations AVOIDING INTERFERENCE The PX301 utilizes clear signal technology, meaning that it is designed to avoid the frequencies of common wireless devices. -
Page 7: Mounting The Camera
Plug power adapter into Camera’s cord recommended.) 8. Repeat the above steps for all additional cameras. Note: The above photos are examples of mounting a camera, your camera will Plug into Surge Protected power source look different from the above images. PX301-C... -
Page 8: Pairing
7. The camera and receiver will then pair and you will see the cameras views appear on screen. 8. If you purchased additional cameras or your kit came with additional cameras repeat the above pairing steps using different camera channels for each additional camera. 30 Seconds to pair Select Camera Press pair button PX301-C... -
Page 9: Troubleshooting
• Make sure SD card is not locked by adjusting the tab on the side of the card Remote not • Ensure that the remote control has batteries inserted into it and that those batteries working are not dead • Try plugging the IR sensor in • Try using the remote control closer to the receiver PX301-C... -
Page 10: Specifications
Electronic shutter speed 1/60 ~ 1/15,000 sec Signal/Noise Ratio >48dB Camera Bracket Operating Temperature 14°F ~ 104°F Operating Humidity Mounting Hardware Included Camera Power Input 9V DC 600mA Dimensions 5.25" x 4.75" x 2'' (With Stand) Weight 0.75 lbs PX301-C... -
Page 11: Notes
NOTES PX301-C... - Page 12 NOTES PX301-C...
-
Page 13: Drilling Template
DRILLING TEMPLATE Cut along the dotted line for a drilling template. DRILL HOLES IN DRILL HOLES IN THE MARKED THE MARKED AREAS AREAS DRILL HOLES IN DRILL HOLES IN THE MARKED THE MARKED AREAS AREAS PX301-C... - Page 14 DISCLAIMER Defender does not endorse any of defender products for any illegal activities. Defender is not responsible or liable in any way shape or form for any damage, vandalism, theft or any other action that may occur while a Defender product is in use by the consumer.
Need help?
Do you have a question about the PX301 and is the answer not in the manual?
Questions and answers