
Related Manuals for Defender PHOENIX HD


Summary of Contents for Defender PHOENIX HD
- Page 1 PHOENIX HD QUICK START GUIDE ATTENTION For Returns or Support you MUST contact: DefenderCameras.com/Support...
-
Page 2: Table Of Contents
TABLE OF CONTENTS WHAT’S INCLUDED ....................4 WHAT YOU’LL NEED ....................6 REGULATORY INFORMATION ................. 6 GET TO KNOW YOUR DEVICE .................. 7 1 0.1″ Touchscreen Monitor ..................7 Camera ........................8 LIVE VIEW ......................... 9 Multiview Mode ......................9 Single View Mode ....................10 BASIC SYSTEM SETUP..................... 11 Proper Camera Installation And Placement ............12 Camera Settings......................13 Camera Setup - Pairing ..................13... - Page 3 ACTIVATE YOUR WARRANTY PROTECT SUPPORT VALUE Covered for the Receive videos, tips & Exclusive access to unexpected updates for your product special offers Open your camera & scan this QR code, or visit: DefenderCameras.com/Warranty EXTEND YOUR WARRANTY Don’t forget to protect your purchase and ease your mind by extending your included 1 year manufacturer warranty to 2 or 3 years. If something goes wrong, our team of Security Experts will get you back up and running fast! Extended Warranties can be purchased up to 60 days after your product’s purchase. 2 YEAR WARRANTY 3 YEAR WARRANTY Extend your peace of mind to three years Extend your peace of mind to two years ◊ Product Defects ◊ Product Defects ◊ Advanced Replacements ◊ Advanced Replacements ◊...
-
Page 4: What's Included
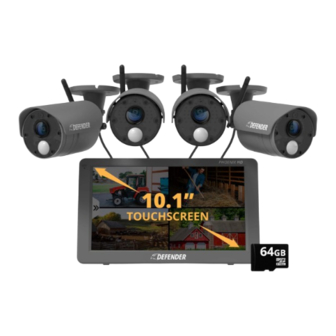
WHAT’S INCLUDED PHOENIXHD2C 1 x 10.1” Full HD Monitor 2 x 1080P HD Wireless 2 x 7.6ft Camera Power Cameras with 7ft Power Adapters Cable Cord & pre-installed 64GB MicroSD Card 24/7 VIDEO SECURITY SYSTEM DefenderCameras.com 1 x 5.8ft Monitor Power 1 x Window Warning Sticker 2 x Drilling Templates Adapter ACTIVATE YOUR WARRANTY PROTECT SUPPORT VALUE Covered for the Receive videos, tips & updates Exclusive access to unexpected for your product special offers Open camera and scan this QR code or visit: DefenderCameras.com/Warranty... - Page 5 PHOENIXHD4C 1 x 10.1” Full HD Monitor 4 x 1080P HD Wireless 4 x 7.6ft Camera Power Cameras with 7ft Power Adapters Cable Cord & pre-installed 64GB MicroSD Card 24/7 VIDEO SECURITY SYSTEM DefenderCameras.com 1 x 5.8ft Monitor Power 1 x Window Warning Sticker 4 x Drilling Templates Adapter ACTIVATE YOUR WARRANTY PROTECT SUPPORT VALUE Covered for the Receive videos, tips & updates Exclusive access to unexpected for your product special offers Open camera and scan this QR code or visit: DefenderCameras.com/Warranty Camera & Monitor...
-
Page 6: What You'll Need
WHAT YOU’LL NEED • Drill and or Phillips #2 screwdriver • 1/4” drill bit for pilot holes • 1/4” drill bit for wall anchors • 15/64” (6mm) long drill bit (Choose the right drill bit based on the surface material) REGULATORY INFORMATION FCC STATEMENT: This device complies with part 15 of the FCC Rules. Operation is subject to the following two conditions: (1) This device may not cause harmful interference. (2) This device must accept any interference received, including inter- ference that may cause undesired operation. This equipment complies with FCC radiation exposure limits set forth for an uncontrolled environment. This equip- ment should be installed and operated with a minimum distance of 20cm between the radiator and any part of your body. FCC WARNING: This equipment has been tested and found to comply with the lim- its for a Class B digital device, pursuant to Part 15 of the FCC Rules. These limits are designed to provide reasonable protection against harmful interference in a resi- dential installation. This equipment generates, uses and can radiate radio frequency energy and, if not installed and used in accordance with the instructions,may cause harmful interference to radio communications. However, there is no guarantee that interference will not occur in a particular installation. If this equipment does cause harmful interference to radio or television reception, which can be determined by turning the equipment off and on, the user is encouraged to try to correct the interference by one or more of the following measures: • Reorient or relocate the receiving antenna. • Increase the separation between the equipment and the receiver. • Connect the equipment into an outlet different from that to which the receiver is connected. • Consult the dealer or an experienced radio/TV technician for help. IC STATEMENT: This device contains licence-exempt transmitter(s)/receiver(s) that comply with Innovation, Science and Economic Development Canada’s licence-ex- empt RSS(s). Operation is subject to the following two conditions: (1)This device may... -
Page 7: Get To Know Your Device
GET TO KNOW YOUR DEVICE This system does not connect to the Internet or a mobile app. With your privacy in mind, footage is saved on the local microSD card. 10.1″ TOUCHSCREEN MONITOR Antenna (For optimal performance and to avoid range and connection issues, always keep your antenna lifted) Microphone Mounting Hole Playback Volume Up Mounting Hole Sleep Volume Down MicroSD or TF Card Power Port Power Indicator Light Power Switch Speaker Stand PLEASE NOTE: When Sleep button is pressed the monitor screen will turn off until motion is detected in front of the camera(s). -
Page 8: Camera
CAMERA Microphone - Captures the sound on camera side and transmits the sound from camera to monitor. Lens - Captures the view in the cameras field of view and transmits video from the camera to the monitor. IR LED - Infrared LEDs provide viewing in no/low light conditions. Deterrent Light- Flashes when motion is detected. PIR Sensor - Detects motion within the camera’s field of view. Speaker - Outputs sound from the monitor when manual talk is enabled. Camera Antenna - Receives & sends signals to or from the monitor. Pair Button - While in pairing mode, press and hold the pairing button to pair the camera to a single monitor. Camera Base - Use the camera base to mount the camera on a wall or other flat surfaces. -
Page 9: Live View
LIVE VIEW MULTIVIEW MODE Enter sequence mode (audio No MicroSD card inserted will only play from the active camera) Camera channel Open Quick Access Menu Open Menu Camera volume muted Manually start recording Camera volume on on all cameras Manual recording on all Motion Recording Activated cameras in-progress New recordings saved to Enter playback menu MicroSD card. Overwrite recordings Camera is recording PLEASE NOTE: Cameras can be muted and unmuted in multiview by tapping When more than one camera is paired, your monitor will only provide sound from the active camera. -
Page 10: Single View Mode
SINGLE VIEW MODE Camera signal strength to Zoom in on camera view the monitor Manually start recording Switch camera channel on the selected channel Monitor volume muted Enter playback menu Tap and hold to turn on Press and hold to talk siren on the camera To enter sequence mode Manual recording on the from multiview mode tap selected channel in-progress To exit sequence mode tap and return to multiview mode, tap the screen. PLEASE NOTE: In single view, to turn the volume on or off, use the volume buttons at the top of the monitor. -
Page 11: Basic System Setup
BASIC SYSTEM SETUP PLEASE READ FIRST! Verify all accessories and complete the monitor and camera setup before installing the cameras. For optimal performance and range, lift the antenna. Connect the monitor to the AC power adapter, then connect the other end of the adapter to a standard outlet and confirm the power button, located on the right-hand side of the monitor, is in the ON position. Connect each camera to the AC adapter, then connect the other end of the adapter to a standard outlet and extend the camera’s antenna into the upright position. Complete camera and monitor setup. IMPOTRANT: The camera power supply is not waterproof. -
Page 12: Proper Camera Installation And Placement
PLEASE NOTE: Installing your camera indoors pointing outside through a window, will result in a glare or reflection when “auto” is selected in the night vision settings. This will also disable the cameras PIR sensor and will not be able to detect motion outdoors. Defender Phoenix HD supports motion detection. Motion detection is influenced by multiple factors such as distance from the camera, the size of the object, the height, angle, and direction of the camera, and your night vision settings. Glass will also disable motion detection accuracy as the sensor can not function through glass. -
Page 13: Camera Settings
CAMERA SETTINGS CAMERA SETUP - PAIRING Your cameras come pre-paired to your monitor. If you have purchased an additional camera or want to assign the camera(s) to a different channel, complete the following steps. 1. Select 2. Select 3. Select Camera Setup 4. Select Pairing 5. Select a channel to pair the 6. Press the pairing button for 3 seconds camera. and release. Wait up to 1 min for your cameras to sync to your monitor and display your footage. TIP: To unpair a camera(s), press and hold the pairing button on the camera until appears. -
Page 14: Camera On/Off
CAMERA ON/OFF Your system has a privacy feature built in to allow you to stop recording from the selected camera without unpairing. PLEASE NOTE: If you turn your camera off you will not be able to live view or record footage until the camera is turned back on. 1. Select 2. Select 3. Select Camera Setup 4. Select Camera On/Off 5. Toggle on or off the camera(s) based on your preference. -
Page 15: Camera Brightness
CAMERA BRIGHTNESS Select your camera’s level of brightness based on your preference. Testing each option after installing the camera is recommended. 1. Select 2. Select 3. Select Camera Setup 4. Select Brightness 5. Select your preferred Brightness. Select low, med, or high for each camera. -
Page 16: Camera Resolution
CAMERA RESOLUTION The camera’s default resolution is HD 1080P. TIP: Reducing the camera’s resolution to 720P, will extend your recording storage capacity up to 50%. 1. Select 2. Select 3. Select Camera Setup 4. Select Resolution 5. Select your preferred resolution for each camera. -
Page 17: Night Vision Setup
NIGHT VISION SETUP Your camera’s default night vision is set to auto. Auto: The camera will record full color during the day and black and white at night. Off: The camera will record in color during the day. At night, the camera’s recording color will be dependent on ambient lighting. PLEASE NOTE: When Installing your camera indoors pointing outside through a win- dow, select Off to avoid a glare or reflection in your live view and recorded footage. 1. -
Page 18: Recording Setup
RECORDING SETUP Duration: Select the length of time the camera will record when motion is no longer detected. The default setting is 15 seconds. IMPORTANT: By default, the system is set to record on motion only. Make all neces- sary changes based on your preference. Please note, when setting a manual recording or scheduled recording, this will override all motion recording settings. 1. -
Page 19: Schedule Recording
SCHEDULE RECORDING IMPORTANT: When a recording schedule is set, your camera(s) will record continuously during that period and override any motion detection settings. SETTING A SCHEDULE 1. Select 2. Select 3. Select Recording Setup 4. Select Schedule Recording 5. Select Modify 6. Select the camera(s) and day(s) you want to set a recording or and adjust the start and end time. Click Save to apply the changes. TIP: You can create as many recording schedules as desired. A recording schedule can be continuous or blocks of time during the day. -
Page 20: Deleting A Recording Schedule
DELETING A RECORDING SCHEDULE 1. Select 2. Select 3. Select Recording Setup 4. Select Schedule Recording 5. Select Modify 6. Select the camera(s), day(s) of the week and input the start and end time of a previous recording schedule. Select Delete. *Repeat to delete additional recording schedules. -
Page 21: File Overwrite
FILE OVERWRITE Recording time varies depending on the size of the Micro SD card inserted. Once your card is full, old footage will be overwritten to ensure you never stop recording. The default settings are set to overwrite. If you do not wish to overwrite older footage, turn off this setting. 1. Select 2. Select 3. Select Recording Setup 4. Select File Overwrite 5. Select No (X) -
Page 22: Audio On/Off
AUDIO ON/OFF Your camera is defaulted to record audio. To adjust this setting, follow the steps below. PLEASE NOTE: This function only turns off audio recording only. Audio will be played in live view. To turn off audio in live view mode, refer to “ LIVE VIEW “ to turn off monitor audio. 1. -
Page 23: System Settings
SYSTEM SETTINGS TIME SETUP 1. Select 2. Select 3. Select System Settings 4. Select Time Setup 5. Enter your current date and time. -
Page 24: Language
LANGUAGE Select your preferred monitor language. Default is English. 1. Select 2. Select 3. Select System Settings 4. Select Language 5. Select your preferred language. -
Page 25: Default Settings
DEFAULT SETTINGS To return your system back to factory settings, restore default settings. PLEASE NOTE: All custom settings will be lost however, all previously recorded footage will remain on the Micro SD card. 1. Select 2. Select 3. Select System Settings 4. Select Default Settings 5. Select Yes... -
Page 26: Format Memory Card
FORMAT MEMORY CARD IMPORTANT: Formatting your MicroSD card will delete all recordings. This cannot be reversed. Formatting your SD card may be necessary when you receive an error indicating the SD card is corrupted or when swapping SD cards. To format your SD card please follow the steps below. 1. Select 2. Select 3. Select System Settings 4. Select Format Memory Card 5. Select Yes 6. System will confirm when formatting is complete... -
Page 27: Firmware Upgrade
FIRMWARE UPGRADE PLEASE NOTE: Only complete a firmware upgrade when recommended by Customer Support. Once completed, your monitor will restart. 1. Select 2. Select 3. Select System Settings 4. Select Firmware Upgrade 5. Select the devices to update, and 6. Wait for the system to finish updating. click Yes to confirm. Once complete the monitor will reboot. -
Page 28: Motion Detection Settings
MOTION DETECTION SETTINGS Customize your motion detection sensitivity level and mask area for each camera. Default sensitivity is set to medium. SENSITIVITY 1. Select 2. Select 3. Select Motion Detection Settings 4. Select Sensitivity for the camera you want to adjust the settings for 5. Select your preferred motion detection sensitivity level and click to return to the previous screen. *Repeat for each camera TIP: Refer to page 30 for Advanced Sensitivity Settings. -
Page 29: Mask Area
MASK AREA 1. Select 2. Select 3. Select Motion Detection Settings 4. Tap Mask Area 5. By default, your camera will detect motion in the entire field-of-view. If this is your preferred setting, skip this step. To filter out unwanted motion detection, tap the grid to mask over areas where you do not wish to detect motion. Masked areas wil appear white. *Repeat for each camera. -
Page 30: Advanced Sensitivity Settings
ADVANCED SENSITIVITY SETTINGS IMPORTANT: These settings are based on the average home and environment. Typically, no setting change is required. If you are experiencing a significant amount of inaccurate motion notifications, based on your environment, you can customize this setting. VMD: Video Motion Detection Algorithm, optimizes motion detection at a wider range and longer distances. -
Page 31: Alert Settings
ALERT SETTINGS There are two types of Alerts - Monitor and Camera(s) MONITOR ALERT When motion is detected on one or more cameras, the monitor will beep. 1. Select 2. Select 3. Select Alert Settings 4. Select Alert on Monitor 5. Select Alert Volume to adjust the 6. Select Channel Alert On/Off to select level of sound on your monitor using which camera(s) will trigger an alert on the – and + symbols, select once the monitor, select once complete. complete. - Page 32 7. Select Alert Mute Schedule to set 8. Select Modify to set a schedule. a schedule of when you DO NOT want the monitor to alert you to motion. 9. Select the camera(s) you wish to 10. Select the days of the week you set a schedule for. wish the schedule to apply to. 11. Adjust the start and end times to 12. Click Save to save your schedule. mute notifications for motion alerts. TIP: To remove the schedule, select the camera(s) and dates you wish to delete the schedule for, put the times you wish to delete and select Delete.
-
Page 33: Camera Alert
CAMERA ALERT There are two types of camera alerts. Voice Message: The camera will make an announcement “This area is under 24-hour surveillance.“ Light: The deterrent light is a red flashing light in front of the camera. 1. Select 2. Select 3. Select Alert Settings 4. Select Alert on Camera 5. Select the camera(s) you wish to have an audio alert and/or deterrent light. -
Page 34: Playback
PLAYBACK TIP: Playback can also be accessed by pressing the Playback button on the top of the monitor. 1. Select 2. Select to access the Recording File List. 3. Select the camera and day you 4. Tap the recording to playback. wish to playback recordings from. Days with recordings will be highlighted in green. PLEASE NOTE: In playback mode, to turn the volume on or off, use the volume buttons at the top of the monitor. -
Page 35: Frequently Asked Questions
FREQUENTLY ASKED QUESTIONS WHAT TO DO WHEN A CAMERA DOES NOT PAIR SUCCESSFULLY TO THE PHOENIX HD MONITOR. If your camera(s) do not pair automatically after following the pairing steps, unplug your camera(s) from power for one minute. Plug the camera(s) back in and repeat the pairing steps. WHAT IS THE MAXIMUM SIZE MIRCOSD CARD THAT CAN BE USED IN THE PHOENIX HD? The maximum size mircoSD card is 512 GB. - Page 36 Need Help? Visit: DefenderCameras.com/Support REV01 03282024 E Defender is continuously enhancing our products to bring customers the best user experience. For the most up to date Quick Start Guide, please visit defendercameras.com. DEFENDER® does not endorse any DEFENDER® products for illegal activities. DEFENDER® is not responsible or liable in any way for any damage, vandalism, theft or any other action that may occur while a DEFENDER® product is in use by the purchaser. We reserve the right to change models, configuration, or specifications without notice or liability. Product may not be exactly as shown. ©2024 DEFENDER®. All rights reserved. DEFENDER®, the DEFENDER® logo and other DEFENDER® marks may be registered. All other Trademarks are the property of their respective owners.
Need help?
Do you have a question about the PHOENIX HD and is the answer not in the manual?
Questions and answers