Advertisement
Advertisement
Table of Contents

Subscribe to Our Youtube Channel
Related Manuals for X-Rite SpectraLight III


Summary of Contents for X-Rite SpectraLight III
- Page 1 SpectraLight III Operation Manual...
-
Page 2: Warranty Information
Cet appareil numérique de la classe A est conforme à la norme NMB-003 du Canada. EQUIPMENT INFORMATION Use of this equipment in a manner other than that specified by X-Rite, Incorporated may compromise design integrity and become unsafe. WARNING: This instrument is not for use in explosive environments. -
Page 3: Safety Instructions
12 months, unless different local regulations apply. This warranty shall be fulfilled by the repair or replacement, at the option of X-Rite, of any part or parts, free of charge including labor, F.O.B. its factory or authorized service center. -
Page 4: Specifications
Transient Overvoltage: Category II INSTALLATION Recommendations for Surround X-Rite SpectraLight III is designed for critical color evaluation and therefore it is important that precautions betaken to ensure the best environment for this purpose. • Viewing booth installations provide an area which is manufactured in conformance with ASTM standards. The work surface and surround area of view are neutral in color and low in gloss. - Page 5 misjudgments, the background on which the sample is placed and the surrounding area of view should be neutral in color and have a low gloss. It is typically recommended that Munsell N7/ is used. • White backgrounds are recommended when evaluating low gloss or light color samples, gray backgrounds are recommended when evaluating medium gloss of intermediate color samples, and matte or flat black backgrounds are recommended when evaluating high gloss or dark color samples.
- Page 6 Rear Panel Rear of Unit Bottom Panel Thumbscrews Notch Slot Figure 2. Rear Into Bottom Panel 5. While supporting the Rear Panel, insert the Left Panel (#3) side tabs into the Rear Panel (#2). Fasten the Left Panel to the Bottom Panel by securing it with the thumbscrew as shown in Figure 3. Side Tabs Rear Panel Left...
- Page 7 Right Panel Rear Panel Side Tabs Left Panel Right Panel Rear Panel Thumbscrew Left Panel Figure 4. Right Panel Into Rear and Bottom Panel 7. Slide the pivot slots on the front panel (#5) onto the pivots located on each of the two side panels. 8.
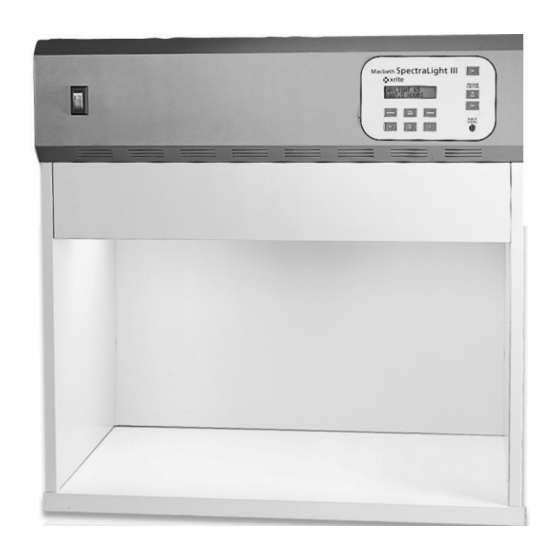
- Page 8 Figure 6. SpectraLight III Viewing Booth 10. The Spectralight Booth is now fully assembled. See Figure 6. 11. Place the viewing booth on the table or bench capable of holding a minimum of 300 lbs (136 kg). Note: The table or bench height should be determined by the average height of the observer and whether observations will be made from a standing or sitting position.
- Page 9 Ensure that the diffuser latch is secured before releasing. Failure to do so may result in the diffuser sliding out of position. 17. Plug SpectraLight III into a power source matching the voltage specified on the power label on the rear of the unit. Turn on the Main Power Switch located on the front panel.
- Page 10 Do not install the overhead luminaire under a fire sprinkler system. Dissipated heat from the luminaire may cause the sprinkler system to activate. 1. Carefully unpack and remove the SpectraLight III from its shipping container. 2. Remove the eyebolts (four for the single overhead, eight for the dual overhead) from the accessory package and screw them into the weld nuts located on top of the unit.
- Page 11 SpectraLight III is shipped with its lamps and daylight filters installed. The diffuser is shipped in a separate container and must be installed at this point. 4. Carefully unpack and remove the diffuser from its shipping container. CAUTION In the following step, make sure the hinge pins are carefully placed behind the Horizon lamps to avoid lamp breakage.
-
Page 12: Maintenance
MAINTENANCE Cleaning the Diffuser, Daylight Filters, Lamps, and Reflectors To clean the unit; refer to Figure 13 and Figure 14, and proceed as follows: Main Power Switch Diffuser Figure 13. Open Luminaire 1. Turn off the Main Power Switch before proceeding. CAUTION In the following step, make sure there are no objects in the way of the diffuser upon release and be careful to gently lower the diffuser. - Page 13 Cool White Fluorescent Hinge Custom Fluorescent Hinge Horizon Filter Pack Illuminant "A" Horizon Quarter Quarter Vent Turn Turn Fastener Fastener Custom Fluorescent Cool White Fluorescent Figure 14. Filter and Lamp Location 7. Slide the filter pack sideways and remove it. 8.
-
Page 14: Replacing Lamps
9. Reset the lamp time meter using the procedure “Resetting the Lamp Time Meter” on the following pages. Certification Program X-Rite is pleased to offer a Preventative Maintenance and Certification service for users of SpectraLight viewing systems. This factory authorized service provides a Certificate of Performance with traceability to A2LA (American Association for Laboratory Accreditation) for the line of SpectraLight viewing systems. -
Page 15: Operation
OPERATION Note: When powering off the SpectraLight III using the Main Power Switch, wait at least 5 seconds before you power it on again. This will enable all of the firmware and hardware to properly shut off. If you attempt power on less than 5 seconds after the power off, the unit may not power up. -
Page 16: Running The Program
Using the Automatic Shut-Off Feature The SpectraLight III Daylight lamps have the shortest life among all the lamps in the unit. To reduce the frequency of Daylight lamp replacement, the SpectraLight III has a feature called “Automatic Shut-Off.” This feature automatically switches the lamp source from Daylight to Cool White Fluorescent after a period of five minutes. - Page 17 Interpreting Diagnostic Messages The SpectraLight III may display one of these diagnostic messages in the event that a situation has occurred which prevents the SpectraLight III from operating normally. The messages and troubleshooting suggestions are listed below. I got this message...
- Page 18 X-Rite shall not be liable for errors contained herein or for incidental or consequential damages in connection with the performance or use of this material. This manual is the copyright of X-Rite. Any reproduction of the publication in whole or in part without the express permission of X-Rite is a breach of this copyright.
- Page 20 Corporate Headquarters - USA 4300 44th Street SE Grand Rapids, Michigan 49512 Phone 1 800 248 9748 or 1 616 803 2100 Fax 1 800 292 4437 or 1 616 803 2705 Corporate Headquarters - Europe Althardstrasse 70 8105 Regensdorf Switzerland Phone (+41) 44 842 24 00 Fax (+41) 44 842 22 22...
Need help?
Do you have a question about the SpectraLight III and is the answer not in the manual?
Questions and answers