Table of Contents
Advertisement
Advertisement
Table of Contents

Related Manuals for Qomo QPC60


Summary of Contents for Qomo QPC60
- Page 1 English QOMO Portable Document Camera QPC60...
- Page 2 • Welcome: Thanks for purchasing this product. Please read the instructions carefully before using this product. • FCC Compliance Statement (Class A): This device complies with Part 15 of the FCC Rules. Operation is subject to the following two conditions: (1) this device may not cause harmful interference, and (2) this device must accept any interference received;...
- Page 3 Warning 1. Do not allow children to operate the folding arm without supervision. Do not put your hands here to avoid injury. 2. Do not look directly at the LED light source, which may cause retinal damage. 3. Carry the product by holding the lower part of the main unit in both hands. Never hold the product by the arm or the camera head only.
-
Page 4: Preparing The Document Camera
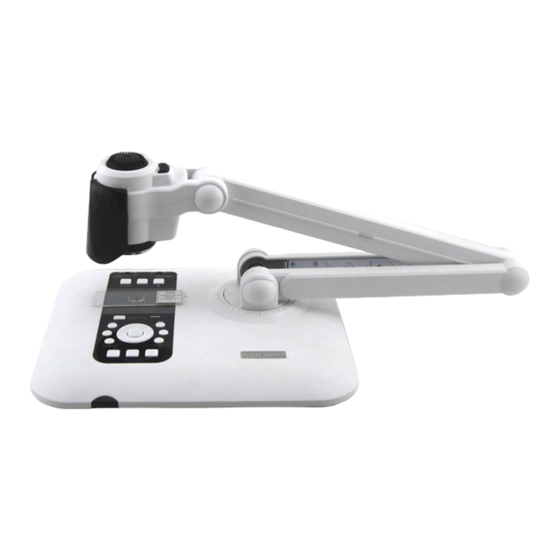
Preparing the document camera Knowing the document camera parts Camera head Lamp Lamp power button Lamp shuttle wheel Led indicator Remote control signal receiver Control panel LCD Display / Light Box SD Card slot USB port TV System Switch Antitheft slot VGA Input Port VGA Output Port HDMI Output Port... -
Page 5: Control Panel
Control Panel Button Function Select output port. Select Aspect Ratio. 16:9 for 1280x720 / 4:3 for 1024x768 3” screen backlight on / off. Power on / off. Pass the signal from PC via RGB input port to RGB output port. Display toggle. -
Page 6: Remote Control
Remote Control Button Function Button Function Laser pointer / Brightness hotkey * The function varies with model. Increase / decrease the sound volume. Power on / off Picture in Picture function on / off Freeze current image. *For displaying a still image as an * Pause the clip while playing videos insert while displaying another image. -
Page 7: Camera Head
Setting up This section provides useful tips on how to adjust the document camera smoothly for your needs. Camera head The camera head can turn freely at 180° up and down. 180º Illumination lamp If the light is too dark, please turn on the lamp on camera head to make best exposure. - Page 8 Recommended working area ▶ Main working area 7.2” 9.7” ▶ Secodary working area 13" x 9.7" (4:3) 13" x 7.2" (16:9) If the document is not put in the recommend working area, the image should be rotated by FLIP button ( ) on control panel or remote control.
-
Page 9: Adjusting The Brightness
Recommended panel switch function Press Display toggle ( ) to preview images and videos in the external display device. Adjusting the brightness 1. Press MENU button ( ) , and select the brightness mode ( 2. Use ( ) buttons to increase or decrease the brighness level. Adjusting the size Use the Zoom button ( ) to zoom in or zoom out the screen. -
Page 10: Adjusting The Focus
Functions indicated by can only be used by the remote control. Adjusting the focus ▶ Automatic focus Press AF button ( ) to automatically focus. This function provides a one-shot auto-focus. ▶ Manual focus Use the manual focus button ( on remote control to finetune the focus. Anti-glare Anti-glare sheet is a transparent plastic that is overlaid on top of shiny object or glossy surface to reduce the glare. - Page 11 Inserting and Ejecting an SD / SDHC card (Not supplied) 1. Insert a memory card (SD/SDHC/MMC/MMC 2.0) with the label facing up until it reaches the end of the slot. 2. When the card is inserted successfully, the icon ( ) will appear on screen and the internal memory will become inaccessible.
-
Page 12: Making The Connections
Making the Connections System diagram VGA IN VGA OUT VIDEO OUT NTSC DC IN(5V/2.5A) HDMI OUT AUDIO OUT MIC. IN PASS THROUGH Step 1 / Plugging in the Power Outlet Use power adapter to connect DC IN connector on the product to a standard 100V~240V AC power outlet. The type of power adapter is depending on your countries / regions. -
Page 13: Step 3 / Connecting With Components
Step 3 / Connecting with Components Display Device Product Port Cable Port HDMI HDMI OUT HDMI RGB OUTPUT RGB INPUT AUDIO OUTPUT AUDIO IN VIDEO IN VIDEO OUTPUT VIDEO AUDIO OUTPUT AUDIO IN ▶ HD TV • Connect via HDMI OUTPUT 1. Use HDMI cable to connect to your HDTV via the HDMI OUT connector. 2. - Page 14 ▶ Standard TV • Connect via VGA OUTPUT 1. To display images, you can use VGA cable to connect to your television’s RGB port via the VGA OUT connector. 2. Make sure the output switch is set for VGA mode and select an appropriate Aspect Ratio. 3.
-
Page 15: Connect To An External Microphone
Connect to a speaker system Plug a 3.5mm plug speaker to AUDIO OUT connector on the product. Only the audio from the video playback is supported. VGA IN VGA OUT VIDEO OUT NTSC DC IN(5V/2.5A) HDMI OUT AUDIO OUT MIC. IN PASS THROUGH LINE IN If HDMI OUT and AUDIO OUT are connected simultaneously, the audio from HDMI OUT device will be disable but output from AUDIO OUT device. - Page 16 Connect to a computer ▶ Connect via VGA cable Use VGA cable to connect VGA IN connector on the product to the VGA OUT connector on the computer. VGA IN VGA OUT VIDEO OUT NTSC DC IN(5V/2.5A) HDMI OUT AUDIO OUT MIC. IN PASS THROUGH To display computer image, press PC button ( ) on the control panel.
-
Page 17: Basic Operation
Basic operation 1. Press MENU ( ) button on the remote control or control panel. 2. Press ( ) button to toggle between tabs. 3. Press ( ) to make a selection and display the setting selections. 4. Use ( ) to adjust the setting. - Page 18 Name icon Option Description Enable HD Rec. mode on / off *When enter the HD Rec. mode, the output HD Rec. Mode On / Off signal will be terminated and then press “Recoding” button to record videos in High Definition (1280x720) resolution. Beep On / Off Enable beep sound on / off...
-
Page 19: Playing Back
Functions indicated by can only be used by the remote control. Recording a video clip / Taking a still picture 1. Choose the focus mode according to distance to object: Normal mode for 20cm to ∞. Macro mode ( ) or ( ) for 5cm ~ 20cm. 2. Use the Zoom button ( ) to zoom in or zoom from the screen. -
Page 20: Copying Files To Your Computer
Copying files to your computer Please notice that the video clips are recorded in MP4 format and are compiled as CLIPxxxx.mp4 (xxxx are four serial numbers). Before viewing these videos on your PC, you may need to install some media programs. 1. -
Page 21: Advance Operation
Functions indicated by can only be used by the remote control. Advance operation Highlight function / Mask function( ) Highlight function 1. Use the Highlight display to draw attention to a particular section of the output image. 2. Press the Highlight button ( ) on the remote control, and use the direction buttons to move the highlighted area. - Page 22 Project slides 1. Place the anti-glare sheet on top of the built-in panel first and then place the silde on top of the anti-glare sheet. 2. Press LightBox button ( ) to turn on the panel’s backlight as a lightbox. 3.
- Page 23 Functions indicated by can only be used by the remote control. Connect to a microscope Connect to a microscope enables you to examine microscopic objects on a big screen. 1. Adjust the microscope and focus objects. 2. Choose an appropriate micoscope adapter. 3. Microscope adapter accessaries are applicable to Ø28mm ,Ø31mm, Ø33mm, and Ø34mm eyepieces.
- Page 24 Storing 1. Power off the product. 2. Unplug the AC adapter from the wall outlet. Then , disconnected the AC Adapter and all cables. 3. Fold the camera head and arms in the direction shown in the figure.
-
Page 25: Troubleshooting
Troubleshooting When using the document camera : Problem Cause Solution The AC adapter is not Re-connect one end of the Cannot be powered on correctly connected to the AC adapter to the document normally. wall outlet or the document camera and the other end to camera. - Page 26 When using the document camera : Problem Cause Solution Press AF button to auto focus or adjust by pressing Manual Focus. Probably the distance of The image is fuzzy. object is too close to the lens. Select Macro mode if the distance is less 20cm. The document is not put in Press [ ] button to adjust...
- Page 27 When using the document camera : Problem Cause Solution It happens when you insert Cannot delete the pictures a memory card after taking a The lost recordings are saved few pictures or video clips. and video clips, and also can- not find them in the memory in the internal memory.
- Page 28 QOMO Portable Document Camera QPC60 QOMO HiteVision, LLC Toll Free: (866) 990-QOMO Email: info@qomo.com...
Need help?
Do you have a question about the QPC60 and is the answer not in the manual?
Questions and answers