Table of Contents
Advertisement
Quick Links
PRECAUTIONS
Please follow these precautions:
To prevent fire or shock hazard, do not expose the unit to rain or
moisture.
To prevent electrical shock, do not open the unit. Refer to qualified
personnel for service only.
Do not use the unit continuously for more than 24 hours with camera
auto focus on. It may cause damage to the camera lens.
Be careful not to spill water or other liquids onto the unit, or allow
combustible or metallic objects to get inside the base.
Unplug the VISUALIZER from the wall outlet when it is not being
used for a long period of time.
Clean the unit with a soft cloth lightly moistened with a mild
detergent solution.
Clean the lens carefully with an air spray or soft dry cloth to avoid
scratching it.
Rotate the camera lens cap before power the unit on.
- 1 -
Advertisement
Table of Contents

Subscribe to Our Youtube Channel
Related Manuals for Qomo QPC70


Summary of Contents for Qomo QPC70
- Page 1 PRECAUTIONS Please follow these precautions: To prevent fire or shock hazard, do not expose the unit to rain or moisture. To prevent electrical shock, do not open the unit. Refer to qualified personnel for service only. Do not use the unit continuously for more than 24 hours with camera auto focus on.
-
Page 2: Table Of Contents
Contents PRODUCT INTRODUCTION ............3 PARTS IDENTIFICATION ............4 MAKING ADJUSTMENTS ............4 CONTROL PANEL ..............5 LIGHT BOX(Optional) ..............6 REMOTE CONTROL INSTRUCTION ......... 7 CONNECTIONS ................. 9 INSTALLING VISUALIZER SOFTWARE ........10 USB PORT ................10 USB IMAGE CAPTURE ............11 CONTROLLING VISUALIZER BY COMPUTER ....... -
Page 3: Product Introduction
PRODUCT INTRODUCTION Thank you for purchasing the VISUALIZER. This VISUALIZER comes with a new design which is easy to use, portable and with a high resolution. The VISUALIZER can be used to present 3D objects, text, graphs, transparencies and negative films. It can be connected to projector, PC and other multi-media equipment. -
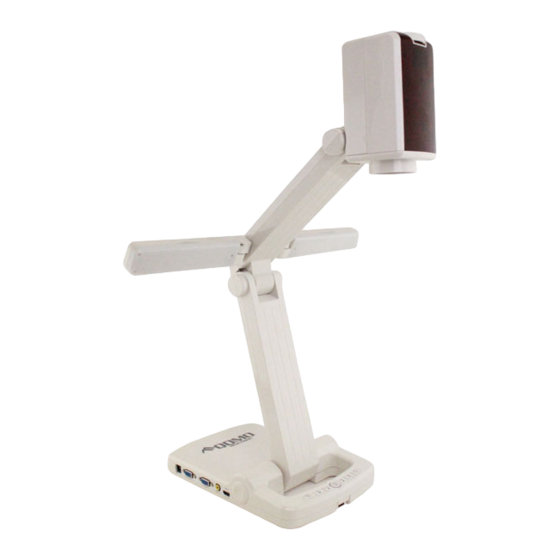
Page 4: Parts Identification
PARTS IDENTIFICATION Zoom In/Out knob Camera head Up camera stand Camera Lens Arm lights Down camera stand Base Control Buttons *Light Box Connectors Control Buttons Note: The parts marked with“*”is optional. MAKING ADJUSTMENTS Rotate the arm lights and the camera head until they are properly positioned. -
Page 5: Control Panel
CONTROL PANEL There are seven touch buttons located the front panel of the VISUALIZER: · RECALL (Show saved images/video) · SAVE (Save images ) · ROTATE (Rotate the image 0° , 90° , 180° , 270° ) · POWER (Turn the VISUALIZER on/off and switch input source between CAM,VGA and HDMI) ·... -
Page 6: Light Box(Optional)
LIGHT BOX(Optional) Connector Stage Stgae Operation B uttons Indicator LAMP FREEZE ROTATE 2DIV SAVE RECALL AUTO If the unit come with a light box, to connect it to the unit, turn on the backlight by pressing the “LAMP” key, and then press the “NEG” button on the Remote Control to display the film negatives. -
Page 7: Remote Control Instruction
REMOTE CONTROL INSTRUCTION POWER (Control the VISUALIZER On/Off) LAMP (Turn arm lights On/Off. Press and hold for three seconds to delete all the stored files in the SD Card under recall status) FREEZE (Freeze the screen) NEG (Display film negatives) MIRROR (Vertical reverse of the image) SPLIT (Image Split function) ROTATE (Rotate the image 0°... - Page 8 TELE/WIDE (Increase/decrease zoom) FAR/NEAR (Focus near or far) AUTO (To auto white balance and auto focus) CAM (CAM signal output selection) HDMI/PC (HD or PC signal output selection) (Capture Videos and save) (Capture images and save) (Play/pause saved video) (Stop save video / video playback) Del (Delete the selected file under recall status) RECALL (Show saved images/video) EXIT (Exit recall)
-
Page 9: Connections
CONNECTIONS Panel ( Right) SD Card COMPUTER IN Panel (Left) HDMI IN HDMI OUT 12V- IN PROJECTOR RS 232 #1 MIC IN #2 USB Port #3 SD Card Port #4 COMPUTER IN #5 12V DC POWER IN #6 HDMI IN #7 PROJECTOR OUT #8 RS 232 #9 HDMI OUT... -
Page 10: Installing Visualizer Software
INSTALLING VISUALIZER SOFTWARE This function is to capture and display images with the USB interface, which includes displaying static and dynamic pictures, capturing dynamic images and playback the dynamic images with the Windows Media Player or alternative player. Insert the CD-ROM that comes with the VISUALIZER into the CD- ROM drive. -
Page 11: Usb Image Capture
USB IMAGE CAPTURE You can capture images on the visualizer from a computer connected with a USB connector. You can also save the contents with image- capture and video-recording functions. The Software Manual in the CD-ROM will tell you how to do these. Note: Do not connect / disconnect the USB cable when the application is running, which will cause the program to be interrupted. - Page 12 Split Image Image Title Image Freeze Image Mirror Image Rotate 0°, 90°, 180°, 270° Image Save & Recall 32 frames (Max.), 4 x 4 screen display SD Card Support up to 32GB RGB DB15FLC (1) Input connectors HDMI (1) Embedded MIC (1) RGB DB15FLC (1) Output connectors HDMI (1)
- Page 13 N.W: 2.3KG Weight G.W: 4.5KG *G.W: 5.5KG (With Light Box) AC power cord AC adapter RGB cable Computer RS232 cable (6-pin to 9-pin) USB cable Accessories HDMI Cable Software CD Infrared remote control Warranty card *Light Box (Optional) * Design and specifications are subject to change without prior notice. - 13 -...
Need help?
Do you have a question about the QPC70 and is the answer not in the manual?
Questions and answers