Table of Contents
Advertisement
Quick Links
Advertisement
Table of Contents

Subscribe to Our Youtube Channel
Related Manuals for Qomo QD5000


Summary of Contents for Qomo QD5000
- Page 1 QD5000 4K UHD Visualizer User Manual V1.0.2...
-
Page 2: Table Of Contents
Contents Precautions ..............................1 Parts Identification ..........................2 Control Panel ............................3 Remote Control ............................4 Basic Preparations ..........................5 Making Connections ........................... 6 Mouse Operating Instructions ...................... 8 Menu Operating Instructions......................9 Basic Operation.............................10 RS232 code list ............................14 Folding The Unit .............................15 Problems And Solutions ........................ -
Page 3: Precautions
Precautions Please follow these precautions: ⚫ To prevent fire or shock hazards, do not expose the unit to rain or moisture. ⚫ To prevent electrical shock, do not open the cabinet. Refer to qualified personnel for service only. ⚫ Do not use the unit continuously for more than 24 hours with camera autofocus on. -
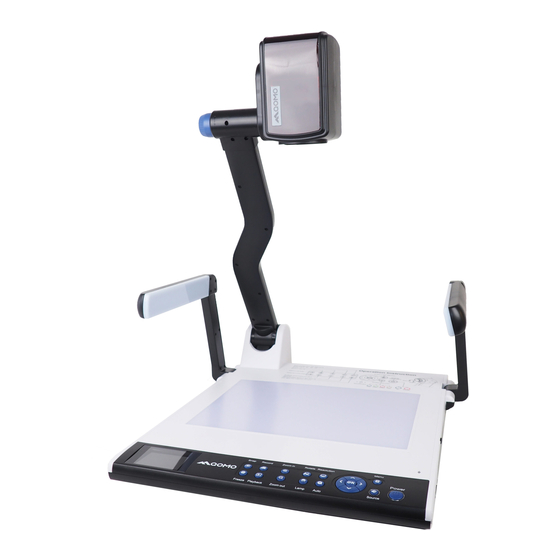
Page 4: Parts Identification
Parts Identification 1. Zoom in/Zoom out Knob 9. Infrared Receive Area 2. Camera Stand 10. Rear Connector 3. Left Arm Lamp 11. Right Arm Lamp 4. Bottom Lamp 12. Work Stage 5. Remote Control Slot 13. Side Connector 6. Preview screen 14. -
Page 5: Control Panel
Control Panel Button operation instruction Power On/Off, press and hold 3 seconds to off. To show or hide the menu/Delete button in the playlist. Select a Visualizer input signal. Capture a still image. Record a video clip, and press it again to stop recording. Freeze the image / Press and hold for 3 seconds to split Re-display stored images and videos. -
Page 6: Remote Control
Remote Control Control the visualizer Power Increase and decrease Zoom in/ on/off magnification Zoom out Control the arm lamp and Lamp bottom lamp Snap Capture a still image Auto autofocus Record a video clip Record Select the Visualizer input Setting signal Far/Near Focus near or far... -
Page 7: Basic Preparations
Basic Preparations 1. Place one hand firmly on the base of the visualizer, while carefully lifting the camera stand using the other hand. 2. Open the arm lights and rotate the camera head until they are properly positioned. -
Page 8: Making Connections
Making Connections ⚫ Connect to the projector or monitor Use the HDMI cable to connect the HDMI out port to the projector's or monitor's HDMI input port. ⚫ Connect to a desktop computer Use the HDMI cable to connect the HDMI out port to the monitor's HDMI input port. - Page 9 ⚫ Connect power source Connect the power cord to the 12V IN connector. Before making any connections, turn off all the power. Please ensure that the visualizer along with all other equipment to be connected are turned off.
-
Page 10: Mouse Operating Instructions
Mouse Operating Instructions Move the mouse guide to the bottom middle of the screen, and the operation menu will pop up, and the menu functions are as follows: Name Icon Name Icon Name Icon Annotation Auto Zoom in Zoom out Rotate Mirror Freeze... -
Page 11: Menu Operating Instructions
Menu Operating Instructions Name Icon Selection Functions Description Resolution 720P/1080P/2160P Focus Mode Auto Focus/ Manual Focus Function Mask Activate the Mask function Split Activate the Split function Photo Resolution 3840*2160 Image Recording 2160P@30FPS/1080P@30FPS/ Setting Resolution 720P@30FPS Language Support Chinese, English System Time Time Setting User-defined... -
Page 12: Basic Operation
Basic Operation ⚫ Device power on After connecting the power source, please wait for the source indicator to turn off, only the red light of the power button is on, and then press the power button. ⚫ Working on the stage Place your material on the platform. - Page 13 ⚫ Adjusting image size To reduce or enlarge the image size displayed on the screen, rotate the Zoom in or Zoom out knob, or use the buttons on the control panel. ⚫ Quickly switch resolutions The factory default resolution is 1080P, switch the device between 2160p, 1080P, and 720P by clicking the “Resolution”...
- Page 14 ⚫ Focusing When the visualizer is turned on the focus automatically adjusts to the stage, press the “AUTO” button to autofocus. You can also manually adjust the focus with the near focus button or the far focus button. ⚫ Freezing image To show a still image on the screen, press the “Freeze”...
- Page 15 Zoom, Microsoft Teams, or Google Meet. However, to better experience the 4K UHD visualizer UVC function, we'd recommend using it with the QCamera and you can download this free from the QOMO website at the link below. https://www.qomo.com/qcamera...
-
Page 16: Rs232 Code List
RS232 code list Baud rate: 9600bps Stop bit: 1-bit Data bits: 8-bit Odd-even check: none Communication encoding: Hex code Function Required Commands (Hex) Power ON 48 02 28 01 54 Power OFF 48 02 18 02 54 48 02 28 1e 54 Down 48 02 28 1f 54 Left... -
Page 17: Folding The Unit
Folding The Unit ⚫ Fold the right arm light down first onto the base, then the left arm down. Rotate the camera head clockwise until the camera head is parallel to the camera stand. ⚫ Carefully fold the camera stand down to the front panel. Do not lay the unit down flat. -
Page 18: Problems And Solutions
Problems And Solutions Problem Possible causes Solutions The device does The power adapter is not Make sure the power adapter r is not turn on in the connected correctly to the connected correctly to the device normal condition. device or the power socket. and power socket. -
Page 19: Specifications
Specifications 10X Optical Zoom Lens 10X Digital Zoom Shooting Area 720P: 1280 x 720 Video Resolution 1080P: 1920 x 1080 2160P: 3840 x 2160 Image sensor Resolution 8.3 Mega UHD Frame Rate 4K@30fps max Camera Rotation Vertically 330° Image Rotation 0°/90°/180°/270°... - Page 20 12V 2A external AC adapter Folded: 510 x 410 x 120mm Dimension (W x D x H) Setup: 510 x 530 x 570mm Packing: 600 x 200 x 480mm Note: Specifications are subject to change without notice Qomo.com 1-866-990-7666 support@qomo.com...
Need help?
Do you have a question about the QD5000 and is the answer not in the manual?
Questions and answers