Table of Contents
Advertisement
Quick Links
Download this manual
See also:
Hardware Manual
Advertisement
Table of Contents

Subscribe to Our Youtube Channel
Related Manuals for ACTi D61


Summary of Contents for ACTi D61
- Page 1 Encoder Firmware V4.06.09 User’s Manual 4” Indoor Dome Series Hardware Manual D61, D62, D64, D65, E61, E62, E63, E64, E65, E66, E67, E68, E69 2013/03/05 www.acti.com...
-
Page 2: Table Of Contents
Table of Contents Precautions ............. 3 Introduction ............4 The List of Models ................... 4 Package Contents ..................5 Safety Instructions ................... 6 Physical Description ................. 7 Installation and Access ........... 8 Camera Installation ................. 8 Accessing Camera ..................9 www.acti.com... -
Page 3: Precautions
Operation of this equipment in a residential area is likely to cause harmful interference in which case the users will be required to correct the interference at their own expense. www.acti.com... -
Page 4: Introduction
H.264, 1080p/30fps, DNR, MicroSDHC, PoE 10MP Indoor Dome with D/N, IR, Basic WDR, Vari-focal lens, f3-13mm/F1.4, H.264, 1080p/30fps, DNR, MicroSDHC, PoE From the installation perspective these models are very similar; therefore you can use one manual for all of them. www.acti.com... -
Page 5: Package Contents
Hardware Manual Package Contents 1. Camera D64, D65, E61, E62, D61, D62, E66, E67, E68 E63, E64, E65, E69 2. Screw Pack 3. Drill Template These screws are for surface mounting. If you need to use specific mounting accessories, the screws are included in the package of mounting accessories. -
Page 6: Safety Instructions
Safety Check Upon completion of any service or repairs to this video product, ask the service technician to perform safety checks to determine if the video product is in proper operating condition. www.acti.com... -
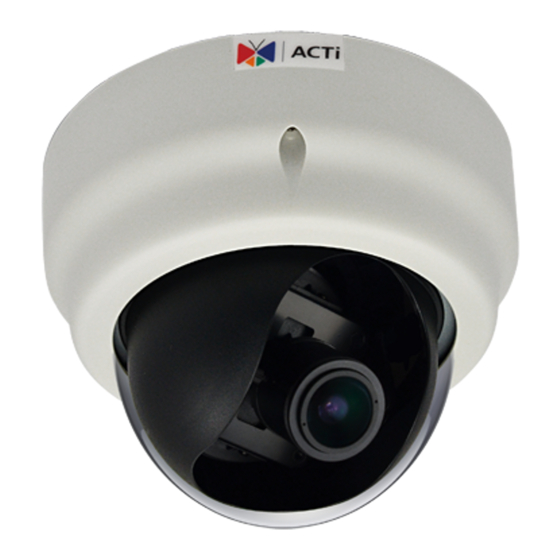
Page 7: Physical Description
Hardware Manual Physical Description D61, D62, E66, E67, E68 D64, D65, E61, E62, E63, E64, E65, E69 1) Reset Button The purpose of reset button is to restore the factory default settings of the camera, including administrator’s password. The reset button can be used for following purposes: 1. -
Page 8: Installation And Access
If the network cable cannot enter the back side of the camera through the hole in the mounting surface, you may remove the side cap of the camera and let the cable be connected through the side hole instead: www.acti.com... -
Page 9: Accessing Camera
The quickest way to discover the cameras in the network is to use the simplest network search, built in the Windows system – just by pressing the “Network” icon, all the cameras of the local area network will be discovered by Windows thanks to the UPnP function support of our cameras. www.acti.com... - Page 10 The IP Utility can be downloaded for free from http://www.acti.com/IP_Utility With just 1 click, you can launch the IP Utility and there will be an instant report as follows: You can quickly notice the D11 model in the list.
- Page 11 PC has to be configured to match the network segment of the camera. Manually adjust the IP address of the PC: In the following example, based on Windows 7, we will configure the IP address to 192.168.0.99 and set Subnet Mask to 255.255.255.0 by using the steps below: www.acti.com...
- Page 12 In such case, please plug in only one camera at a time, and change its IP address by using the Web browser before plugging in the next one. This way, the Web browser will not be confused about two devices having the same IP address at the same time. www.acti.com...
-
Page 13: Access The Camera
– the user just has to accept the use of such control when prompted so. No other third party utilities are required to be installed in such case. The following examples in this manual are based on Internet Explorer browser in order to cover all functions of the camera. www.acti.com... - Page 14 HTTP port of the camera is 80, which can be omitted from the address for convenience. Before logging in, you need to know the factory default Account and Password of the camera. Account: Admin Password: 123456 For further operations, please refer to the Firmware User Manual. www.acti.com...
Need help?
Do you have a question about the D61 and is the answer not in the manual?
Questions and answers