
Subscribe to Our Youtube Channel
Related Manuals for Oakton Type J


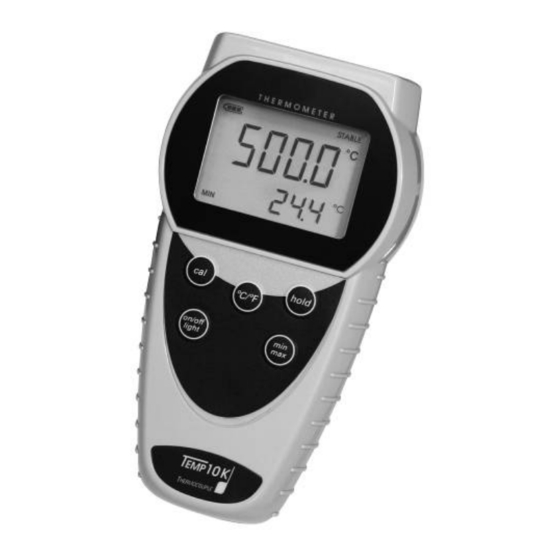
Summary of Contents for Oakton Type J
- Page 1 INSTRUCTION MANUAL Thermocouple Thermometer Type J, K, T Part of Thermo Fisher Scientific 68X450501 Rev 0 02/08...
-
Page 3: Table Of Contents
TABLE OF CONTENTS INTRODUCTION ........1 SAFETY PRECAUTIONS ..... 2 SPECIFICATIONS ........ 3 BATTERY INSTALLATION AND REPLACEMENT ..........5 INSERTING AND REMOVING OPTIONAL RUBBER ARMOUR ...... 6 ASSEMBLING OPTIONAL HANDSFREE ACCESORIES ..........7 SELF TEST ........... 8 CONNECTING A THERMOCOUPLE ... 8 KEY FUNCTIONS ....... -
Page 4: Introduction
INTRODUCTION This versatile hand-held instrument provides highly accurate temperature measurements. The instrument is designed for easy operation and includes the following features: • Operator selection of Celsius or Fahrenheit scale • Resolution of 0.1° C/F from -199.9 to 999.9° • Large backlit LCD with two lines of four-digit display •... -
Page 5: Safety Precautions
SAFETY PRECAUTIONS WARNING: This instrument is designed to accept low level signals supplied by standard thermocouples. Under NO circumstances should the input voltage exceed the specified 50V RMS. To prevent ignition of a hazardous atmosphere, batteries must only be changed in an area known to be non-hazardous. -
Page 6: Specifications
SPECIFICATIONS Thermocouple Thermometers Type Temperature range –210°C to 1200°C Temp10J (Type J) (–346°F to 2192°F) –250°C to 1372°C Temp10K (Type K) (–418°F to 2501°F) –250°C to 400°C Temp10T (Type T) (–418°F to 752°F) Out of range display: - - - - Resolution 0.1°/1°... - Page 7 Display update rate 0.5 sec per update. Input One thermocouple with ANSI connector. Input Protection 50V rms Storage –40°C to 65°C (–40°F to 149°F) Humidity 10% to 90% (non-condensing) Battery Life Size: Three AA, 1.5V; Alkaline Life: 750 hours continuous, typical, (without backlighting) Dimensions Without Armor:...
-
Page 8: Battery Installation And Replacement
BATTERY INSTALLATION AND REPLACEMENT The total battery life without backlighting is about 750 hours. Each bar of the battery annunciator represents 200 hours. A blinking empty battery annunciator indicates 150 hours remaining. Selected settings are stored in memory and will remain in memory even after power is turned off, or while batteries are being replaced. -
Page 9: Inserting And Removing Optional Rubber Armour
INSERTING AND REMOVING OPTIONAL RUBBER ARMOUR insert thermometer into optional rubber armor, slide in from the top of meter before pushing the bottom edges of meter down to set it into position. Lift up the stand at the back meter bench applications if necessary. -
Page 10: Assembling Optional Handsfree Accesories
ASSEMBLING OPTIONAL HANDSFREE ACCESORIES You can use the optional magnets and strap in the Hands Free Kit accessories for hands-free operations. - 7 -... -
Page 11: Self Test
SELF TEST Press the on/off key. The thermometer performs a self-test and all display digits and indicators, should remain on for approximately one second. The thermometer will then display the thermocouple thermometer type and resume to the measurement mode. CONNECTING A THERMOCOUPLE Use the correct thermocouple type for your instrument. - Page 12 Thermocouple wiring polarity must be correct. If readings decrease as the temperature increases, the thermocouple wires may be reversed. The red wire is negative for thermocouple wires manufactured in North America. - 9 -...
-
Page 13: Key Functions
KEY FUNCTIONS Toggle between Celsius or °C/°F Fahrenheit. Activates Calibration mode for offset calibration (after 0°C field calibration enabled). Activates/Deactivates freezing of the measured reading while hold in measurement mode. Activates/Deactivates display of the minimum and maximum readings. Powers on and shuts off the thermometer by holding it for 3 seconds. -
Page 14: Display Overview
10. Display Overview °C/°F Celsius or Fahrenheit indicator. Minimum reading annunciator. Maximum reading annunciator. 3 Bar : < 750 hours 2 Bar : < 550 hours 1 Bar : < 350 hours Blinking: < 150 hours Blinks during calibration mode. Remains in display indicating field calibration is active. -
Page 15: Hold Functon
If a thermocouple is not connected or if the thermocouple is defective, the display will indicate “OPEn”. Thermocouples are sensitive at the tip or measuring junction. When taking measurements, allow time for the reading to stabilize. Multiplying the time constant of the probe by 5 will give you the approximate time required. -
Page 16: Min And Max Function
13. MIN AND MAX FUNCTION Press the min/max key to toggle between the minimum and maximum readings. The minimum and maximum reading function is ideal for monitoring unattended operations while continually displaying every temperature change that occurs. The minimum and maximum values are sensed and automatically stored. -
Page 17: Canceling A Field Calibration14
compensate for thermocouple drift. Pack sensing end of probe in a container tightly packed with crushed ice and filled with distilled water. Allow temperature to stabilize. Press and hold the cal key for 3 seconds to enter the calibration mode, the CAL annunciator on the display starts blinking. -
Page 18: Field Calibration Lockout And Re-Enable
17. FIELD CALIBRATION LOCKOUT AND RE-ENABLE The calibration lockout feature prevents any field calibration changes. The lockout remains in effect until a lockout re- enable has been performed. Use the following procedures to lockout or re- enable the field calibration operation. LOCKOUT PROCEDURE Turn the thermometer off. -
Page 19: Maintenance
18. MAINTENANCE Properly used, the thermometer should maintain calibration indefinitely and not require service other than occasional cleaning of the housing and changing of the batteries. 19. CLEANING WARNING: TO PREVENT IGNITION OF A HAZARDOUS ATMOSPHERE BY ELECTROSTATIC DISCHARGE, CLEAN WITH DAMP CLOTH. Do not clean with abrasives or solvents. -
Page 20: Trouble Shooting
21. TROUBLE SHOOTING The following chart lists the most probable faults. There are no internal adjustments or user-replaceable parts. FAULT ACTION Check condition of batteries. Check that batteries are inserted properly. Display Display Out of range indication. shows - - - - Display No thermocouple connected in the Shows... -
Page 21: Accessories
Magnets and a Strap) HNDSFRKIT General purpose probe 08517-55 (immersion Into liquids), type EC-TPGLPJ- Penetration probe (meat, 08517-65 semi-soft Materials), type J EC-TPPENJ- Surface probe 08517-60 (direct contact on EC-TPSURJ- Hot surfaces), type J Clip-on probe (surface 08469-00 contacts- Electronics), type J... -
Page 22: Warranty
23. WARRANTY The Manufacturer warrants this product to be free from significant deviations from published specifications for a period of three years. If repair or adjustment is necessary within the warranty period, the problem will be corrected at no charge if it is not due to misuse or abuse on your part as determined by the Manufacturer. -
Page 23: Innocal® Calibration And Repair Services (North America)
25. INNOCAL® CALIBRATION AND REPAIR SERVICES (NORTH AMERICA) Optimum performance of your temperature-measuring instrument is not a timeless condition. To ensure quality measurements, have your instrument calibrated regularly. Trust InnoCal® to satisfy your calibration and equipment repair needs. With over a decade of service, we've helped thousands of customers meet ISO, FDA, EPA, GLPs/cGMPs and other quality... - Page 24 Reliable Support Trust in our free diagnostic support and troubleshooting advice. Our factory- trained metrologists and technicians are armed with years of experience and extensive technical data. Convenient Reminders It’s so easy to keep your instruments functioning properly. Based on your requirements, InnoCal will send you a reminder when it’s time to re-certify or service your instrument.
- Page 25 With today's high quality standards such as ISO 9000, certification is becoming increasingly important. Traceability is not a timeless condition. It must be verified and maintained over the life of the calibration to ensure the highest accuracy possible. When you have your calibration done by InnoCal, we will send you an automatic reminder when it is time to recalibrate your instrument.
- Page 26 Calibration test points System against Meter Probe (meter + NIST- only only probe)* traceable standards Four test points across range of instrument. Meters: –270 to 2316°C (–454 to 4200°F); Probes & Systems: –80 to 17000-10 17001-10 17002-10 1000°C (–112 to 1832°F).
- Page 28 TECHNICAL ASSISTANCE If you have any questions about the use of this product, contact the Manufacturer or authorized seller. For more information on OAKTON Instruments/Thermo Scientific Products, please contact your nearest distributor or visit our web site listed below: OAKTON Instruments P.O.
Need help?
Do you have a question about the Type J and is the answer not in the manual?
Questions and answers