
Subscribe to Our Youtube Channel
Related Manuals for V-fit Air Elliptical Trainer


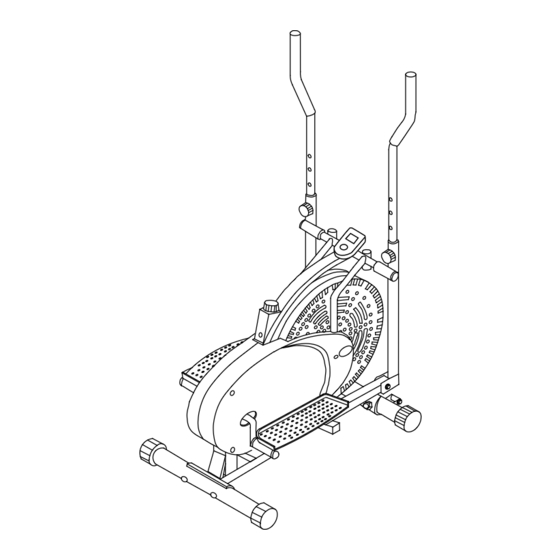
Summary of Contents for V-fit Air Elliptical Trainer
- Page 1 Air Elliptical Trainer Assembly & User Manual Please ensure that you read this manual carefully before attempting to assemble or use your new product and retain for future use...
-
Page 3: Table Of Contents
Contents Section Page General Information ..4 Before you start ..5 Safety ....Exercise Information . -
Page 4: General Information
General Information Guarantee Quality Beny Sports Co. UK Ltd. guarantee's its product range for This exercise product has been designed and DOMESTIC USE ONLY for a period of 1 YEAR from the manufactured to comply with the latest (BS EN 957) original certified date of purchase. -
Page 5: Before You Start
Please note that some of the parts may be pre-fitted to major components, so please check carefully before contacting our CUSTOMER SUPPORT team. In any event, please do not return the product to your retailer before contacting us first. Air Elliptical Trainer Page 5... -
Page 6: Safety
Your product is suitable for users weighing: 242LBS / 17.2 Stones / 110KG or less. Conformity This product conforms to: (BS EN 957) - PART 1 Class (H) - HOME USE - Class (C). It is NOT suitable for therapeutic purposes. Page 6 Air Elliptical Trainer... -
Page 7: Exercise Information
Work at your own, comfortable pace and the results will come. The better your aerobic fitness the harder you will have to work to stay in your target zone. Air Elliptical Trainer Page 7... - Page 8 To determine your target zone, see the chart opposite. If you are new to exercise and by definition unfit, refer to the left column. If you exercise regularly and have good aerobic fitness, refer to the right column. Page 8 Air Elliptical Trainer...
-
Page 9: Cool Down
Repeat 2 to 3 times. Toe Touch Slowly bend forward from your waist, letting your back and shoulders relax as you lower your trunk. Gently stretch down as far as is comfortable and hold for 10 seconds. Air Elliptical Trainer Page 9... - Page 10 Sit on the floor with your right leg extended and place your left foot flat against the right inner thigh. Stretch forward toward the right foot and hold for 10 seconds. Relax and then repeat with the left leg extended. Repeat 2 - 3 times. Page 10 Air Elliptical Trainer...
- Page 11 Warm Up 5 - 10 Minutes Exercise 2 minutes at 'A' Cool Down 5 Minutes Exercise slowly 1 minute Repeat entire cycle 2 or 3 times This is only a suggested programme and may not suit every individual's needs. Air Elliptical Trainer Page 11...
- Page 12 If necessary, use a rubber mat underneath to reduce the possibility of slipping in use. If you need to make a fine adjustment, simply twist the end of either Rear Frame Stabiliser Adjustable Hex End Cap (13) to compensate for uneven floors. Page 12 Air Elliptical Trainer...
- Page 13 When you have finished your routine, turn the Tension Controller Knob drive chain. (36) fully ANTI-CLOCKWISE again to ensure that the Tension Controller Cable is not under tension when your Air Cross Trainer is not in use. Air Elliptical Trainer Page 13...
- Page 14 Please take care to adjust each side equally to ensure that the Flywheel is kept in alignment and that there is approximately 10mm of FREEPLAY on the Drive Chain when correctly adjusted. 10mm Adjustable nuts Spindle nuts (25) 10mm Page 14 Air Elliptical Trainer...
- Page 15 Foam Handgrips or pedals. Air Elliptical Trainer Page 15...
-
Page 16: Assembly
Qty 4 Qty 4 Item 46A Item 46B Item 48R Item 47 Item 48L Item 51 Qty 4 Qty 4 Qty 1 Qty 4 Qty 2 Qty 1 Item 60 Item 61 Qty 1 Qty 1 Page 16 Air Elliptical Trainer... - Page 17 (46b), 4 x M10 Spring Washers (46a) and 4 x M10 Dome Nuts (47) as shown in fig. 1. Note The Roller Wheels (18) on the Front Stabiliser (2) should not rest on the floor. FRONT FIG 1 REAR Air Elliptical Trainer Page 17...
- Page 18 Cross Trainer. Refit the D-Shape Washer (49), M8 Spring Washer (52) and M8 x 20mm Allen Bolt (58). Note Fully tighten both Allen Bolts. Pivot tube faces rear FRONT REAR FIG 2 Air Elliptical Trainer Page 18...
- Page 19 (6L & R) using 2 x M10 x 45mm Hex Bolts (44) and 2 x M10 Nylon Locknuts (45) for each Footplate. Note The Footplates are fitted with the raised edge on the inside. FIG 4 Air Elliptical Trainer Page 19...
- Page 20 Plug the Sensor Wire (26) into the back of the Exercise Monitor. Note Please see separate instruction sheet for operation of the Exercise Monitor. Computer Bracket FIG 6 Air Elliptical Trainer Page 20...
- Page 21 Remember, your Cross Trainer has REVERSIBLE movement! Forward pedaling emphasizes your quadriceps muscles (front thighs), while backward pedaling emphasizes you hamstrings (back thighs). Take advantage of this fact to make your workout less fatiguing, and more fun. Air Elliptical Trainer Page 21...
- Page 22 Assembly Air Elliptical Trainer Page 22...
- Page 23 CRANK BEARINGS ....2 CRANK BEARING SHELL ..2 Note Some of the above accessories are pre-fitted to the master component. They may not be supplied separately Air Elliptical Trainer Page 23...
-
Page 24: Customer Support
Beny Sports Co. UK Ltd. Unit 8, Riparian Way, The Crossings, Cross Hills, West Yorkshire. BD20 7BW CUSTOMER SUPPORT is open from 9.00am to 5.00pm from Monday to Friday Tel: 0871 222 0881 Fax: 01535 637722 E-mail: beny@benysports.co.uk Copyright Beny Sports Ltd. 2005 Printed February/2005...
Need help?
Do you have a question about the Air Elliptical Trainer and is the answer not in the manual?
Questions and answers