HiTi Digital S420 User Manual
S420
Hide thumbs
Also See for S420:
- User manual (26 pages) ,
- Service manual (115 pages) ,
- User manual (30 pages)
Table of Contents
Advertisement
Advertisement
Table of Contents

Related Manuals for HiTi Digital S420


Summary of Contents for HiTi Digital S420
- Page 2 Check the P ac k age Conten t Before using HiTi photo printer, please check the printer package content for the following items: HiTi Photo Printer x 1 LCD Controller x 1 Power Cord x 1 USB Cable x 1 ※...
- Page 3 Outline Get to know S420 Installing S420 Standalone printing A. Home Menu Introduction B. Main Function Instruction C. Special Function Instruction PC-link Printing Troubleshooting Contact HiTi...
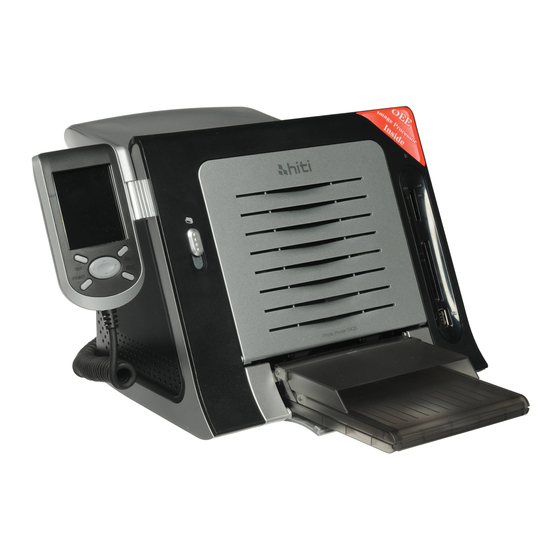
- Page 4 Get To Know S420 T o ensure proper printer operation, please read the following instructions thoroughly before using the S420 photo printe. LCD controller TFT Color LCD Directional Button 〔ESC〕 〔OK〕 〔PRINT〕 〔EDIT〕 PRINT EDIT Front view 1. Ribbon Door Button 2.
- Page 5 Installing S420 Installing LCD controller Connect the LCD LCD controller installation is complete. controller to S420...
- Page 6 Installing S420 Installing ribbon cartridge Push the ribbon door button to open the Install the ribbon cartridge inserting the left ribbon doo r . (indicated by the arrow) side of the ribbon first followed by the right side. The ribbon has to be installed in the printer Close the ribbon door to complete the ribbon properl y .
- Page 7 Installing S420 Loading photo papers Broadside Follow the demonstration to correctly remove Open the paper cassette cove r . photo papers from the packing. Load photo papers into the paper cassette and Open the paper cassette door on the printer then close the cove r .
- Page 8 Installing S420 Powering up the printer T urn on the powe r . Plug the power cord into the power cord socket at the back of the printer.
- Page 9 Installing S420 Installation of Dust Proof Case Installing the dust proof case Gently insert the latch into the corresponding latch receiver opening on one side first, then gently push the latch on the opposite end of the dust proof case into the corresponding latch receiver opening to finish the installation.
-
Page 10: Standalone Printing
12. INDEX Micro Drive 3. Image device from SD / MMC 8. STICKER 13. SETUP / MS / MS Pro 4. Matte effect ON 9. IMAGE DEVICE 14. Confirm or continue 5. Printing control by S420 10. Cancel or go back... - Page 11 取 消 確 認 取 消 Use directional button to The number of copies S420 is processing the job. determine the number of chosen is displayed at lower copies, and then press [OK] right corner. Repeat step 3 to go back image navigator.
- Page 12 Standalone printing B. Main Function Instruction ID Photo Choose PHOTO], and Select an ID format, and then Load images into column press [OK] to continue. press [OK] to continue. highlighted. Select an image, and then Repeat step 3 and step 4 to When all columns are filled, press [OK] to continue.
- Page 13 Standalone printing B. Main Function Instruction Sticker Choose [STICKER], and press Select a sticker, and then Load images into column [OK] to continue. press [OK] to continue. highlighted. Pick an image, and then Repeat step 3 and step 4 to When all columns are filled, press [OK] to continue.
- Page 14 Standalone printing B. Main Function Instruction Index Choose [INDEX], and press Select an index format, and The printer automatically [OK] to continue. then press [OK] to continue. counts the copy of prints based on the index format. Please press [OK] or [PRINT] to start printing or press [ESC] to go back.
- Page 15 Choose [SETUP], and press Language: Accessible LinkPrint: Users are allowed to [OK] to continue. languages on S420 may vary control the S420 by using the from region to region. LCD controller or by using a digital camera. Quick Preview: Choose Printer Setting:...
- Page 16 Standalone printing B. Main Function Instruction Setup Counter: The user is allowed Cleaning Mode: HiTi strongly About: It displays information to reset the counter if the suggest users to utilize this about the current printer PIN code is correctly function frequently to keep firmware, color table version, entered.
- Page 17 Standalone printing C. Special Function Instruction Image adjuster & enhancer In the image navigator, Select an image editing Example on ‘Move’: Use select an image and press function and press [OK] to directional button to adjust [EDIT] to adjust and enhance start editing.
- Page 18 Standalone printing C. Special Function Instruction LCD Adjustment Choose [SETUP], and press Select [Printer Setting] Choose [LCD Adjustment] [OK to continue. press [OK] to continue. press [OK] to continue. Choose an item for LCD adjustment. Note that in LCD adjustment, only the properties of Contrast, Brightness, Color R/G, Color B/Y, Position, and Default Setting can be adjusted.
- Page 19 Standalone printing C. Special Function Instruction Color Setting Choose [SETUP], and press Select [Printer Setting] Choose [Color Setting] [OK] to continue. press [OK] to continue. press [OK] to continue. Select a reference image Note that in color setting, saved in the memory card for only the properties of color calibration, then press Contrast, Brightness,...
- Page 20 Standalone printing C. Special Function Instruction Print Position Choose [SETUP], and press Select [Printer Setting] Choose [Print Position] [OK] to continue. press [OK] to continue. press [OK] to continue. Place 4x4 or 4/2/4 sticker Based on the printout of 4x4 into the paper cassette for or 4/2/4 sticker, adjust the calibration reference.
- Page 21 Standalone printing C. Special Function Instruction Cleaning Mode Choose [SETUP], and press Select [Cleaning Mode] Before the cleaning process [OK] to continue. press [OK] to continue. begins, please remove the ribbon cartridge from the printer and press [OK] to start the cleaning job.
- Page 22 * The photo printer will remind you that the blue tooth dongle is working. Select the image and trans the image from the image source to S420. * Blue tooth dongle function can't be used in the [Index] .
- Page 23 PC-link Printing Connect the PC and Printer Install the Printer Driver Insert the Mater CD to run the installation. Power on the printer to continue. Installation completed. The PC is installing the printer driver. Install the IDésirée (Please see the user guide of IDésirée for detail.)
-
Page 24: Indicator Status
Paper Out consumables status Open the ribbon door and remove the Blinking x 5 Paper Jam jammed paper. Please use S420-compatible consumables Blinking x 6 Paper Mismatch and check if consumables are correctly placed in the paper cassette. Note: If your problems are not listed above, please contact HiTi service center nearest to you. - Page 25 2007 HiTi Digital, Inc. P/N:39.P2000.E11...
Need help?
Do you have a question about the S420 and is the answer not in the manual?
Questions and answers