
Related Manuals for BARIX EXSTREAMER WIRELESS


Summary of Contents for BARIX EXSTREAMER WIRELESS
- Page 1 ® EXSTREAMER EXSTREAMER EXSTREAMER WIRELESS Network audio player for digital audio streaming in custom home installations and commercial applications User Manual Version 1.7 For Firmware V6.2...
-
Page 2: Table Of Contents
Exstreamer User Manual Version 1.7 Table of Content INTRODUCTION ..................2 FEATURES....................2 PACKAGE CONTENT ................3 GETTING TO KNOW YOUR EXSTREAMER ..........3 INSTALLATION ..................4 ............4 NSTALLING THE USIC ERVER PROGRAM ......5 ONNECTING THE XSTREAMER TO YOUR AUDIO EQUIPMENT ..........5... -
Page 3: Introduction
1 Introduction Congratulations on the purchase of your Exstreamer Digital from Barix AG. What exactly is the Exstreamer? It is an audio network interface for your home stereo system that streams MP3s from your PC and radio stations from the internet. -
Page 4: Package Content
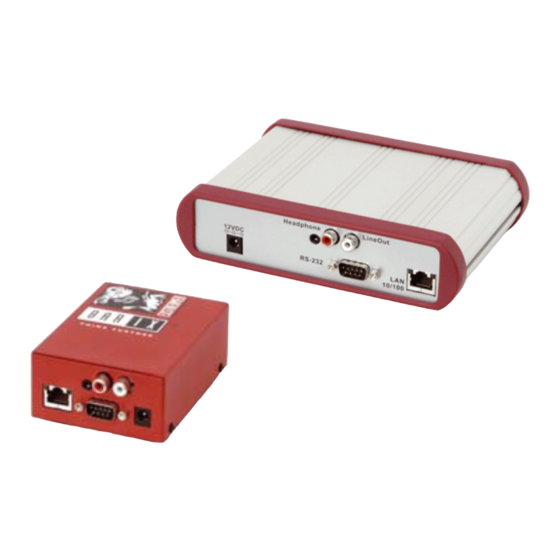
B Stereo RCA line output 2 Red light This port is for connection to your home audio equipment If the light is blinking, it means that the Exstreamer either lost connection to or can’t find the zServer. C RJ45 for LAN 10/100 Half/Full duplex This port is for the connection to your network. -
Page 5: Installation
The startz.bat file must always run in order for you to use STEP 2 the Exstreamer. If you reboot your PC you will not be able Download the setup file of the music server program to use the Exstreamer until you again run the startz.bat file. -
Page 6: Connecting The Exstreamer To Your Audio Equipment
Plug the included network cable ( g ) into the network port of the Exstreamer ( a) and the other end into your hub or switch. You can also use a crossover network cable (not included) for a direct connection to your PC. -
Page 7: Controlling The Exstreamer
PLAY This action plays the media file. STEP 2 NEXT TRACK Type in the IP address of the Exstreamer in the address bar This action skips to the next media file in the playlist. then press Enter PREVIOUS TRACK You should now see the control panel of the Exstreamer This action skips to the previous media file in the playlist. -
Page 8: Synchronisation Control
Exstreamer kitchen, clicking the Exstr. Living room’s sync The Exstreamer only can show a few playlists at a time. To link will make Exstreamer kitchen a sync slave. Control of see the rest of them click on “…next playlists…”, the sound that both play is possible only on Exstr. -
Page 9: Audio Adjustment Interface
This action unlocks the volume level. PLAY This action brings you back to the user control interface. EXSTREAMER Clicking on the Exstreamer logo will bring you to the Barix homepage. ( + ) This action increases the volume by increment. -
Page 10: Device Configuration
Open your web browser We recommend that you set a Static IP address. STEP 2 Type in the IP address of the Exstreamer and press Enter Example: 192.168.0.12 STEP 3 Click on the Config link 7.2 Configuration Overview IP Address Enter the 4 values of the desired device IP address e.g.:... -
Page 11: Server Settings
Exstreamer User Manual Version 1.7 Mode 2 Webserver 7.4 Server settings In Mode 2 the Exstreamer gets the playlists and music from a standard web server. This settings adjust the way Exstreamer will get its stream. Server IP Address In this field you have to enter the IP address of your web server. -
Page 12: General Settings
These adjustments will be stored even if the unit looses power. Own Name You can enter the name of the Exstreamer here. This name is displayed in the file info frame on the device status page. This name will be returned when using the DISCOVER command (see technical documentation) and will be used for the SYNC function by other Exstreamers. -
Page 13: Wlan Settings (Wireless Lan)
7.9 Serial settings indicated by your wireless access point. If you don’t enter a This settings adjust the serial port, serial gateway and IR name, then the Exstreamer will log onto the first wireless Dongle LED properties. network it finds. -
Page 14: Security Settings
7.10 Security settings This settings can be used to secure the access to the Exstreamer on several levels. The status is shown next to each password (set or not set). Access is free for levels without a password (default setting). -
Page 15: Reverting To Factory Defaults
Reset button has to be pressed for about 5 seconds while the Exstreamer is powered. Important note Use this method if connection to the Exstreamer cannot be established. This can happen if you have set a Static IP address once, switched off Sonic IP and then forgotten the IP address. -
Page 16: Updating The Device
STEP 3 7.13 Updating the device To upload an update click on "Browse..." to locate the file you want to update. Barix constantly enhances the capabilities of their products. Therefore we recommend to keep the software on the version date The file is named exstreamer_ .bin... -
Page 17: The Step By Step "How To
8 The step by step “How To” Make sure that Playlist List Path says: /playlist.html 8.1 How to set a static IP address STEP 9 Hit the Apply button to save the changes. The Exstreamer STEP 1 will reboot. Open your Web Browser. -
Page 18: How To Set The Exstreamer To Stream Music From A Web Server
Hit the Apply button to save the changes. The Exstreamer will reboot. streaming puller STEP 7 For use with standard MP3 jukeboxes After the reboot the Exstreamer will wait for a stream on STEP 1 the selected TCP and/or UDP Streaming Listen Port. Open your Web Browser STEP 2 Enter the IP address of the Exstreamer and press Enter. -
Page 19: Ir Remote Control
IR Serial receiver from where you want to use the IR remote control. On power up the blue LED will be on until the Exstreamer has set the network and announced the IP Address. The function of this LED can be changed in the configuration Serial settings by the field "RTS function"... -
Page 20: Advanced User Section
STEP 4 STEP 8 Connect the supplied serial cable to your PC’s COM port Hit <enter> to enter the Exstreamer setup mode. and to the serial port of the Exstreamer. STEP 5 Keep the Reset button pushed and plug in the power supply. -
Page 21: Network Configuration Using Telnet
Serial Port control API Run a command session. Type telnet in the run window The serial port on the Exstreamer can be used to send with the IP address announced by Sonic IP on port 9999. control commands from a home automation system and Example: telnet 192.168.0.12 9999... -
Page 22: Faq And Troubleshooting
,SMB/CIFS, integrated ® ™ web server for control and configuration Q: How do I ping the Exstreamer to see if it’s on my PC Card slot for 802.11b Wireless LAN card (only network? Exstreamer Wireless) A: You can ping any device on your network by opening a DOS command box. -
Page 23: Dictionary
Example: ping 192.168.2.10 connected to a Network. Sonic IP Barix Sonic IP® technology is designed to vocally announce Microsoft DOS (Disk Operating System) is a command line the Annuncicom IC’s current IP address. This makes it user interface. MS-DOS 1.0 was released in 1981 for IBM easier and faster to obtain the necessary network computers. - Page 24 All mentioned trademarks are belonging to their respective owners and are used for reference only. Barix, Exstreamer, Instreamer, SonicIP and IPzator are trademarks or registered trademarks of Barix AG, Switzerland in certain legislations. For information about our devices and the latest version of this manual please visit www.barix.com.
Need help?
Do you have a question about the EXSTREAMER WIRELESS and is the answer not in the manual?
Questions and answers