
Related Manuals for QNAP Turbo Station TS-201


Summary of Contents for QNAP Turbo Station TS-201
- Page 1 TS-201 Turbo Station User Manual (Version: 2.0.0) ©Copyright 2007. QNAP Systems, Inc. All Rights Reserved.
- Page 2 All brands and products names referred to are trademarks of their respective holders. LIMITED WARRANTY In no event shall the liability of QNAP Systems, Inc. (QNAP) exceed the price paid for the product from direct, indirect, special, incidental, or consequential software, or its documentation.
-
Page 3: Table Of Contents
2.5.1 Windows Users ..............18 2.5.1.1 Using Mozilla Firefox ............35 2.5.2 Mac Users................37 Chapter 3. Enjoy the Powerful Services of TS-201 ......43 Server Administration..............48 Quick Configuration ............49 System Settings ............53 3.3.1 Server Name................53 3.3.2 Date &... - Page 4 Network Recycle Bin .............. 101 Event Logs ..............102 Chapter 4. Copy Data Directly by Front USB Port to TS-201 .... 103 Chapter 5. Multimedia Station ............104 Share Photos and Multimedia Files via Web Interface ....... 104 Enable iTunes Service..............111 Use UPnP Media Server ...............
- Page 5 Chapter 10. NetBak Replicator ...........139 Chapter 11. TS-201 Maintenance ............154 11.1 Restart/ Shut down Server............154 11.2 Reset Administrator Password and Network Settings ......155 11.3 Disk Failure or Malfunction ............156 11.4 Power Outage or Abnormal Shutdown..........156 Technical Support ................
-
Page 6: Safety Warnings
Unplug the power cord and all connected cables before cleaning. Wipe TS- 201 with a wet towel. Do not use chemical or aerosol to clean TS-201. Do not place any objects on TS-201 for the server’s normal operation and to avoid overheat. -
Page 7: Chapter 1. Overview Of Ts-201 Turbo Station
Chapter 1. Overview of TS-201 Turbo Station Introduction Thank you for choosing TS-201 Turbo Station. This product has the following key features: 9-in-1 server: Multimedia Station, Download Station, Mirror Station, Disaster Recovery, Web Server, Backup Server, File Server, FTP Server, and Printer Server. -
Page 8: Package Contents
Package Contents Your TS-201 package contains: TS-201 Turbo Station Adaptor Power cord CD-ROM (user manual, Quick Installation Flat head screws x 8 Quick Install Wizard & utility Guide inclusive) Ethernet cable x 1 Front panel x 1 Thumb screws x 4... -
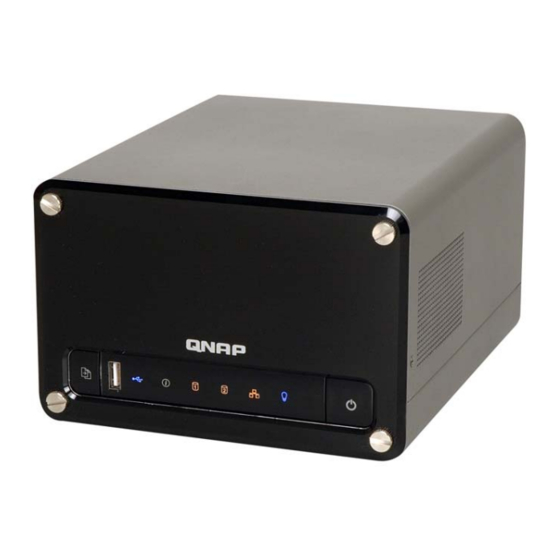
Page 9: Hardware Illustration
Giga LAN USB 2.0 x 2 *Note: TS-201 has a built-in Smart Fan. When the system temperature reaches 48ºC, the fan will operate immediately. Therefore, it is normal that the Smart Fan does not rotate when the system starts up. -
Page 10: Chapter 2. Install Ts-201
Chapter 2. Install TS-201 Install Hard Disk Loosen the screws on the disk trays and take out the disk trays. Install a hard disk on each tray. Make sure the disk holes match the holes at the base of the disk tray and lock the disk with four screws. - Page 11 Insert the disk trays to TS-201. Push the disk trays to the end. Fasten the screws on the trays. When two disks are installed, make sure HDD1 is installed on top of HDD2. Remove the protection films on the LED panel and both sides of the front panel.
-
Page 12: Hard Disk Recommendation List
The following HDD models are verified by QNAP that are compatible with TS-201. It is recommended to use the disk models listed here. Other HDD brands that are not tested by QNAP may or may not work properly with TS-201. For more updated compatible hard disk information, please visit QNAP website at http://www.qnap.com. - Page 13 Maxtor Buffer Capacity Rotational Model Name Model No. Interface Size (GB) Speed (RPM) (MB) Grizzly 3H500F0 SATA II 3Gb/s 7200 Grizzly 3H400F0 SATA II 3Gb/s 7200 DiamondMax 10 6L300S0 SATA 1.5Gb/s with NCQ 7200 DiamondMax 10 6L250S0 SATA 1.5Gb/s with NCQ 7200 DiamondMax 10 6L200M0 SATA 1.5Gb/s with NCQ...
-
Page 14: Set Up Ts-201
Please check your network environment and select the appropriate installation method before installing TS-201. 1. Office/ Home Connect TS-201 and PC to the same hub/ switch/ router. 2. Individual Connect TS-201 directly to your PC by a network cable. - 14 -... - Page 15 When you have verified your network environment, please follow the steps below to install TS-201. Network cable USB cable Connect TS-201 to the hub/ switch/ router or PC according your network environment. Connect USB printer to TS-201 and enable USB printer service*. Connect the power.
-
Page 16: Check System Status
Check System Status TS-201 provides LED indicators for you to indicate the system status and information easily. When TS-201 is turned on, please check the following items to make sure the system status is normal. Note that the following LED information is applicable only when you have properly installed HDD1 and/or HDD2, and connected TS-201 to the network and power. - Page 17 LED Display & System Status Overview LED Display & System Status Blue: System has started Power Blink in orange: Accessing network Blink in orange: Accessing data HDD1/ HDD2 Green: System is normal Blink in green: Hard disk not detected Blink in red: Bad blocks are found in hard disk Blink in green for 5 seconds, blink in green and red Status alternatively: Hard disk not initialized...
-
Page 18: Configure Software Settings
Please select the appropriate procedure according to your OS. ® 2.5.1 Windows Users Insert TS-201 CD-ROM in your PC. Wait for a few seconds until the following screen shows up. Then start to configure the software settings of TS-201. 1. Select TS-201. - 18 -... - Page 19 2. Install Quick Install Wizard. - 19 -...
- Page 20 3. Run Quick Install Wizard. When the wizard prompts for performing quick configuration, click OK. 4. Enter the default user name and password. Default user name: administrator Password: admin - 20 -...
- Page 21 When you have entered quick configuration page, follow the instructions to complete the settings. Click Next to continue. - 21 -...
- Page 22 Step 1. Enter the server name and click Next. - 22 -...
- Page 23 Step 2. Enter a new password or select to use the original password. Click Next to continue. - 23 -...
- Page 24 Step 3. Select the time zone of your location or enter the date and time manually. You can also select to synchronize the time of TS-201 with an Internet time server automatically. Click Next to continue. - 24 -...
- Page 25 Step 4. Select the encoding language of TS-201 and click Next. Note: All files and directories on TS-201 will be created using Unicode encoding. If your FTP client or PC does not support ® Unicode, e.g. Windows 95, 98, ME OS, select the language the same as the OS of your PC here in order to view the files and directories on the server properly.
- Page 26 Next. Note: If you select to enter IP address manually, please make sure your PC and TS-201 are in the same LAN. If you are not sure about the network settings, please contact your network administrator or ISP.
- Page 27 Step 6. When one or two hard drives are installed in TS-201, select the RAID configuration and click Next to format. Warning: All data on the drives will be deleted unless you select “Same configuration as the current one”. - 27 -...
- Page 28 Step 7. You have finished quick configuration. Please make sure all settings are correct and click Next to start disk formatting. - 28 -...
- Page 29 Step 8. Please wait patiently when formatting the disk(s). Formatting may take a few minutes depending on the capacity of your hard drives. When finished, click Next to proceed. - 29 -...
- Page 30 TS-201 provides several default share folders for data sharing and access. To map the share folders on TS-201 as your drive, check the option “Continue to map network drive for me” and follow the steps below to proceed. To start to use TS-201 immediately, you can skip to 5.
- Page 31 For example, to map the folder Public as your drive, select the folder and click Map Network Drive. Note: The share folders Qdownload, Qmultimedia, Qusb, and Qweb are system default network share of TS-201 for the use of Download Station, Multimedia Station, USB auto-copy and Web Server.
- Page 32 c. Select the drive letter for the connection and click Finish. d. Upon successful connection, you can start to use the share folder on TS- 201. You can access these folders by opening My Computer. - 32 -...
- Page 33 5. Quick Install Wizard will appear when all configurations are completed. Click on the name of TS-201 on the list to enter administration page. - 33 -...
- Page 34 6. When the administration page of TS-201 is shown, you can start to use the services. If you have any questions during web administration, please click the help button on the top right hand corner of the page. To modify system settings, click Administration. Enter the user name and password to login.
-
Page 35: Using Mozilla Firefox
For higher security, some Firefox versions will close the ports of certain services. The default port for TS-201 administration is 6000. To use port 6000 to access TS-201 via Firefox, you need to open this port in Firefox via the following steps. (1) Enter about:config in the browser. - Page 36 (4) Then enter 6000 and click OK. (5) The setting will be added to the list. You can now use Firefox to access port 6000 of TS-201. - 36 -...
-
Page 37: Mac Users
1. Please go to Network settings and select Using DHCP. Then connect TS- 201 to your Mac via a cable. 2. Open a web browser and enter the default IP address of TS-201 to login the system. Default IP of TS-201: http://169.254.100.100:6000 Note: It is recommended to access TS-201 by Mozilla Firefox in Mac. - Page 38 3. When the administration page is shown, click Administration. Enter the default user name and password to login. Default user name: administrator Password: admin - 38 -...
- Page 39 4. Follow the step-by-step guide in Quick Configuration to complete the settings of TS-201. If you have any questions during web administration, please click the help button on the top right hand corner of the page. - 39 -...
- Page 40 Note: If you are not sure about the network settings, please contact your network administrator or ISP. 2. Connect TS-201 to your Mac by a cable. Open a web browser and enter the default IP address of TS-201. Default IP address of TS-201: http://169.254.100.100:6000 Note: It is recommended to access TS-201 by Mozilla Firefox in Mac.
- Page 41 3. When the administration page is shown, click Administration. Enter the default user name and password to login. Default user name: administrator Password: admin - 41 -...
- Page 42 4. Go to TCP/IP Configuration of Network Settings . Select to use static IP and input the IP address of TS-201. Make sure the value does not conflict with the IP address of your Mac and other devices in LAN. Configure the subnet mask and default gateway of TS-201 to the same as subnet mask and router address of Mac which you set in Step 1.
-
Page 43: Chapter 3. Enjoy The Powerful Services Of Ts-201
A. Use network share-Public folder 1. You can access the public folder of TS-201 by the following means: a. Open My Network Places and find the workgroup of TS-201. If you cannot find the server, please browse the whole network to search for TS-201. - Page 44 B. Manage TS-201 ® Manage TS-201 using web browser by Windows or Mac 1. You can access TS-201 web administration page by the following methods: a. Use Quick Install Wizard to find TS-201. b. Open a web browser and enter http://[TS-201 IP]:6000# Note: ®...
- Page 45 Note: If your TS-201 is placed behind an NAT gateway and you want to access TS-201 by secure login from the Internet, you must open the port 443 on your NAT and forward this port to TS-201 LAN IP. - 45 -...
- Page 46 PC, you can restore all backup data. Please refer to Chapter 3.8.6. Web Server TS-201 enables you to create your own website easily. It also supports PHP and SQLite to establish interactive websites. Please refer to Chapter 7. Printer Server TS-201 supports network printer sharing function by direct USB connection.
- Page 47 Please refer to Chapter 10. File Server TS-201 provides convenient and secure file server functions that support central data management. Users can be granted with the right to access network share and share important files. Please refer to Chapter 3.7 and Chapter 9.
-
Page 48: Server Administration
Server Administration There are 8 main sections in server administration: - 48 -... -
Page 49: Quick Configuration
Quick Configuration Please follow the step-by-step guide in Quick Configuration to complete the settings of TS-201. If you have any questions during web administration, please click the help button on the top right hand corner of the page. Other buttons... - Page 50 Step 2. Change the administrator password or select to use the original password. Step 3. Enter the date, time and select the time zone for the server. Step 4. Select the language the server uses to display files and directories. The default setting is English.
- Page 51 Note: 1. Please contact your ISP or network administrator for the IP address of primary and secondary DNS servers. When TS-201 plays the role as a terminal and needs to perform independent connection, e.g. BT download, you must enter at least one DNS server IP for proper URL connection.
- Page 52 Step 6. Initialize disk volume in TS-201 for the first time configuration. Step 7. When TS-201 is initialized, the basic settings will be shown. - 52 -...
-
Page 53: System Settings
3.3.1 Server Name Enter the name of TS-201. The server name can be 14 characters long at maximum, which supports alphabets, numbers and hyphen (-). The server does not accept names with space, period (.), or names in pure number. -
Page 54: Date & Time
3.3.2 Date & Time Set the date, time, and time zone according to your location. If the settings are incorrect, the following problems may occur: When using a web browser to access or save a file, the display time of the action will be incorrect. -
Page 55: Encoding Setting
3.3.3 Encoding Setting Select the language TS-201 uses to display files and directories. Note: All files and directories on TS-201 will be created using Unicode encoding. If your FTP clients or the OS of your PC does not support ®... -
Page 56: Network Settings
You can select one of the following two methods to configure the TCP/IP settings of TS-201. 1. Obtain IP address settings automatically via DHCP If your network supports DHCP, TS-201 will use DHCP protocol to retrieve the IP address and related information automatically. 2. Use static IP address To use fixed IP address for network connection, enter fixed IP address, subnet mask and default gateway. - Page 57 “0.0.0.0” in the settings. Enable DHCP Server If no DHCP is available in the LAN where TS-201 locates, you can enable this function to enable TS-201 as a DHCP server and allocate dynamic IP address to DHCP clients in LAN.
- Page 58 Maximum Transmission Unit (MTU) refers to the size (in bytes) of the largest packet that a given layer of a communications protocol can transmit. TS-201 uses standard Ethernet frames: 1500 bytes by default. If your network appliances support Jumbo Frame setting, select the appropriate MTU value for your network environment.
-
Page 59: Microsoft Networking
3.4.2 Microsoft Networking ® Enable file service for Microsoft networking: If you are using Microsoft ® Windows OS, enable this service to access the files on network share folders. Assign a workgroup name. Standalone Server Use local users for user authentication. WINS server If the local network has a WINS server installed, specify the IP address. - Page 60 If there is no master browser in your network, you can check the box Domain Master in this section to configure TS-201 as the master browser to enhance the speed of accessing information on Network Neighborhood.
-
Page 61: Apple Network
If your AppleTalk network uses extended networks, and is assigned with multiple zones, assign a zone name to TS-201. If you do not want to assign a network zone, enter an asterisk (*) to use the default setting. This setting is disabled by default. -
Page 62: Ftp Service
“System Settings—Encoding Setting” page so that the folders and files on FTP can be properly shown (please refer to Chapter 3.3.3). If your FTP client supports Unicode, make sure you have enabled Unicode support for both your client and TS-201. - 62 -... - Page 63 You can enable anonymous login to allow users to access the FTP server of TS- 201 anonymously. The users can access the folders and files which are opened for public access. If this option is disabled, users must enter an authorized user name and password to access the server.
-
Page 64: Multimedia Station
3.4.6 Multimedia Station To share multimedia files like photos, music or video files on the network, please enable Multimedia Station. For further information of Multimedia Station, iTunes service and UPnP Media Server, please refer to Chapter 5. - 64 -... -
Page 65: Download Station
3.4.7 Download Station TS-201 supports BT, HTTP and FTP download independent of PC/notebook. To use download function of TS-201, please enable Download Station. For further information, please refer to Chapter 6. Warning: Please be warned against illegal downloading of copyrighted materials. -
Page 66: Web Server
3.4.8 Web Server You can publish your own server by enabling Web Server function of TS-201. Enter the port number for web server service, the default number is 80. For further information, please refer to Chapter 7. - 66 -... -
Page 67: Ddns Service
After enabling DDNS service of TS-201, whenever TS-201 restarts or the IP address is changed, TS-201 will notify DDNS provider immediately to record the new IP address. When the user tries to connect TS-201 via the host name, DDNS will transfer the recorded IP address to the user. - Page 68 DDNS providers. Note: The DDNS function of TS-201 is not applicable when TS-201 is located behind an NAT router. Since the IP address sent from TS-201 to DDNS provider is virtual, which cannot be found on the Internet, the user will not be able to access TS-201.
-
Page 69: 3.4.10 View Network Settings
3.4.10 View Network Settings You can view current network settings and status of TS-201 in this section. - 69 -... -
Page 70: Device Configuration
Device Configuration You can configure SATA disk, USB disk and USB printer settings in this section. - 70 -... -
Page 71: Sata Disk
This page shows the model, size and current status of the disk(s) installed on TS- 201. You can format and check disks, and scan bad blocks on the disks. When the SATA disks are formatted, TS-201 will create the following default share folders:... - Page 72 You can create the following disk volumes: • Single Disk Volume Each disk will be used as a standalone disk. However, if a disk is damaged, all data will be lost. • RAID 1 Mirroring Disk Volume RAID 1 (mirroring disk) protects your data by automatically backing up the contents of one drive onto the second drive of a mirrored pair.
-
Page 73: Usb Disk
3.5.2 USB Disk TS-201 supports USB disks and thumb drives for extended storage. Connect the USB device to the USB port of TS-201, when the device is successfully detected, the details will be shown on this page. - 73 -... -
Page 74: Usb Printer
USB Printer 1. To provide printer sharing function for network users, you can simply connect a USB printer to the USB port of TS-201. TS-201 will detect the printer automatically. 2. A printer icon should be shown in the share folder of the server. Double click the icon. - Page 75 3. Install the printer driver. 4. When finished, you can start to use network printer service of TS-201. Note: 1. TS-201 supports general USB printer only but not multifunction printer. 2. TS-201 printer service is only supported in Windows OS but not Mac 3.
-
Page 76: User Management
User Management The files on TS-201 can be shared among multiple users. For easier management and better control of users’ access right, you have to organize users, user groups and their access right control. 3.6.1 Users The system has created the following users by default:... - Page 77 512 users can be created at maximum (including system default users). You can create a new user according to your needs. The following information is required to create a new user: User name The user name must not exceed 32 characters. It is case-insensitive and supports double-byte characters, such as Chinese, Japanese, and Korean except: "...
-
Page 78: User Groups
User Groups User group is a collection of users with the same access right to files or folders. TS-201 has created the following user groups by default: Administrators All members in this group have administration right. You cannot delete this group. - Page 79 Department and Ms. Jane Wu for Sales Department. The IT Department therefore needs to create two user accounts for them to access company data on TS-201. To create a user account, go to User Management-Users. Click Create. - 79 -...
- Page 80 Enter the user name (Jones Lee/ Jane Wu) and password. Check the box “Continue to set the user groups to which this user belongs” and click OK. - 80 -...
- Page 81 iii. Select the user groups the users belong to on the right list, i.e. Mr. Jones Lee for Administration Dept and Ms. Jane Wu for Sales Dept, and click Add. Then click Close. - 81 -...
- Page 82 The user names will appear on the list on Create User Page. - 82 -...
- Page 83 Create Private Network Share for User Groups You can create particular network share for each user group. The procedure is described as below: 1. To create a network share called media accessible by Administration Department only, please go to “User Management—User Groups” page. Select the user group Administration Dept and click Create Private Network Share on the right.
- Page 84 3. You can see the folder media in Network Share Management page. 4. Enter Access Control. You can see that only Administration Dept has full access right to the folder. - 84 -...
-
Page 85: Quota
The IT department is planning to set the disk quota of Mr. Jones Lee from Administration Department and Ms. Jane Wu from Sales Department on TS-201. The disk quota is 2000MB for Mr. Jones Lee and 4000MB for Ms. Jane Wu. - Page 86 2. Select Jones Lee on User page and click Quota Settings on the right. 3. Enter the quota size 2000MB and click OK. 4. Follow the same steps and enter the quota size 4000MB for Jane Wu and click OK. The quota setting is successfully applied. - 86 -...
-
Page 87: Network Share Management
Network Share Management The primary purpose of network storage is file sharing. You can create different network share folders for various types of files, and provide different file access rights to users or user groups. There are five options in Network Share Management: - 87 -... -
Page 88: Create
3.7.1 Create To create a network share, enter the following information: Network share name The length of the network share name cannot exceed 32 single-byte characters or 10 double-byte characters, and cannot contain the following characters: " . + = / \ : | * ? < > ; [ ] % Disk volume This area shows the disk volume status. -
Page 89: Property
3.7.2 Property To edit the property of an existing network share, select a share and click Property. You can then edit the content of that share. - 89 -... -
Page 90: Access Control
3.7.3 Access Control When a network share is created, you can assign access rights to users or user groups: Deny access Access to the network share will be denied. Read only Users can read the files only on the network share. Full access Users can read, write, create, or delete files and folders on the network share. -
Page 91: Restore
3.7.5 Restore If the default network shares of TS-201 are not created successfully, you can use the Restore function to restore the network shares. To do so, click Restore and the shares will be created. - 91 -... -
Page 92: System Tools
System Tools System Tools enable you to optimize the maintenance and management of TS- 201. - 92 -... -
Page 93: Alert Notification
If your mailbox requires SMTP authentication, enter the user name and password. Note: It is recommended to send a test e-mail to make sure you can receive the alert mails. 3.8.2 Restart/ Shutdown Select to restart or shut down TS-201. - 93 -... -
Page 94: Hardware Settings
SATA disk is less than the value. The range of the value is 1-51200 MB. iv. Auto power on when power resumes after power loss When this function is enabled, TS-201 will turn on automatically when power resumes after improper shutdown or power loss. - 94 -... -
Page 95: System Update
3.8.4 System Update Note: If the system is running properly, you do not need to update the firmware. Before updating system firmware, please make sure the product model and firmware version are correct. Follow the steps below to update firmware: Step 1: Download the release notes of the same version as the firmware from QNAP website http://www.qnap.com. -
Page 96: Change Logo
3.8.5 Change Logo You can choose your own picture to display on the login page of TS-201. The size of the picture cannot exceed 20K bytes. - 96 -... -
Page 97: Remote Replication (Disaster Recovery)
3.8.6 Remote Replication (Disaster Recovery) Remote Replication enables you to replicate files on TS-201 to another TS-201 or QNAP NAS series. The files will be compressed before the replication process in order to save time for data transfer. Make sure a network share is created before creating a remote replication task. - Page 98 Complete all settings and click OK to save or Cancel to quit. The port for remote replication is 873. If you are using two TS-201 servers behind an NAT router, please open the port 873 on NAT router and forward the port to the corresponding LAN IP of TS-201. Otherwise, the remote replication service will be blocked by NAT.
- Page 99 Edit Select the task to be edited. Click Edit. Modify the settings. Click OK to save or Cancel to quit. iii. Delete Select the task to be deleted. Click Delete. - 99 -...
-
Page 100: Backup/ Restore/ Reset Settings
3.8.7 Backup/ Restore/ Reset Settings • To backup all settings, including user accounts, server name and network configuration etc., click Backup and select to open or save the setting file. • To restore all settings, click Browse to select a previously saved setting file and click Restore to confirm. -
Page 101: Network Recycle Bin
3.8.8 Network Recycle Bin This function enables files deleted on the shares of TS-201 to be removed to Network Recycle Bin to reserve the files temporarily. To enable this function, check the box “Enable Network Recycle Bin” and click Apply. The system will create a network share "Network Recycle Bin"... -
Page 102: Event Logs
Event Logs TS-201 can store thousands of recent event logs, including warning, error and information messages. In case of system malfunction, event logs can be retrieved to analyze system problems. - 102 -... -
Page 103: Chapter 4. Copy Data Directly By Front Usb Port To Ts-201
Copy button and TS-201 will copy all files in the device. If there are no changes, press the Copy button and TS-201 will not copy the files. -
Page 104: Chapter 5. Multimedia Station
A. Upload photos by web administration 1. To use Multimedia Station of TS-201, make sure a SATA disk is installed correctly in TS-201 according to the instructions in Chapter 2.1. A share folder Qmultimedia will be created. Enable Multimedia function in Network Settings. - Page 105 2. Click on the link http://TS-201 IP/Qmultimedia on Multimedia Station page or click Multimedia Station on the login page of TS-201 to access Multimedia Station. 3. Click on the top right hand corner. Login with administrator name and password to manage Multimedia Station. Users without administration right can view the photos and multimedia files on Multimedia Station but they do not have the right to modify the files.
- Page 106 4. Click Browse to select the multimedia file and then click Upload to upload the file to the folder. 5. You can also create folders by clicking and upload files to the folders. - 106 -...
- Page 107 B. Upload photos to Qmultimedia folder directly You can upload multimedia files to TS-201 directly by the following steps. Use Run function in Windows. Enter \\[server name] or \\[server IP] to access share folder on TS-201. Open the folder Qmultimedia. Enter the user name and password to login.
- Page 108 When you login Multimedia Station by web browser again, all multimedia files will be shown. Buttons on Multimedia Station page Sort files by name Sort files by size Sort files by date Return to previous page Return to Home Create folder Rename file or folder Select all Select none...
- Page 109 View Photo Information 1. To view detailed information of a photo, click on the thumbnail of the picture. 2. The information of the photo, e.g. file name, resolution, size, camera producer will be shown on the right. You can enter a description for the picture in the box below the photo and click Submit.
- Page 110 Buttons Description You can use the buttons on top of the photo to manage the album. Back to previous level Previous image Next image Rotate image anticlockwise Rotate image clockwise Zoom in Zoom out Play slideshow. Select the time interval in seconds. Click play to play slide show.
-
Page 111: 5.2 Enable Itunes Service
5.2 Enable iTunes Service Enable iTunes service on TS-201. The mp3 files on Qmultimedia folder of TS-201 will be shared via iTunes. All the computers with iTunes installed on LAN will be able to find, browse and play the music files on TS-201. - Page 112 Note: You can download the latest iTunes software from official Apple website http://www.apple.com. - 112 -...
-
Page 113: 5.3 Use Upnp Media Server
5.3 Use UPnP Media Server TS-201 is built-in with TwonkyMedia, DLNA compatible UPnP media server. Enable this function and TS-201 will share particular music, photos or video files to DLNA network. You can use DLNA compatible digital media player (DMP), to play the multimedia files on TS-201 on TV or acoustic sound system. - Page 114 (1) Language: Select the display language. (2) Server Name: Enter the name of TS-201 UPnP Media Server. This name will be shown on DMP operation interface, e.g. NAS. (3) Content Locations: Select the share folder on TS-201 to be shared to DMP.
- Page 115 About UPnP and DLNA Universal Plug and Play (UPnP) is a set of computer network protocols promulgated by the UPnP Forum. The purpose of UPnP is to allow devices to connect seamlessly and to simplify the implementation of networks at home and in corporate environment.
-
Page 116: Chapter 6. Download Station
Chapter 6. Download Station TS-201 supports BT, HTTP and FTP download mechanism. You can add download task to TS-201 and let the server finish downloading independent of PC. Warning: Please be warned against illegal downloading of copyrighted materials. The Download Station functionality is provided for downloading authorized files only. - Page 117 2. Click on the link http://TS-201 IP/Qdownload on Download Station page or click Download Station on the login page of TS-201 to access Download Station. - 117 -...
- Page 118 Click Add new BT task on the left and upload a torrent file. You can download legal torrent files by searching on the Internet. There are websites that provide legally sharing torrents e.g. www.legaltorrents.com. Please download the torrent files to your local disk and then upload them to TS-201. - 118 -...
- Page 119 (B) Add new FTP/HTTP task To run an FTP download task, click Add new FTP/HTTP task. Enter the FTP URL of the download task and select the share folder to save the files. Enter the user name and password to login the FTP server (if necessary). Then click OK to start downloading.
- Page 120 5. You can select an available download task and click Set Share Time to configure the time for sharing the torrent file, or click Set Config to set the maximum number of downloads at the same time (default value is 3). You can also set the maximum download and upload rate (default value is 0, which means unlimited), and port range (default range is 6881-6899).
- Page 121 6. To pause a running download task, select the task in View Run list and click Pause/ Restart download task. You can view tasks that are paused or finished in View Pause List and View Finish List respectively. To restart a paused task, select the task in View Pause List and click Pause/ Restart download task.
- Page 122 8. To delete a running, paused, or finished task, select the task and click Delete download task. You can select to remove the download task only and retain the downloaded files, or remove the task and downloaded files. 9. To logout Download Station, click on the top right hand corner.
- Page 123 10. To access the folders you have downloaded, please go to the share folder Qdownload of TS-201. - 123 -...
- Page 124 Dump Diagnostic Information To view the diagnostic details of a download task, select a task on the list and click [Dump Diagnostic Information]. - 124 -...
- Page 125 3. Set the maximum number of simultaneous downloads as 3-5 for the best download rate. 4. TS-201 is located behind NAT router. The port settings have led to slow BT download rate or no response. You may try the following means to solve the problem: a.
-
Page 126: Chapter 7. Web Server
Chapter 7. Web Server TS-201 enables you to upload web pages and manage your own website easily by Web Server function. It also supports PHP and SQLite for you to establish an interactive website. Once you activate Web Server function, you can access your own homepage from anywhere. - Page 127 The file index.html, index.htm or index.php will be the home path of your webpage. - 127 -...
- Page 128 IP/ on Web Server page or click Web Server on the login page of TS-201 to access the web page you upload. Note that when Web Server is enabled, you have to type [http://TS-201 IP address:6000] in your web browser to access the login page of TS-201.
- Page 129 SQLiteManager. (1) Unpack your download file SQLiteManager-*.tar.gz. (2) Upload the unpacked folder SQLiteManager-* to \\TS-201 IP\Qweb\. (3) Open your web browser and go to http://TS-201 IP/SQLiteManager-*/. : The symbol "*" refers to the version number of SQLiteManager. - 129 -...
-
Page 130: Chapter 8. Ftp Server
Chapter 8. FTP Server TS-201 supports FTP service. To use FTP service, enable this function in Network Settings and follow the steps below: Open an IE browser and enter ftp://[TS-201 IP] or ftp://[TS-201 name]. OR By Web File Manager of TS-201. - Page 131 Click FTP. Enter the user name and password to login FTP service. - 131 -...
- Page 132 You can start to use FTP service. - 132 -...
-
Page 133: Chapter 9. Web File Manager
Chapter 9. Web File Manager Using Web File Manager To use Web File Manager, enable web service in Network Settings first. - 133 -... - Page 134 Launch the web browser and go to TS-201 administration page. Select Web File Manager and enter the correct login name and password. You can login as “guest” to access the network shares open to guest access on TS-201. The login password of guest is guest.
- Page 135 Select an existing network share. You can organize share folders of TS-201. With Web File Manager, you can upload, rename, or delete files and folders in the network shares. View files online Click on a file displayed on the web page. The information of the file will be shown.
- Page 136 Rename file or folder Select a file or folder to rename. Click (Rename) on the toolbar. iii. Enter the new file or folder name and click OK. Delete file or folder Select a file or folder to delete. Click (Delete) on the toolbar. iii.
- Page 137 View Files Named in Local Language To view files named in Chinese, you may have to configure the browser settings. Take Internet Explorer as an example, follow the steps below to configure the settings. 1. Click on Tools in IE browser. 2.
- Page 138 Web File Manager Icons Icon Description Return to the parent folder Refresh the current page Return to network share list home page Create folder Rename file or folder Delete file or folder Select all Cancel selection Logout Full access network share folder Read-only network share folder Malfunction network share folder - 138 -...
-
Page 139: Chapter 10. Netbak Replicator
® NetBak Replicator is a powerful program installed in user’s system (Windows only) for data backup. You can back up any files or folders on local PC to specified share folder on TS-201 by LAN or WAN. Main Functions Backup •... - Page 140 Install NetBak Replicator Select Install NetBak Replicator in TS-201 CD-ROM. Follow the steps to install NetBak Replicator. Upon successful installation, a shortcut icon will be shown on the Desktop. Double click the icon to run NetBak Replicator. - 140 -...
- Page 141 Use NetBak Replicator 1. Before using NetBak Replicator, please login TS-201 administration and go to Network Share Management to create a share folder for backup. Make sure the share folder is open for everyone access or you login the share folder with an authorized account or administrator by NetBak Replicator.
- Page 142 2. Run NetBak Replicator. Click . All TS-201 and their share folders within the network will be displayed. - 142 -...
- Page 143 3. When the following window appears, all TS-201 in the LAN will appear on the left list. Select a server and a share folder on the right. NetBak Replicator also supports backup via WAN, you can enter the IP address of TS-201 for data backup directly and select a share folder.
- Page 144 Description of Buttons on NetBak Replicator Open Configuration: Open a previously saved NetBak Replicator configuration. Save Configuration: Save the settings on NetBak Replicator. The file will be named as *.rpr Select All: Select all items in the window. Clear All: Clear selection. Select My Document: Select all folders in My Document.
- Page 145 • Backup Select files and folders for backup. - 145 -...
- Page 146 Start When you have selected the files for backup to TS-201, click Start on NetBak Replicator. The program will start to copy the selected files to the specified share folder on TS-201. - 146 -...
- Page 147 File Filter Click File Filter on NetBak Replicator main page to select file format to be skipped from backup. Then click OK. - 147 -...
- Page 148 Schedule Click Schedule on NetBak Replicator main page. Then check the box “Enable Backup Schedule” and select the frequency and time for backup. Click OK to confirm. - 148 -...
- Page 149 Monitor Select a folder for monitoring. When this option is enabled, the system will upload all files or folders to the server instantly for backup when the files or folders are modified. Other files will be gray and cannot be selected.
- Page 150 Initialize Configuration When using this function, NetBak Replicator will record all current settings of the user, including whether or not monitor function is enabled. When the user login again, this program will load the previous recorded settings for users to manage data backup. - 150 -...
- Page 151 • Restore Please follow the steps below to restore files from TS-201 to your PC. a. Restore to original position: Select the location that the data will be restored to. b. Select new restore position: Click to select the directory to restore data to or select a previously chosen location from the drop-down menu.
- Page 152 d. Option: Select recovery option and error option. If the restoring file existed, NetBak Replicator will: Overwrite all the files Ask first Skip this file If an error happens in the process of file restoring, NetBak Replicator will: Stop the restoring Ask first Ignore this error message - 152 -...
- Page 153 • a. Save As…: To save all logs on NetBak Replicator, click this button. All logs will be saved as text file. b. Clear All: Click this button to clear all logs. c. Option: Select the type of logs to be recorded― “Record all logs” or “Record error logs only”.
-
Page 154: Chapter 11. Ts-201 Maintenance
11.1 Restart/ Shut down Server Follow the steps below to restart or shut down TS-201. 1. Enter the administration page and select Restart/ Shutdown in System Tools. 2. Click Restart to reboot the server or Shut Down to turn off the server. -
Page 155: Reset Administrator Password And Network Settings
Reset Administrator Password and Network Settings To reset the administrator password and network settings of TS-201, 1. Press the reset button of TS-201 for a few seconds. A beep sound will be heard. 2. Login TS-201 with the default user name and password:... -
Page 156: Disk Failure Or Malfunction
11.4 Power Outage or Abnormal Shutdown In case of power outage or improper shutdown of TS-201, the system will resume to the state before it is shut down. If your server does not function properly after restart, please do the following: 1. -
Page 157: Technical Support
Technical Support QNAP provides dedicated online support and customer service via instant messenger. You can contact us by the following means: Online Support: http://www.qnap.com E-mail: support@qnap.com.tw MSN: support@qnap.com.tw SKYPE: qnapskype - 157 -... -
Page 158: Gnu General Public License
GNU GENERAL PUBLIC LICENSE Version 2, June 1991 Copyright (C) 1989, 1991 Free Software Foundation, Inc. 51 Franklin Street, Fifth Floor, Boston, MA 02110-1301, USA Everyone is permitted to copy and distribute verbatim copies of this license document, but changing it is not allowed. Preamble The licenses for most software are designed to take away your freedom to share and change it. - Page 159 software is modified by someone else and passed on, we want its recipients to know that what they have is not the original, so that any problems introduced by others will not reflect on the original authors' reputations. Finally, any free program is threatened constantly by software patents. We wish to avoid the danger that redistributors of a free program will individually obtain patent licenses, in effect making the program proprietary.
- Page 160 or work under the terms of Section 1 above, provided that you also meet all of these conditions: a) You must cause the modified files to carry prominent notices stating that you changed the files and the date of any change. b) You must cause any work that you distribute or publish, that in whole or in part contains or is derived from the Program or any part thereof, to be licensed as a whole at no charge to all third parties under the terms of this...
- Page 161 a) Accompany it with the complete corresponding machine-readable source code, which must be distributed under the terms of Sections 1 and 2 above on a medium customarily used for software interchange; or, b) Accompany it with a written offer, valid for at least three years, to give any third party, for a charge no more than your cost of physically performing source distribution, a complete machine-readable copy of the corresponding source code, to be distributed under the terms of Sections 1 and 2 above on a...
- Page 162 this License. Therefore, by modifying or distributing the Program (or any work based on the Program), you indicate your acceptance of this License to do so, and all its terms and conditions for copying, distributing or modifying the Program or works based on it.
- Page 163 8. If the distribution and/or use of the Program are restricted in certain countries either by patents or by copyrighted interfaces, the original copyright holder who places the Program under this License may add an explicit geographical distribution limitation excluding those countries, so that distribution is permitted only in or among countries not thus excluded.
- Page 164 CORRECTION. 12. IN NO EVENT UNLESS REQUIRED BY APPLICABLE LAW OR AGREED TO IN WRITING WILL ANY COPYRIGHT HOLDER, OR ANY OTHER PARTY WHO MAY MODIFY AND/OR REDISTRIBUTE THE PROGRAM AS PERMITTED ABOVE, BE LIABLE TO YOU FOR DAMAGES, INCLUDING ANY GENERAL, SPECIAL, INCIDENTAL OR CONSEQUENTIAL DAMAGES ARISING OUT OF THE USE OR INABILITY TO USE THE PROGRAM (INCLUDING BUT NOT LIMITED TO LOSS OF DATA OR DATA BEING RENDERED INACCURATE OR LOSSES SUSTAINED BY YOU...
Need help?
Do you have a question about the Turbo Station TS-201 and is the answer not in the manual?
Questions and answers