
Subscribe to Our Youtube Channel
Related Manuals for Aztech HomePlug Turbo


Summary of Contents for Aztech HomePlug Turbo
- Page 1 Easy Start 85Mbps High Speed HomePlug Ethernet Adapter Easy Start Easy Start Page 1 of 20...
-
Page 2: Table Of Contents
Easy Start Table of Contents Preliminary Pages Page Table of Contents ........................2 Chapter 1 – Introduction ......................5 Chapter 2 – Installation & Connection ................6 System Requirements ...............6 Installation & Uninstallation of Configuration Utilty ......6 Connection & Indicator Lights............8 Chapter 3 – All About The Home Network.................9 Remove/Disable Conflicts..............9 3.1.1 TCP/IP ....................9... - Page 3 Easy Start Safety Summary Messages WARNING HIGH VOLTAGE is used in the equipment. Make sure equipment is properly grounded BEFORE opening. Failure to observe safety precautions may result in electric shock to user. CAUTION Check voltages before connecting equipment to power supplies. Wrong voltages applied may result in damage to equipment.
-
Page 4: Important Safety Instructions
Easy Start Important Safety Instructions Please read these instructions carefully: 1. Unplug the HomePlug Ethernet Adaptor from the wall outlet before cleaning. Do not use liquid cleaners or aerosol cleaners. Use a damp cloth for cleaning. 2. Do not use the HomePlug Ethernet Adaptor near water. 3. -
Page 5: Chapter 1 - Introduction
Easy Start C hapter 1 – Introduction One of the major drawbacks in setting up home network is the absence of required wiring inside the house to interconnect networked computers. In recent years several technologies have attempted to address the issue. The most prominent technology so far is the family of WIFI (802.11 X) products. -
Page 6: Chapter 2 - Installation & Connection
Easy Start C hapter 2 – Installation & Connection System Requirements HomePlug Ethernet Adaptor is applicable with all TCP/IP operating systems with Ethernet port. Drivers are not required for this adapter. But the supplied software and the network password operates only with Windows operating systems. Your computer must meet the below mentioned minimum requirements in order to use the HomePlug Ethernet Adaptor Configuration Utility: •... - Page 7 Easy Start Note… 1. Before connecting the HomePlug Ethernet Adaptor, please note its Security ID / Device Password and keep it available for configuration of the network. 2. No drivers are required for installation of the HomePlug Ethernet Adaptor. Note… If there is no connection/link among the HomePlugs with the Network cable inserted onto the HomePlugs OR the ping test among the HomePlugs are not successful, please power off and on again for the HomePlugs.
-
Page 8: Connection & Indicator Lights
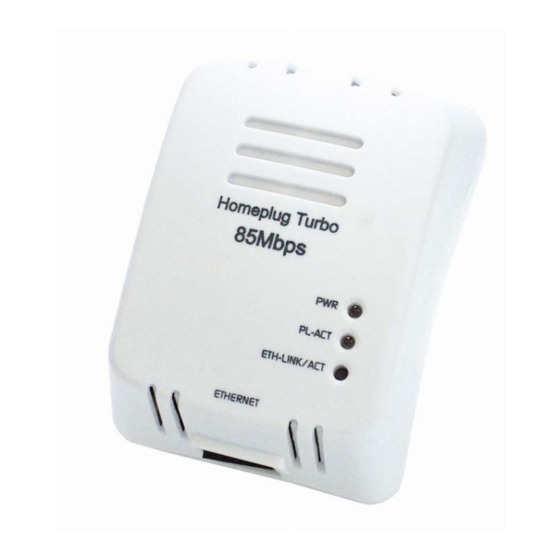
Easy Start Connection & Indicator Lights The HomePlug Ethernet Adaptor has three lights indicator (LEDs) and an Ethernet port. See Figure 1-1 below. Power LED PL-ACT LED ETH-LINK/ACT LED ETHERNET CONNECTION POINT Figure 1-1 : 85Mbps High Speed Homeplug Ethernet Adapter PWR: Lights up when connected to AC power supply. -
Page 9: Chapter 3 - All About The Home Network
Easy Start C hapter 3 – All About The Home Network This chapter contains important and useful information on networks—from the configuration of your computer to examples of applications to general tips. Remove/Disable Conflicts You may need to check the TCP/IP and Internet properties to make sure there are no conflicts with the way devices in the network are identified. -
Page 10: Examples Of Applications
Easy Start Examples Of Applications This section demonstrates some of the application scenarios 3.2.1 Home Networking – Option 1 Workstation with Internet connection over an ADSL/Cable modem. See Figure 1-2 below. Figure 1-2 : Home Networking Option 1 3.2.2 Home Networking – Option 2 Networking for Online Gaming. -
Page 11: Home Networking- Option 3
Easy Start 3.2.3 Home Networking- Option 3 Networking for several workstations with IP-STV and one Internet connection over an ADSL/Cable modem router. See Figure 1-4 below. Figure 1-4 : Home Networking Option 3 3.2.4 Home Networking – Option 4 Networking for several workstations with IP-STV and one Internet connection over an ADSL/Cable router and an ADSL/Cable modem. -
Page 12: Care Instructions
Easy Start Care Instructions 3.3.1 Network Volume The maximum number of HomePlug adaptors in a single-family house is theoretically 253 connections, but in practice no more than 10 devices should be transferring data simultaneously. 3.3.2 Network Security Normally the electric meter forms a physical barrier, i.e. only devices connected to this meter can be part of the network and benefit from the phase coupling. -
Page 13: Chapter 4 - Configuration Utility For Windows
Easy Start C hapter 4 – Configuration Utility For Windows Running the Utility: To run the utility, double click the PowerPacket Utility icon on your desktop. See Figure 1-6 below. Figure 1-6 : PowerPacket Utility Icon Main Screen The Main screen essentially provides a list of all powerline devices logically connected to the computer where the utility is running. - Page 14 An icon is optionally shown with the name. A distinction in icons is made between low-speed and high-speed devices (HomePlug 1.0 and Turbo). By default, the icon is displayed with the name. HomePlug 1.0 HomePlug Turbo Easy Start Page 14 of 20...
- Page 15 Easy Start The MAC Address column shows the device’s MAC address. The Password column shows the user-supplied Device Password (initially left blank). The Device Password can be found on the label at the back of the unit. A user may enter the password by using the Enter Password button (explained below).
- Page 16 Easy Start The Add button is used to add a remote device to your network that is not on the displayed list in the lower panel, for example, a device currently on another logical network. Users are advised to locate the Device Passwords for all devices they wish to manage and add them to the local logical network by clicking on the Add button.
-
Page 17: Privacy Screen
Easy Start Privacy Screen The Privacy dialog screen provides a means for managing the local network and providing additional security. All HomePlug devices are shipped using a default logical network (network name), which is normally “HomePlug”. The Privacy dialog screen allows user to make the network private by changing the network name (network password) of devices. -
Page 18: Qos Screen
Easy Start QoS Screen With the QoS screen, you can select the type of application intended for the HomePlug device. There are three choices: • Online Game / Internet Select this option if the device will be connected to a computer or a game console •... -
Page 19: Diagnostics Screen
Easy Start Diagnostics Screen The Diagnostics screen shows system information and a history of all devices seen. See Figure 1-12. The upper panel shows technical data concerning software and hardware on the host computer used to communicate over HomePlug. It shall include the following: •... -
Page 20: About Screen
Easy Start The lower panel contains a history of all remote devices seen on the computer, over time. Devices are shown here regardless of whether or not they are on the same logical network. • Adapter Alias Name • Adapter MAC Address •...
Need help?
Do you have a question about the HomePlug Turbo and is the answer not in the manual?
Questions and answers