Table of Contents
Advertisement
Quick Links
Advertisement
Table of Contents

Related Manuals for Aztech WL562


Summary of Contents for Aztech WL562
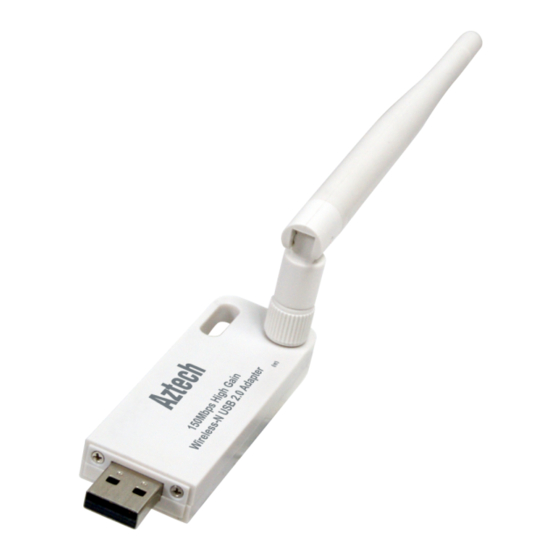
- Page 1 Wireless N USB Adapter...
- Page 2 User Manual 2011 © All rights reserved. Version 1.0 No part of this document may be reproduced, republished, or retransmitted in any form or by any means whatsoever, whether electronically or mechanically, including, but not limited to, by way of photocopying, recording, information recording, or through retrieval systems without the express written permission.
-
Page 3: Table Of Contents
Configuration ......................15 Connecting to non-Secured Wireless AP ............ 15 Connecting to WEP-Secured Wireless AP ........... 16 Connecting to WPA-PSK-Secured Wireless AP ..........17 About WL562(L)USB Utility ..................18 Network Tab ....................18 Button Section ......................19 Function Section ...................... 19 Profile ...................... - Page 4 User Manual WPS ......................34 Definition of each field ................... 35 Security...................... 37 Auth./Encry. Setting - WEP/TKIP/AES ..............37 802.1x Setting ......................38 Page 4 of 43...
-
Page 5: About The Product
This device also supports connection to other wireless network standards like Wireless G or Wireless B. WL562(L)USB is easy to setup - install the necessary driver software, connect it to an available USB slot, and then connect to a wireless network. The... -
Page 6: Getting Started
User Manual Getting Started Setting up the device is easy. The flowchart below provides an outline of the steps needed to complete the installation. Brief descriptions appear beside each step. Detailed instructions are provided in the subsequent pages. The package includes the Wireless Check Package N USB Adapter, Easy Start Guide, Contents... -
Page 7: Check Package Contents
WL562(L)USB Easy Start Guide Resource CD – contains WL562(L) Utility installer, and User Manual Remove or Disable Conflicts To make sure the device installation moves on smoothly, you need to remove or disable conflicts that may interfere the installation. Probable conflicts may include:... -
Page 8: Configuring Internet Properties
User Manual Configuring Internet Properties To set the Internet Properties: 1. Click the Start button, and then click Run. This opens the Run dialog box. 2. Type control inetcpl.cpl, and then click OK. This opens Internet Properties. 3. Click Connections tab. 4. -
Page 9: Installation
Note: To install the driver software: 1. Insert the Resource CD to the CD-ROM. This opens the WL562(L)USB Utility Setup. If the Utility does not open automatically, click the Start button, and then click Run. Enter d:\setup.exe, where d is the CD-ROM drive. - Page 10 User Manual 3. Click Next. 4. Select either of the options available: a. Install driver and Ralink WLAN Utility, this will install driver for the adaptor, and the wireless utility b. Install driver only, this will install only the driver for the adaptor. Page 10 of 43...
- Page 11 User Manual 5. Click Next. 6. If you selected the first option, please select either one of the options available: a. Ralink Configuration Tool b. Microsoft Zero Configuration Tool Page 11 of 43...
- Page 12 User Manual 7. Click Next. 8. Click Install, required driver/utility is now being installed into the PC Page 12 of 43...
- Page 13 User Manual 9. Click Finish to exit the wizard, installation is now complete. Page 13 of 43...
- Page 14 User Manual Page 14 of 43...
-
Page 15: Configuration
User Manual Configuration This chapter describes how to configure WL562(L)USB to get connected to your WLAN router. The adaptor’s configuration in windows XP is similar with windows 2000 and windows Vista. This user guide describes the configuration for windows XP. -
Page 16: Connecting To Wep-Secured Wireless Ap
User Manual 2. Click Connect button to connect to the desired AP. Connecting to WEP-Secured Wireless AP 1. Select an AP with WEP encryption and click "Connect". 2. The Authentication and Encryption window will appear as below 3. Select the Default Key and Key format set on the AP then enter the WEP key on the required field. -
Page 17: Connecting To Wpa-Psk-Secured Wireless Ap
User Manual Connecting to WPA-PSK-Secured Wireless AP 1. Select an AP with WPA-PSK encryption and click Connect. 2. The Authentication and Encryption window will appear as below. Select WPA-PSK as the Authentication Type then select TKIP or AES encryption on the drop down box and click Next. -
Page 18: About Wl562(L)Usb Utility
User Manual About WL562(L)USB Utility WL562(L)USB Utility is a software application used in tandem with the device to connect to a wireless network and to configure the device settings. WL562(L)USB Utility can be installed on computers running Windows 2000, XP, or Vista. -
Page 19: Button Section
User Manual There are three sections to the RaUI dialog box. These sections are briefly described as follow. Button Section Includes buttons for the Site Survey, Link Information, Profile page, Advanced page, the About button, Help and Radio On/Off button Function Section Appears to present information and options related to the button. - Page 20 User Manual Profile page Network page Page 20 of 43...
- Page 21 User Manual Advanced page About page Page 21 of 43...
-
Page 22: Profile
User Manual Profile The Profile List keeps a record of your favorite wireless settings at home, office, and other public hot-spots. You can save multiple profiles, and activate the correct one at your preference. Picture below shows the basic profile section. Definition of each field: 1. -
Page 23: Icons And Buttons
User Manual 11. Fragment Threshold: The user can adjust the Fragment threshold number by sliding the bar or key in the value directly. Icons and buttons: : Indicates if a connection made from the currently activated profile. : Indicates if the connection has failed on a currently activated profile. : Indicates the network type is infrastructure mode. - Page 24 User Manual Add a new Profile : Next Button. : Back Button. : Cancel Button. Parameter definitions 1. Profile Name: The user can chose any name for this profile, or use the default name defined by system. 2. SSID: The user can key in the intended SSID name or select one of the available APs from the drop-down list.
- Page 25 User Manual 4. Authentication Type: There are 7 type of authentication modes supported by RaUI. They are open, Shared, LEAP, WPA and WPA-PSK, WPA2 and WPA2-PSK. 5. Encryption Type: For Open authentication mode, the selection of available encryption type are None and WEP. For Shared and 802.1x authentication mode, the selection of available encryption is WEP.
- Page 26 User Manual 7. Pre-shared Key: This is the key shared between the AP and STA. For WPA-PSK and WPA2-PSK authentication mode, this field must be filled with a key between 8 and 32 characters in length. 8. 802.1x Setting: This is introduced in the topic of "Section 3-2 : 802.1x Setting". Page 26 of 43...
-
Page 27: Network
User Manual 9. Power Save Mode: Choose CAM (Constantly Awake Mode) or Power Saving Mode. 10. Channel: Only available for setting under Ad-hoc mode. Users can choose the channel frequency to start their Ad-hoc network. 11. RTS Threshold: User can adjust the RTS threshold number by sliding the bar, or key in the value directly. -
Page 28: Definition Of Each Field
User Manual Network function Definition of each field 1. SSID: Name of BSS or IBSS network. 2. Network Type: Network type in use, Infrastructure for BSS, Ad-Hoc for IBSS network. 3. Channel: Channel in use. 4. Wireless Mode: AP support wireless mode. It may support 802.11a, 802.11b, 802.11g or 802.11n wireless mode. -
Page 29: Connected Network
User Manual : Indicates that the connection is successful. : Indicates the network type is in infrastructure mode. : Indicates the network type is in Ad-hoc mode. : Indicates that the wireless network is security-enabled. : Indicates 802.11a wireless mode. : Indicates 802.11b wireless mode. -
Page 30: Advanced
User Manual The detailed AP information is divided into three parts. They are General, WPS, CCX information and 802.11n (The 802.11n button only exists for APs supporting N mode.) The introduction is as follows: 1. General information contains the AP's SSID, MAC address, authentication type, and encryption type. -
Page 31: Definition Of Each Field
User Manual Definition of each field 1. Wireless mode: Select wireless mode. 2. Select Your Country Region Code: There are eight countries to choose from in the country channel list Apply the above changes. Link Status The link status page displays detailed information about the current connection. Page 31 of 43... -
Page 32: Throughput
User Manual 1. Status: Current connection status. If no connection, if will show Disconnected. Otherwise, the SSID and BSSID will show here. 2. Extra Info: Display link status in use. 3. Channel: Display current channel in use. 4. Authentication: Authentication mode in use 5. -
Page 33: Transmit Statistics
User Manual Transmit Statistics 1. Frames Transmitted Successfully: Frames successfully sent. 2. Frames Fail To Receive ACK After All Retries: Frames failed transmit after hitting retry limit. 3. RTS Frames Successfully Receive CTS: Successfully receive CTS after sending RTS frame. 4. -
Page 34: Received Statistics
User Manual Received Statistics 1. Frames Received Successfully: The number of frames successfully received. 2. Frames Received With CRC Error: The number of frames received with a CRC error. 3. Frames Dropped Due To Out-of-Resource: The number of frames dropped due to a resource issue. -
Page 35: Definition Of Each Field
User Manual Definition of each field 1. WPS Configuration: The primary goal of Wi-Fi Protected Setup (Wi-Fi Simple Configuration) is to simplify the security setup and management of Wi-Fi networks. Ralink STA supports the configuration and setup using a PIN configuration method or a PBC configuration method through an internal or external Registrar. - Page 36 User Manual 5. PIN Code: The user is required to enter an 8-digit PIN Code into Registrar. When an STA is the Enrollee, you can click "Renew" to re-generate a new PIN Code. 6. Config Mode: The station serving as an Enrollee or an external Registrar. 7.
-
Page 37: Security
User Manual 8. Progress Bar: Displays the rate of progress from Start to Connected. Security Auth./Encry. Setting - WEP/TKIP/AES Page 37 of 43... -
Page 38: 802.1X Setting
User Manual Definition of each field 1. Authentication Type: There are 7 authentication modes supported by the utility. They are open, Shared, LEAP, WPA and WPA-PSK, WPA2 and WPA2-PSK. 2. Encryption Type: For open and shared authentication mode, the available encryption types are None and WEP. -
Page 39: Authentication Type
User Manual Authentication type: 1. PEAP: Protect Extensible Authentication Protocol. PEAP transport securely authenticates data by using tunneling between PEAP clients and an authentication server. PEAP can authenticate wireless LAN clients using only server-side certificates, thus simplifying the implementation and administration of a secure wireless LAN. -
Page 40: Client Certification
User Manual Session Resumption User can choose to "Disable" and "Enable". Tunnel Authentication 1. Protocol: Tunnel protocol, List information include "EAP-MSCHAP v2", "EAP- TLS/Smart card", "Generic Token Card", "CHAP", "MS-CHAP", "MS-CHAP-V2", "PAP" and "EAP-MD5". 2. Tunnel Identity: Identity for tunnel. 3. - Page 41 User Manual EAP Fast Allow unauthenticated provision mode: During the PAC can be provisioned (distributed one time) to the client automatically. It only supported "Allow unauthenticated provision mode" and use "EAP-MSCHAP v2" authentication to authenticate now. It causes to continue with the establishment of the inner tunnel even though it is made with an unknown server.
- Page 42 User Manual 2. Allow intermediate certificates: It must be in the server certificate chain between the server certificate and the server specified in the "certificate issuer must be" field. 3. Server name: Enter an authentication sever root. Page 42 of 43...
-
Page 43: Safety Warnings
User Manual Safety Warnings For your safety, be sure to read and follow all warning notices and instructions. Do not open the device. Opening or removing the device can expose you to dangerous voltage points or other risks. Only qualified service personnel can service the device.
Need help?
Do you have a question about the WL562 and is the answer not in the manual?
Questions and answers