Advertisement
Quick Links
Remove any packing material, promotional stickers and tape from the oven. Wipe the oven interior with a soft damp sponge and
wash all accessories in warm soapy water. Allow all surfaces to dry thoroughly before use.
KNOW YOUR BREVILLE SMART OVEN
D
D
A
B
C
J
J
A. 12" x 12" enamel broil rack.
B. 12" x 12" enamel baking pan.
C. 13" non-stick pizza pan.
D. Door handle.
The outer surface of the oven, including the oven door, is hot
!
during and after operation. Always use insulated oven mitts
when inserting, removing or handling items from the oven.
E.
Ribbed plate warming tray (see Page 43 of the Instruction
Book for details).
F.
Top rack height position.
G. Middle rack height position.
Note: When the wire rack is inserted into this position, the
Magnetic Auto-Eject Rack ejects the wire rack halfway out of
the oven for easy removal of hot items. Always open the door
slowly to prevent the wire rack from ejecting too quickly.
H. Bottom rack height position.
I.
Wire rack.
J.
Crumb tray.
The Smart Oven
QUICK START GUIDE
TM
D
D
E
E
F
F
F
F
G
G
G
G
H
H
I
I
H
H
I
I
For full details refer to the instruction book | breville.com | Issue 2/08
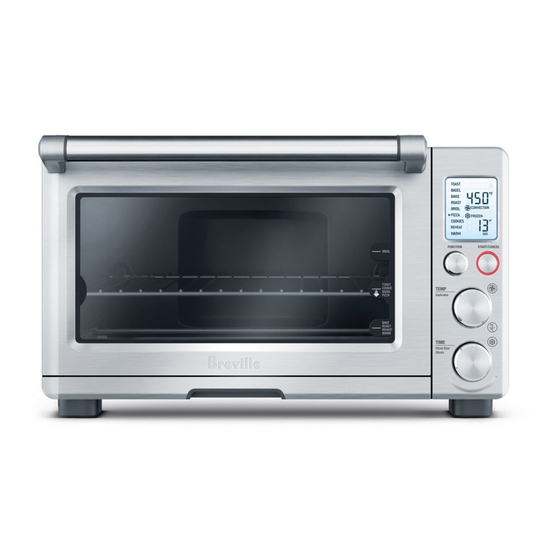
E
E
K
K. LCD screen.
L.
START/CANCEL button.
Note: If not in use, the LCD screen will illuminate for
10 minutes before entering standby mode. Press the START/
CANCEL button on the control panel to re-activate any of
the functions.
M. FUNCTION dial.
N. TEMPERATURE dial (also toast & bagel browning
control dial)
O. TIME dial (also toast & bagel slice selection / pizza size
selection dial)
P.
CONVECTION button - uses fan assistance for faster,
more even & energy efficient cooking.
Q.
TEMPERATURE CONVERSION button - converts the
preset Fahrenheit reading to Celsius.
R.
FROZEN FOODS button - adds the recommended
additional time to defrost then cook frozen foods.
TM
K
M
L
L
P
M
N
Q
R
N
O
O
P
In
the
1.
2.
3.
4.
K
L
P
O
Q
Th
R
mo
wi
ov
1.
2.
3.
4.
5.
Advertisement

Related Manuals for Breville The Smart Oven


Summary of Contents for Breville The Smart Oven
- Page 1 H. Bottom rack height position. preset Fahrenheit reading to Celsius. Wire rack. FROZEN FOODS button - adds the recommended Crumb tray. additional time to defrost then cook frozen foods. For full details refer to the instruction book | breville.com | Issue 2/08...
- Page 2 OPERATING YOUR BREVILLE SMART OVEN The Breville Smart Oven™ features Element IQ™ - a cooking technology that adjusts the power of the heating elements to cook food Note more evenly and quickly. Each of the oven’s functions are preset with our recommended settings, however we suggest experimenting food with these depending on the recipe, amount of food and your personal taste.
- Page 3 Note: When broiling, the Breville enamel broil rack must be inserted into the Breville baking pan. When assembled together, the broil rack is designed to drain grease and fats away from meats for healthier cooking. The baking pan collects these pan drippings and helps prevent spattering.
Need help?
Do you have a question about the The Smart Oven and is the answer not in the manual?
Questions and answers