Table of Contents
Advertisement
Advertisement
Table of Contents

Related Manuals for Breville BOV800 - ANNEXE 202


Summary of Contents for Breville BOV800 - ANNEXE 202
- Page 1 the Smart Oven™ Instruction Booklet BOV800...
- Page 2 CONGRATULATIONS on the purchase of your new Breville Smart Oven™...
-
Page 3: Table Of Contents
CONTENTS Breville recommends safety first Know your Breville Smart Oven™ Quick Start Guide Before first use - Preparing the oven for use - A note on cooking times - A note on rack height positions - A note on STANDBY mode... -
Page 4: Breville Recommends Safety First
BREVILLE RECOMMENdS SAFETy FIRST At Breville we are very safety conscious. We design and manufacture consumer products with the safety of you, our valued customer, foremost in mind. In addition we ask that you exercise a degree of care when using any electrical appliance and adhere to the following precautions. - Page 5 Metal utensils such as knives should not be inserted in the oven to remove food • Do not clean the interior of the Breville residue from the quartz tube elements. Smart Oven™ with metal scouring pads This can damage the elements as well as as pieces can break off the pad and lead to electrocution.
- Page 6 Do not use the appliance if power cord, power plug or appliance becomes damaged in any way. Return the entire appliance to the nearest authorised Breville service center for examination and / or repair. • Any maintenance, other than cleaning, should be performed at an authorised Breville Service Center.
- Page 7 KNOW your Breville Smart Oven™...
-
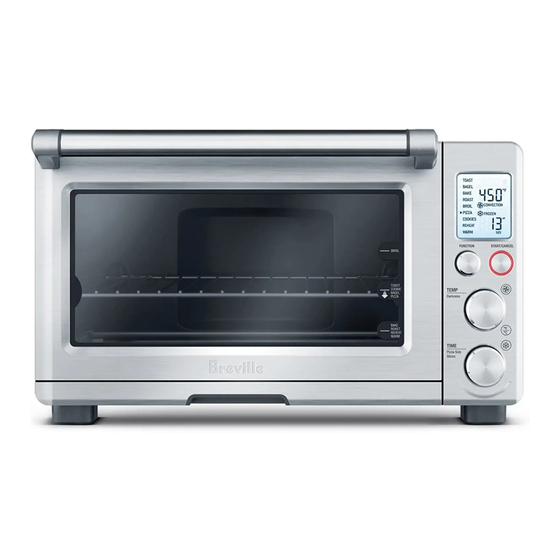
Page 8: Know Your Breville Smart Oven
Wire rack The Breville Bamboo Cutting Board Crumb tray and Serving tray accessory for the top Ventilation slots of the oven is available from Breville. Breville Assist Plug™ Visit www.breville.com.au and refer to the Accessories Card enclosed for more information. - Page 9 KNOW yOUR BREVILLE SMART OVEN™ NOTE When the oven is plugged into a wall outlet, the oven alert will sound twice and the LCD screen will illuminate for 10 minutes before entering standby mode. Press the START/CANCEL button on the control panel to activate any of the functions.
-
Page 10: Quick Start Guide
PIZZA setting. OPERATING yOUR BREVILLE COMPACT SMART OVEN™ FUNCTION DIAL The Breville Smart Oven™ features Element IQ™ - a cooking technology that adjusts the ROTATE power of the heating elements to cook food more evenly and quickly. Each of the oven’s... - Page 11 Centre the food on the wire rack - either placing directly on the rack Turn the FUNCTION dial until the or positioned on the Breville baking indicator on the LCD screen reaches the pan and grill rack (see Page 25 of the desired setting.
- Page 12 The up side of the crumpet must NOTE always face upwards towards the top heating elements - so the top side When grilling, the Breville enamel becomes crisp while the crust is only grill rack must be inserted into the lightly toasted.
- Page 13 PAGE HEAdER..QUICK START GUIdE PIZZA FUNCTION: Melts and browns cheese and toppings, while crisping the pizza crust. Rack Position: Middle Optional Settings: CONVECTION button TEMPERATURE CONVERSION button FROZEN FOODS button NOTE If cooking a frozen pizza, ensure to remove all packaging (including the metal foil pizza pan that may be provided) before placing the pizza in the oven.
-
Page 14: Before First Use
BEFORE FIRST USE of your Breville Smart Oven™... -
Page 15: Preparing The Oven For Use
BEFORE FIRST USE PREPARING THE OVEN FOR USE FUNCTION DIAL NOTE ROTATE In order to remove any protective substances inside the oven, it is necessary to run the oven empty for PIZZA DEFAULT PIZZA 20 minutes. Press the START/CANCEL button to activate this setting. -
Page 16: A Note On Cooking Times
BEFORE FIRST USE A NOTE ON COOKING TIMES TOAST The Smart Oven™ features Element IQ™ Searing top and bottom heat: seals and crisps. - a unique cooking technology that adjusts the power of the cooking elements for optimum results. It is normal to notice the following occur 650W 550W during the cooking cycle:... -
Page 17: A Note On Rack Height Positions
BEFORE FIRST USE A NOTE ON RACK HEIGHT POSITIONS TEMPERATURE DIAL Cooking results are significantly affected by the position of the wire rack as this determines how close the food is to the heating elements. We highly recommend ROTATE following the rack height position for each function as printed on the right hand side REDUCE INCREASE... -
Page 18: A Note On Standby Mode
BEFORE FIRST USE For optimum cooking results: A NOTE ON OPTIONAL SETTINGS • The wire rack should always be inserted Convection Button into the rack height position with the spokes facing upwards. Convection cooking uses fan assistance to circulate heated air around the food. This produces faster, more even, more energy efficient cooking. - Page 19 BEFORE FIRST USE Most recipes recommend reducing Frozen Foods Button temperatures by 10ºC when using FROZEN FOODS button adds the convection cooking. Always check the food recommended, additional time required 10 minutes before the suggested cooking to defrost and then toast frozen bread or time is complete to avoid overcooking.
- Page 20 BEFORE FIRST USE On the PIZZA function, FROZEN NOTE FOODS is the default setting, and the frozen If you have de-selected the symbol is displayed on the LCD screen. FROZEN FOODS setting and the When cooking fresh pizzas, the setting can ‘FRESH’...
- Page 22 OPERATING your Breville Smart Oven™...
-
Page 23: Operating Your Breville Smart Oven
OPERATING yOUR BREVILLE SMART OVEN™ - GRILL GRILL FUNCTION Elements Top heating elements cycle on and off to regulate the correct temperature. Recommended Rack Position Top rack height position. Optional Settings The grill function is ideal for open sandwiches, small cuts of meat, poultry, fish, sausages and NOTE vegetables. - Page 24 OPERATING yOUR BREVILLE SMART OVEN™ - GRILL Turn the FUNCTION dial until the The grilling time is displayed as the indicator on the LCD screen reaches the bottom figure on the LCD screen. Turn the TIME dial to adjust the grilling GRILL function.
-
Page 25: Toast Function
OPERATING yOUR BREVILLE SMART OVEN™ - TOAST TOAST FUNCTION NOTE Your customised grill temperature Elements and time settings will remain in the Top and bottom heating elements cycle on memory of the oven until you change and off to regulate the correct temperature. - Page 26 OPERATING yOUR BREVILLE SMART OVEN™ - TOAST For example, raisin toast, white light- textured breads or thinly sliced bread may require a lighter setting, whilst heavier textured rye, whole wheat or fresh breads may require a darker setting. The number of slices is displayed as the bottom figure on the LCD screen.
-
Page 27: Crumpet Function
OPERATING yOUR BREVILLE SMART OVEN™ - CRUMPET CRUMPET FUNCTION NOTE Element IQ™ will automatically adjust Elements the toasting time depending on the Top and bottom heating elements cycle on heat already present inside the oven. and off to regulate the correct temperature. - Page 28 OPERATING yOUR BREVILLE SMART OVEN™ - CRUMPET NOTE The browning settings range from ‘1’ (lightest) to ‘7’ (darkest). As a general guide: dESIREd CRUMPET COLOUR SETTING Light colour CRUMPET 1 or 2 Medium colour CRUMPET 3, 4 or 5 Close the oven door. Dark colour CRUMPET 6 or 7 Turn the FUNCTION dial until the indicator on the LCD screen reaches the CRUMPET function.
- Page 29 OPERATING yOUR BREVILLE SMART OVEN™ - CRUMPET The timer will be displayed and begin to WARNING count down. The time can be adjusted during the CRUMPET cycle by turning The outer surface of the oven, the TIME dial. including the oven door, is hot during and after operation.
-
Page 30: Bake Function
OPERATING yOUR BREVILLE SMART OVEN™ - BAKE BAKE FUNCTION Elements Top and bottom heating elements cycle on and off to regulate the correct temperature. The top middle element is off. Recommended Rack Position Bottom rack height position. Optional Settings BAKE CONVECTION button. - Page 31 OPERATING yOUR BREVILLE SMART OVEN™ - BAKE The LCD screen will flash • Caution should be exercised when using PREHEATING. Once the oven has pans and dishes constructed of materials other than metal. If using ceramic or reached the set temperature, the glass pans or dishes it is important that temperature alert will sound.
-
Page 32: Roast Function
OPERATING yOUR BREVILLE SMART OVEN™ - ROAST ROAST FUNCTION The roasting temperature and time can be adjusted before or during the roasting cycle. Elements The roasting temperature is displayed Top and bottom heating elements cycle on as the top figure on the LCD screen. - Page 33 OPERATING yOUR BREVILLE SMART OVEN™ - ROAST NOTE NOTE Your customised ROAST temperature When roasting, the Breville enamel and time settings will remain in the grill rack may be inserted into Breville memory of the oven until you change enamel baking pan. When assembled...
-
Page 34: Pizza Function
OPERATING yOUR BREVILLE SMART OVEN™ - PIZZA At the end of the roasting cycle, the PIZZA FUNCTION oven alert will sound three times and the START/CANCEL button surround will Elements cease to illuminate. Top and bottom heating elements cycle on and off to regulate the correct temperature. - Page 35 The cooking temperature is displayed as the top figure on the LCD screen. Place the Breville pizza tray or pizza on Turn the TEMPERATURE dial to the centre of the wire rack so air flows adjust the cooking temperature in 5°C around the sides of the food.
- Page 36 OPERATING yOUR BREVILLE SMART OVEN™ - PIZZA After the PREHEATING alert has Close the oven door. sounded, the timer will automatically To preheat the stove for 15 minutes turn begin to count down in one minute the function dial to PIZZA, the top figure increments.
-
Page 37: Cookies Function
OPERATING yOUR BREVILLE SMART OVEN™ - COOKIE 10. Select the desired pizza setting and COOKIE FUNCTION press the START/CANCEL button to restart the pizza cycle. Elements Top and bottom heating elements cycle on WARNING and off to regulate the correct temperature. - Page 38 OPERATING yOUR BREVILLE SMART OVEN™ - COOKIE The baking temperature and time can be Press the START/CANCEL button adjusted before or during the baking cycle. to activate this setting. The button surround will illuminate red and the The baking temperature is displayed as oven alert will sound.
-
Page 39: Reheat Function
OPERATING yOUR BREVILLE SMART OVEN™ - REHEAT REHEAT FUNCTION NOTE Extreme caution should be exercised Elements when using lids in the oven, as Top and bottom heating elements cycle on pressure build up in a covered pan and off to regulate the correct temperature. - Page 40 OPERATING yOUR BREVILLE SMART OVEN™ - REHEAT Turn the TIME dial to adjust the NOTE reheating time in one minute increments Extreme caution should be exercised up to 1 hour, and in 5 minute increments when using lids in the oven, as between 1 and 2 hours.
-
Page 41: Warm Function
OPERATING yOUR BREVILLE SMART OVEN™ - WARM WARM FUNCTION NOTE Extreme caution should be exercised Elements when using lids in the oven, as Top and bottom heating elements cycle on pressure build up in a covered pan and off to regulate the correct temperature. - Page 42 OPERATING yOUR BREVILLE SMART OVEN™ - WARM The warming time is displayed as the bottom figure on the LCD screen. Turn the TIME dial to adjust the warming time in one minute increments up to 1 hour, and in 5 minute increments between 1 and 2 hours.
-
Page 44: Using The Plate Warming Tray
USING THE PLATE WARMING TRAy for your Breville Smart Oven™... - Page 45 One layer of ceramic plates for warming. • The optional Bamboo Cutting Board and Serving Tray accessory provided by Breville for use in the ribbed section on top of the oven. Visit www.breville.com. au for more information and refer to the Accessories Card enclosed.
-
Page 46: Care, Cleaning And Storage
CARE, CLEANING & STORAGE of your Breville Smart Oven™... -
Page 47: Cleaning The Outer Body And Door
CARE, CLEANING & STORAGE Ensure the oven is turned OFF by pressing WARNING the START/CANCEL button on the control panel. The oven is OFF when the button Do not immerse the body, power cord surround illumination goes out. Remove the or power plug in water or any other power plug from the wall outlet. -
Page 48: Cleaning The Crumb Tray
CARE, CLEANING & STORAGE CLEANING THE CRUMB TRAy STORAGE After each use, slide out the crumb tray Ensure the oven is turned OFF by and discard crumbs. Wipe the tray with a pressing the START/CANCEL button soft, damp sponge. A non-abrasive liquid on the control panel. -
Page 50: Troubleshooting
TROUBLESHOOTING... - Page 51 TROUBLESHOOTING POSSIBLE PROBLEM EASy SOLUTION • Check that the power plug is securely inserted into the outlet • Insert the power plug into an independent outlet Oven will not switch “ON” • Insert the power plug into a different outlet •...
-
Page 52: Recipes
RECIPES... - Page 53 ½ teaspoon salt the Crab dip. Spoon the filling into each ¼ teaspoon ground black pepper mushroom cap. Arrange in a single ¼ cup fresh basil, chopped layer and place on the Breville non stick 70g Goat cheese (optional) pizza pan. Set the wire rack in the bottom rack INGREdIENTS FOR ROASTEd height position and turn the FUNCTION...
- Page 54 If desired, top with crumbled goat cheese the foil together tightly, forming a pouch and set the wire rack in the top rack height and place on the Breville non-stick pizza position. Turn the function dial until pan. Set the wire rack in the bottom rack the indicator points to GRILL.
- Page 55 Brush the chicken breasts with olive oil Setting: # 4 darkness, 2 slices, and season with salt and pepper. Place 180°C/360°F, chicken into the Breville baking tray. Set Convection Fan: OFF the wire rack in the bottom rack height Makes: 4 generous servings position.
- Page 56 INGREdIENTS 1 cup/250g dry pumpkin seeds 4 cups sour dough bread, cut into ½ inch cubes ¼ cup/60ml olive oil METHOd 3 tablespoons Spice Blend (see page 57) Spread pumpkin seeds onto the Breville METHOd non-stick pizza pan. In a large bowl, toss together the cubed Set the wire rack in the middle rack sour dough bread and olive oil. Sprinkle height position and turn the function...
- Page 57 2 boneless, skinless chicken breasts, cut into METHOd 2.5cm size pieces 1 red capsicum, trimmed and seeded, cut into Spread the fennel seeds, coriander seeds 1.5cm cubes and black peppercorns onto the Breville 1 cup fresh pineapple, peeled and cored, cut into non-stick pizza pan. 1.5cm cubes Set the wire rack in the middle rack height position and turn the function dial until the indicator on the LCD FOR MARINAdE screen points to the TOAST function.
- Page 58 METHOd METHOd Evenly sprinkle unsweetened shredded Place a square piece of banana leaf coconut on the bottom of the Breville on a work surface. Spoon one quarter pizza pan. of the chicken mixture on the centre of the banana leaf. Fold sides over the Set the wire rack in the bottom rack mixture;...
- Page 59 10 x (15cm x 10cm) fresh Lasange sheets METHOd Extra butter, melted for greasing Beat the cream cheese in a medium INGREdIENTS FOR BéCHAMEL SAUCE sized bowl until smooth using Breville (WHITE SAUCE) Electric Mixer. Add mayonnaise, cheddar cheese, lemon juice, hot sauce, and 2 tablespoons unsalted butter Worcestershire sauce. Gently fold in the 2 tablespoons unbleached all purpose flour crab, basil and shallots.
- Page 60 BAKE PREPARING THE CANNELLONI COddLEd EGGS WITH SAUTEEd MUSHROOMS ANd SPINACH In a small frypan set over medium heat, Function: BAKE heat the oil. Add onion and cook for five Temperature: 160˚C/ 320˚F minutes, or until lightly browned. Add Cooking Time: 18-20 minutes garlic and cook for another 30 seconds.
- Page 61 Rub olive oil over the fillets, and sprinkle with the spice mixture. Gently rub the mixture into the flesh. Lightly oil the bottom of the Breville roasting pan (or line with non stick baking paper). Place the fillets onto the...
- Page 62 BAKE RIBS WITH ASIAN Place cooled ribs in a re-sealable plastic bag. Combine all of the remaining BARBECUE SAUCE ingredients to make the marinade and pour O of the marinade into the bag. Function: BAKE Close the bag and rub the marinade Temperature: 180˚C/360˚F around each rib.
- Page 63 BAKE BANANAS WRAPPEd IN FILO WITH ASSEMBLING THE FILO CHOCOLATE SAUCE METHOd Function: BAKE Place one piece of the cut filo pastry onto Temperature: 180˚C/ 360˚F a work surface and brush lightly with Cooking Time: 20 minutes melted butter. Place another sheet of Convection Fan: ON filo pastry on top and lightly brush with Makes: 4 generous portions,...
- Page 64 LEMON CHEESECAKE WITH Cool completely before adding the cream cheese filling. FRESH BERRIES Using a Breville food processor or mixer, Function: BAKE beat the cream cheese first until smooth, Temperature: 180˚C/360˚F for cookie crumb slowly add sugar and beat until creamy.
- Page 65 Remove from heat and add the chocolate, stirring to melt. In a separate bowl, whisk together the egg yolks and sugar using a Breville Electric Mixer until the mixture turns a thick creamy pale yellow, about 5 minutes.
- Page 66 Trim sugar. Add butter, eggs and vanilla and excess pastry and pinch the pie crust beaten until smooth using a Breville edges together to make decorative electric mixer. Fold in the chocolate pattern. Cut 4 slits in the shape of a bits and walnuts.
- Page 67 60ml/¼ cup lemon juice 30g/¼ cup plain flour ½ teaspoon baking powder Icing sugar, for sprinkling METHOd Cream butter and sugar using a Breville mixer until pale and creamy. Fold in flour and lemon rind using a large metal spoon. Press mixture into 28x18x3 cm baking pan, lined with baking paper. Set the wire rack in the bottom rack height position.
- Page 68 METHOd Insert the wire rack into the bottom rack height position and turn the FUNCTION In the Breville roasting pan, combine 2 dial until the indicator on the LCD screen tablespoons olive oil and diced eggplant. points to the ROAST function.
- Page 69 Place the ingredients into the Breville * Herbes De Provence; fresh or dried herbs roasting pan. Set the wire rack to the used mainly in southern French cuisines.
- Page 70 Turn down to a simmer and cook for 20 NOTE minutes with the lid on. Allow the soup to cool before pureeing using a Breville To reach the desired doneness of a roast, it is best to remove the roast blender or food processor.
- Page 71 Be sure to completely coat the lamb. Cover INGREdIENTS with plastic wrap and marinade at least 4 2 Cornish hens or 1.5 kg chicken (2 small ones) hours or up to 24 hours. 2 tablespoons butter, melted Place the lamb on the Breville grill rack 2 teaspoons salt in the Breville baking pan to catch the ½ teaspoon ground black pepper drippings. 1 lemon or ruby red grapefruit, cut into wedges...
- Page 72 Deli’s. If not available use 2 x small chickens. Place the chicken onto the grill rack inserted into the Breville baking pan to catch drippings. Set the wire rack in the bottom rack height position. Turn the function dial until the indicator on the LCD screen points to the ROAST function.
- Page 73 Make 1 portion of the Roasted Tomato Halves (Page 68). When cool enough to handle, remove the skin. Place the flesh and juices into a Breville blender or food processor and process until smooth. Use 3½ cups of the puree tomatoes. Set aside.
-
Page 74: Pizza Dough
Sprinkle the yeast on the skin of the roasted tomatoes. Place top of the honey water mixture and let tomatoes and all the juices in a Breville stand for 3 minutes. blender or food processor and puree In a medium bowl, mix together the until smooth. - Page 75 * Artichoke puree is available at gourmet deli’s Fresh basil leaves and some supermarkets. However, it is easy to ½ cup mozzarella cheese, shredded make artichoke puree; process 1 can or jar pickled L cup crumbled goat cheese artichokes using a Breville Food processor. L cup Balsamic Caramelized Onions (Page 55) ¼ cup black olives, pitted 10 cherry tomato halves (seeded and water TROPPO PICANTE removed) or Roasted Yellow Capsicum...
- Page 76 PIZZA TRE-FUNGHI AL SALMONE INGREdIENTS INGREdIENTS ¾ cup Tomato Sauce for pizza (Page 70) ¼ of a small red onion, thinly sliced 250g mixed mushrooms (such as button, oyster, 1 tablespoon capers portobello), sliced 2 tablespoons olive oil 40g butter, cubed ½ tablespoon white balsamic vinegar 2 cloves garlic, sliced Salt and pepper Fresh rosemary and thyme, roughly chopped 1 tablespoon olive oil for brushing Salt and pepper 125g smoked salmon, thinly sliced 125g mozzarella, shredded Fresh dill to garnish METHOd METHOd Saute mushrooms in butter with garlic In a small bowl, combine red onion, in a medium frypan over low heat. Add capers, olive oil, vinegar, season with salt freshly chopped rosemary and thyme.
- Page 77 PIZZA dESSERT PIZZAS CARAMELIZEd PEAR WITH WALNUT BANANA CHOCOLATE INGREdIENTS INGREdIENTS 40g butter, melted, for brushing 2 tablespoons sugar 40g butter, melted 2 pears, peeled, cored and thinly sliced 1 tablespoon sugar 20g butter, cubed ½ teaspoon ground cinnamon 1 tablespoon sugar 2 bananas, peeled and thinly sliced ½ cup mascarpone 100g dark or milk chocolate, melted 1 tablespoon honey ½ cup walnuts, roughly chopped and toasted METHOd Brush melted butter on the pizza dough METHOd and sprinkle with sugar and cinnamon. Brush melted butter on the pizza dough Bake using the default PIZZA setting and sprinkle 1 tablespoon sugar.
- Page 78 1 cup milk chocolate chips METHOd In a large bowl, cream together the granulated sugar, brown sugar and unsalted butter using a Breville Mixer. Beat in the egg. Add vanilla and melted chocolate and mix until combined. In a medium bowl, sift together the flour, baking soda, cornstarch and salt.
- Page 79 75g peanuts, chopped METHOd METHOd In a large bowl combine flour, sugar, In a large bowl using a Breville mixer, coconut and oats. cream together butter and sugar until light and fluffy. Add vanilla and peanut Melt butter and golden syrup in a small butter and mix well.
- Page 80 Breville is a registered trademark of Breville Pty. Ltd. A.B.N. 98 000 092 928. Copyright Breville Pty. Ltd. 2011. Due to continued product improvement, the products illustrated/photographed in this booklet may vary slightly from the actual product.
Need help?
Do you have a question about the BOV800 - ANNEXE 202 and is the answer not in the manual?
Questions and answers