Table of Contents

Subscribe to Our Youtube Channel
Related Manuals for Network Technologies KEEMUX-P2


Summary of Contents for Network Technologies KEEMUX-P2
- Page 1 NETWORK 1275 Danner Dr Tel:330-562-7070 TECHNOLOGIES Fax:330-562-1999 Aurora, OH 44202 INCORPORATED www.networktechinc.com ® KEEMUX Series KEEMUX-P2 2-Port PS/2 KVM Switch Installation and Operation Manual MAN049 Rev 4/11/07...
-
Page 2: Table Of Contents
Network Technologies Inc, 1275 Danner Drive, Aurora, OH 44202 CHANGES The material in this guide is for information only and is subject to change without notice. Network Technologies Inc reserves the right to make changes in the product design without reservation and without notification to its users. -
Page 3: Introduction
INTRODUCTION The KEEMUX-P2 switch allows one user to access two PS/2 CPUs with only one keyboard, monitor and mouse. Internal auto- boot circuitry allows both CPUs to boot simultaneously and error-free without the need for a keyboard, monitor and mouse on each CPU. -
Page 4: Features And Functions
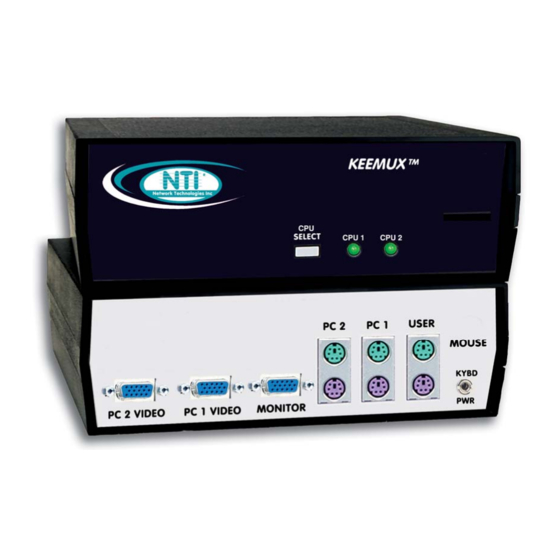
FEATURES AND FUNCTIONS K E E M U X N T I N e t w o r k T e c h n o l o g i e s I n c CPU Status LEDs- for visual indication of connection between the user and a specific CPU. Also used for visual indication of switch mode status CPU Select Switches- push to manually switch to a specific CPU Remote- (optional) for connection of RMT-2-ST remote control... -
Page 5: Installation
INSTALLATION Turn OFF power to all CPUs that will be connected to the NTI Switch before connecting or disconnecting any cables. WARNING! Damage to the CPU may result if power is not turned OFF before connecting or disconnecting cables. Connect PS/2 keyboard to “USER KEYBD” port on the rear panel of the switch. (See Fig. 1) Connect PS/2 mouse to “USER MOUSE”... - Page 6 Fig. 5 Power-Up Sequence 1. The KEEMUX-P2 is powered by the CPUs it is connected to (unless using a power supply with an option). 2. Turn ON power to monitor attached to the KEEMUX-P2. 3. Turn ON power to either or both CPU(s) attached to the KEEMUX-P2.
-
Page 7: Using The Nti Switch
USING THE NTI SWITCH The switch can be operated by the front control panel or by keyboard control. Front Panel Control Pressing the touch switch on the front panel will toggle between CPU 1 and CPU 2 and connect the selected CPU to the keyboard, monitor and mouse. -
Page 8: Audio Support
BROADCAST Mode (USE WITH EXTREME CAUTION) BROADCAST Mode is indicated when both CPU LEDs are illuminated. This mode allows the operator to send keystrokes to both active CPUs simultaneously. However, BROADCAST Mode has some critical requirements: BROADCAST Mode must be OFF when booting an attached CPU. COMMAND Mode must be OFF for keystrokes to reach attached CPU(s) when in BROADCAST. -
Page 9: Rs232 Control
RS232 CONTROL (Optional) RS232 Connections and Configuration Remote Connection The RS232 Interface is designed to meet the RS232C standard and can be controlled from any host CPU or other controller with an RS232 communications port. The pin-out for the DB-9 connector on the unit can be found on page 7. A straight through DB-9 cable (not null modem) will work for most CPUs. -
Page 10: Rs232 Interface Test Program
Dipswitches The dipswitches located next to the RS232 connection (Fig. 8) are used to configure the baud rate and address of the KEEMUX. The default baud rate is 9600. The default address is 1. Use the charts below to change the baud rate and address as needed. 1 2 3 4 5 6 7 8 DIP SWITCH BAUD RATE... - Page 11 If Matrix Options is selected, the following menu, which has 7 options, is displayed: MATRIX OPTIONS 1. Reset single unit - reset single matrix to power-up defaults (not applicable) 2. Reset all units - reset all daisy chained matrix units (not applicable) 3.
-
Page 12: Technical Specifications
TECHNICAL SPECIFICATIONS PS2 Keyboard or Mouse VGA Video Pin # Signal PIN# Signal Pin # Signal KYBD DATA MOUSE DATA GREEN BLUE KYBD CLOCK MOUSE CLOCK RED GND GREEN GND NC ID3 BLUE GND Mating face of a 6 pin miniDIN female Mating face of a 15HD male PS/2 KEYBOARD AND MOUSE VGA VIDEO... -
Page 13: Troubleshooting
(KEEMUX-P2-SW-AC Adapter). If the suggestions above have been tried and the KEEMUX-P2 KVM switch is still not functioning properly, a solution to the problem may be found on our website at http://www.networktechinc.com in the Frequently Ask Questions (FAQ) section, or, please call us directly at (800) 742-8324 (800-RGB-TECH) or (330) 562-7070 and we'll be happy to assist in any way we can. - Page 14 Man049 Rev. 4/11/07...
Need help?
Do you have a question about the KEEMUX-P2 and is the answer not in the manual?
Questions and answers