Table of Contents
Advertisement
Advertisement
Table of Contents

Related Manuals for Renkus-Heinz STXLA


Summary of Contents for Renkus-Heinz STXLA
- Page 1 Line Array User’s Manual...
-
Page 2: Technical Support
Phone: 949 588 9997 Monday through Friday between 8:00 AM and 5:00 PM Pacific Time. Ask for: Jim Mobley (Extension 104) Jonas Domkus (Extension 135) E-mail Jim@renkus-heinz.com Jonas@renkus-heinz.com... -
Page 3: Introduction
“coverage collapse” in the crossover region. The CDT1.5 CoEntrant Driver used in the STLA/9 and STXLA/9 integrates 6.5 inch carbon fiber cone and 2.5 inch voice coil titanium compression drivers into a high output wideband point source. -
Page 4: Table Of Contents
LINE ARRAY SYSTEM COMPONENTS ..................6 PN102/LA SYSTEM................................. 6 PNX102/LA SYSTEM ..............................6 ALL PN/LA SYSTEMS ..............................6 STLA L ..............................7 RRAY YSTEMS STXLA L .............................. 7 RRAY YSTEMS STLA S ................................7 YSTEMS ALL LA SYSTEMS ................................8 ARRAY DESIGN USING AIMWARE ..................... - Page 5 Line Array User’s Manual Setup Procedures..........................17 Landing The System & Loading Out ...................24 TROUBLESHOOTING & SYSTEM CHECK LIST ..................27 X12, X14, X24 ...........................27 ANALOG CONTROLLERS ............................... 27 DIGITAL CONTROLLER ............................... 27 XTERNAL AMPLIFIERS – ........................27 IGNAL PATH FOR SELF POWERED SYSTEMS ...............................
-
Page 6: Pn102/La System
Line Array User’s Manual Thank you for selecting a Renkus-Heinz Line Array System. This manual is intended to help you obtain optimum performance from your system. Your system is one of the four types described below and on the next page. -
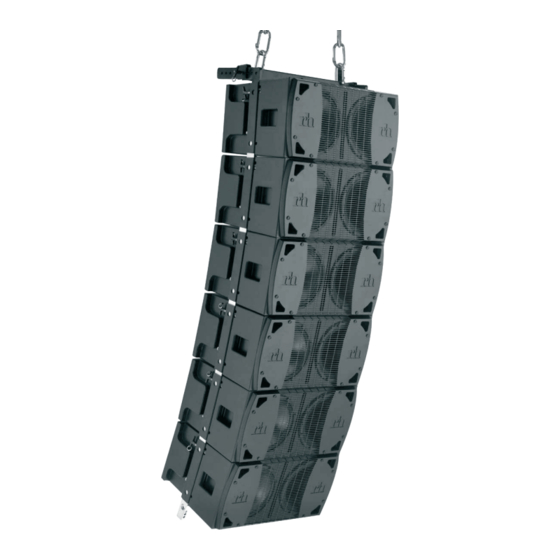
Page 7: Stla Line Array Systems
Subwoofer: DR18-2 self-powered dual 18” subwoofer recommended. STXLA Line Array Systems STXLA/9 Line Array Module. Designed for tri-amp power with external amplifiers using the X14 Controller for Loudspeaker Specific Processing. Uses the same components and pattern control technologies as the self-powered STLA/9 module. -
Page 8: All La Systems
RH Engineering has developed an acoustic lens of the “path length refractor” type in order to change the output of a horn/driver into a planar wavefront. A schematic of the HF section of a Renkus-Heinz Line Array Module looks like this: Renkus-Heinz line array modules use pattern control techniques that have been borrowed from microwave research. - Page 9 Please devote your time and attention to reading this manual. A comprehensive understanding of line array theory, curved vertical arrays and specific features of your Renkus-Heinz Line Array System will help you to operate these products safely and obtain optimal performance.
-
Page 10: Line Source Coupling Only Occurs At Longer Wavelengths/Lower Frequencies
Line Array User’s Manual Line source coupling only occurs at longer wavelengths/lower frequencies This is because adjacent sources have to be less than 1/2 wavelength apart in order to couple coherently. Audible frequencies have a wide range of wavelengths, from over 50 feet at 20 Hz to about 1/2 inch at 20 kHz. Obviously it’s easy to get two sources to couple coherently at 20 Hz, because the wavelength is about 50 feet. - Page 11 Line Array User’s Manual Straight (flat) Line Array Curved Line Array “J” Line Array...
-
Page 12: Line Arrays Are Not "Point And Shoot" Systems
Alternatively, you can download AimWare, the Renkus-Heinz Windows based software program for the design and optimization of vertical arrays. AimWare lets you define audience areas that closely model the real world of performance venues. - Page 13 Line Array User’s Manual Locate the Array In most venues your choice of location will be extremely limited. Optimize the Array Your goal is to make the frequency response curve as flat as possible while delivering the desired SPL. Use the boxes at the left of the screen to add or remove modules and to set the splay angles.
-
Page 14: System Setup: Electronics
STXLA Externally-Powered Systems STX Amplifier Selection STXLA array modules are tri-amplified. For optimum performance we recommend the X14 Controller and the following power amplifier ratings: 1,000 to 2,000 watts, RMS @ 4 ohms... -
Page 15: Source Signal
Optional CobraNet Connections The optional Renkus-Heinz CobraNet Breakout Box provides a very simple way to add CobraNet connectivity to the system. Each Breakout Box can supply signal for up to six modules. PNX/LA Externally-Powered Systems PNX Amplifier Selection PNX/LA array modules are bi-amplified. -
Page 16: Rigging Procedures
Before flying any Renkus-Heinz line array, please ensure that all necessary components are present and undamaged. The RHANG system is a professional precision tool and should be handled with extreme care. Only persons who are fully conversant with the operation of the RHANG flying hardware and provided with suitable safety equipment should install and operate the system. -
Page 17: Ground Stacking Loudspeakers Safely
Anyone who needs to climb over 6 feet high should be fitted with suitable safely equipment including a clip-on harness. Please refer to local Health and Safety legislation in your territory. Your Renkus-Heinz distributor can help with advice on access to this information. -
Page 18: Setup Procedures
Line Array User’s Manual SETUP PROCEDURES STLA line array modules can be stacked up to four high on the STDolly Splay angles can be set while the cabinets are on the ground. To set minimum splay angle, simply insert the quick- release pin through the receiving tube and into the tie bar. - Page 19 Line Array User’s Manual Splay angles can be set while the cabinets are on the ground. To set minimum splay angle, simply insert the quick-release pin through the receiving tube and into the tie bar. To set medium or maximum splay angle, two operators (one per side of the enclosure) should lift the top enclosure until the proper holes on the tie bar and receiving pin are aligned.
- Page 20 Before attaching the flybar to the top array module, attach the side pieces using the provided quick-release pins. RHANGSTLA hardware is manufactured for Renkus-Heinz by ATM Flyware. To attach the RHANGSTLA fly bar, insert it into the receiving tube and then insert the quick-release pin.
- Page 21 Line Array User’s Manual The tilt angle of the entire array is set by moving the bridle attachment bar forward or backward. When moving the bridle attachment points, check that the attachment knobs are completely locked. Also check that both sides of the top bar are located to the same hole on the angle-setting bar.
- Page 22 Line Array User’s Manual Inspect the shackles Self-powered modules require a signal connection (analog XLR or digital CobraNet). Connect the top module of each group that will receive the same signal first. All modules in the group that will receive this signal can be connected using the Looping XLR connectors. Note: if you are not using level shading, the “group is the entire array.
- Page 23 Mute buttons and LED indicators on the PM-3 Digital Tri-Amplifier. Renkus-Heinz uses the Neutrik PowerCon connector for self-powered loudspeaker systems. Each module requires its own AC cable and connector. Make sure the connector is locked into the socket.
- Page 24 Line Array User’s Manual The RHANGSTLA Tie Bar has 3 angle setting positions To set adjacent modules at 0° splay, align the bottom hole on the Tie Bar with the bottom hole in the lower module’s receiving tube. For medium splay (3° in “uptilt” position or 2° in the “downtilt” position) align the top hole in the Tie Bar with the top hole in the receiving tube.
-
Page 25: Landing The System & Loading Out
Line Array User’s Manual For maximum splay (i.e. 5° in “uptilt” position or 4° in “downtilt” position) align the middle hole on the Tie Bar with the bottom hole on the receiving tube. LANDING THE SYSTEM AND LOADING OUT Carefully lower the array onto the dolly. Align the front edge of the dolly (the one without a supporting ledge) and the front edge of the lowest module. - Page 26 Line Array User’s Manual The module’s tie bars fit into slots on the sides of the dolly. Attach the module to the dolly using quick release pins on both sides. The STDolly will support up to four modules. Remove the quick release pins from both sides of the fourth...
- Page 27 Line Array User’s Manual module from the bottom. Have one operator stabilize the dolly-stacked modules, then raise the array until the tie bars are free of the receiving tubes. Roll the dolly and the stack of modules out of the way and repeat the process until the entire array has been stacked on dollys.
-
Page 28: Troubleshooting & System Check List
Line Array User’s Manual Remove the shackles from the RHANGSLTA fly bar Detach the fly bar from the top array module. Make sure that all parts are properly stowed for transport. TROUBLESHOOTING & SYSTEM CHECK LIST X12, X24 and X14 Controllers Are the sense lines properly connected to the amplifiers? Are the correct Loudspeaker Specific Processing modules installed? D26 Digital Controller... -
Page 29: Vertical Array Configuration
Computer – Laptop or Desktop PC running Windows 95/98/2000 or XP with the current version of Renkus- Heinz AimWare installed. It is not possible to configure a Renkus-Heinz Line Array properly without using AimWare. Designs can, of course, be prepared prior to arrival at the venue, but it is often necessary to modify... -
Page 30: Testing And Maintenance
There are several critical points in the cabinets. Of primary concern are: a) The machine screws attaching the enclosure to the flying hardware b) The screws attaching the field-replaceable horn flare to the front of the enclosure (STLA & STXLA only) These fasteners should be regularly checked and tightened as necessary.
Need help?
Do you have a question about the STXLA and is the answer not in the manual?
Questions and answers