Dirt Devil Vacuum Cleaner Owner's Manual
Vacuum cleaner
Hide thumbs
Also See for Vacuum Cleaner:
- Owner's manual (36 pages) ,
- Owner's manual (24 pages) ,
- Owner's manual (18 pages)
Table of Contents
Advertisement
Available languages
Available languages
Quick Links
Download this manual
See also:
Owner's Manual
OWNER'S MANUAL
Operating and Servicing
Instructions
Please read these
instructions carefully
before using your cleaner.
Let us help you put your
vacuum together or
answer any questions, call:
1 -800-321 -1 134
(USA & Canada)
www.dirtdevil.com
AWARNING:
,
Cleaner assembly may
include small Darts. Small
02004 All rights
reserved
#
1-1 1381 2-000
3/04
For quick reference, please record your
vacuum information below.
parts can present a chok-
ing hazard.
Model #:
M ~ Q . Code:
(Mfg. code located on the lower backside of cleaner)
Advertisement
Table of Contents

Related Manuals for Dirt Devil Vacuum Cleaner


Summary of Contents for Dirt Devil Vacuum Cleaner
- Page 1 OWNER'S MANUAL Operating and Servicing Instructions Please read these instructions carefully before using your cleaner. Let us help you put your vacuum together or answer any questions, call: 1 -800-321 -1 134 (USA & Canada) www.dirtdevil.com AWARNING: Cleaner assembly may For quick reference, please record your vacuum information below.
-
Page 2: Important Safety Instructions
THlS CLEANER IS INTENDED FOR HOUSEHOLD USE ONLY. IMPORTANT SAFETY INSTRUCTIONS When you use an appliance, basic precautions should be followed, including the following: READ ALL INSTRUCTIONS BEFORE USING THE APPLIANCE. ALWAYS FOLLOW THESE SAFETY INSTRUCTIONS. BRING CLEANER TO UPRIGHT POSITION WHEN USING THE HOSE AND ATTACHMENTS. - Page 3 Do not use to pick up flammable or combustible liquids, such as gasoline, or use in areas where they may be present. Keep the vacuum cleaner on the floor. Only the hand-held vacuum cleaners may be set on furniture. Cleaner must be in the upright position to lift the rotating brush off the car- pet when doing above floor cleaning.
-
Page 4: Limited Warranty
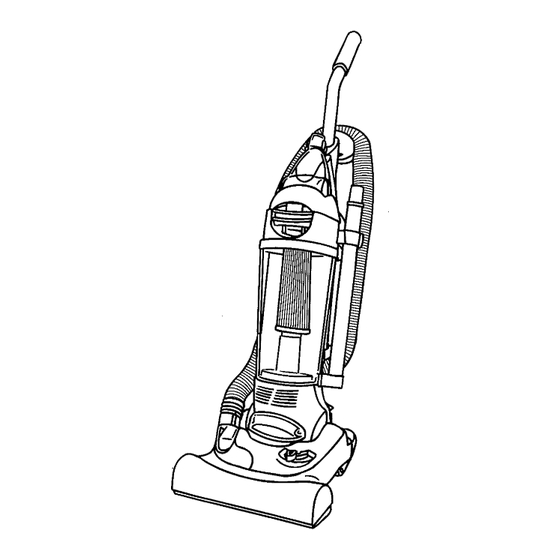
To the consumer, Royal Appliance Mfg. Co. warrants this vacuum cleanerto be free of defects in material or work- manship commencing upon the date of the original purchase. Refer to your vacuum cleaner carton for the length of warranty and save your original sales receipt to validate start of warranty period. - Page 5 FRONT VlEW BACK VlEW FRONT VlEW BACK VlEW 1. Metal Handle 16. Hose Caddy 17. Cord Guide 2. Turbo Tool" 18. Hose 3. Crevice Tool (inside extension wand) 19. Dust Brush 4. Extension Wand 5. Dirt Container Lid 20. Cord Wrap with Quick Cord Release 6.
- Page 6 lODY TO NOZZLE Slide the back panel onto To secure, insert two (2) base. screws into the front of the back panel. UPPER TOOL CADDY (BACK) HANDLE (BACK) AND TURBO TOOL" CADDY (FRONT) ASSEMBLY Slide end of long hose Align carry handle holes Place hose caddy on to Gently push metal han- onto back panel dirt...
- Page 7 Wrap hose around back of Align tabs on clear dirt passage window Clip turbo tool onto the front with the slots on the lower hose cuff. Push hose caddy (Diagram 1). Push of the turbo tool caddy. hose wand down into the right and turn hose clockwise until secure.
-
Page 8: Handle Release Pedal
CAUTION: Brush agitator continues to rotate while hose is removed or in use and at all times while cleaner is Keep hair, loose ciothing, fingers, and all paris of body away from brush area while cleaner is on. Cleaner must be in the upright position to lift the rotation brush off the carpet when cleaning above the floor. ONIOFF PEDAL HANDLE RELEASE FLOORICARPET... - Page 9 WARNING: TO REDUCE THE RISK OF INJURY FROM MOVING PARTS - UNPLUG BEFORE SERVICING. For filter replacement (Part # 2-JC0280-000) please call 1-800-321-1134 or visit www.dirtdevil.com to locate a dealer nearest you. NOTE: Unplug cleaner before changing filter. NOTE: For best performance, replace filter yearly. EMPTY AND CLEAN DIRT CONTAINER De~ress latch to remove dirt lemove lid by grasping dirt...
- Page 10 WARNING: TO REDUCE THE RISK OF INJURY FROM MOVING PARTS - UNPLUG CLEANER BEFORE CHANGING BELT OR BRUSHROLL. TO REMOVE BELT Lay cleaner flat and flip Lift nozzle guard off. Lift and remove brushroll. cleaner to expose nozzle Dispose of old belt. base.
- Page 11 WARNING: TO REDUCE THE RlSK OF ELECTRIC SHOCK - UNPLUG CLEANER BEFORE REMOVING OR REPLACING LIGHTBULB. This cleaner uses a common automotive lamp #906,13.0 volts. For bulb replacement call 1-800-321-1134 or your local auto parts store. TOOL REQUIRED: FLATHEAD SCREWDRIVER Pull bulb out of socket to Secure the headlight lens by Lean cleaner handle back.
-
Page 12: Customer Service
PROBLEM POSSIBLE REASON POSSIBLE SOLUTION 1. Power cord not firmly 1. Plug unit in firmly. Cleaner won't run plugged into outlet. 2. Blown fuse or tripped breaker. 2. Check fuse or breaker in home. Replace fuselreset breaker. 3. Needs service. 3. - Page 13 MANUAL DEL PROPlETARlO lnstrucciones de Funcionamiento y Sewicio Por favor lea estas instrucciones con cuidado antes de usar su aspiradora. Permitanos ayudarle a ensamblar su aspiradora o a contestar sus preguntas, llame al: 1-800-321 -1 134 (EE.UU. y Canada) www.dirtdevil.com AADVERTENCIA: Para tener una referencia dpida, anota por favor la inforrnacion de su aspiradora aqui.
-
Page 14: Instrucciones De Seguridad Importantes
ESTA ASPIRADORA ESTA DISENADA PARA U S 0 DOMESTICO SOLAMENTE. INSTRUCCIONES DE SEGURIDAD IMPORTANTES Cuando use un electrodomestico se deben seguir precauciones basi- cas, incluyendo las siguientes: LEA TODAS LAS INSTRUCCIONES ANTES DE USAR EL APARATO. SIEMPRE SlGA ESTAS INSTRUCCIONES DE SEGURIDAD. PONGA LA ASPIRADORA EN POSICION VERTICAL CUANDO USE LA MANGUERA Y LOS ACCESORIOS. - Page 15 No lo desconecte tirando del cordon electrico. Para desconectarlo, tome la clavija, no el cordon electrico. No tome la clavija o el aparato con las manos mojadas. No coloque objetos en las aberturas. No lo use con una abertura bloquea- da;...
- Page 16 FELICITACIONES Usted es ahora el orgulloso propietario de una Dirt DevilB. Confiamos en que su nueva adquisicidn le ofrecerii muchos aiios de satisfaccidn. Nuestra compaiiia diseii6 y desarrolld este product0 tenihdolo a usted en mente. Estamos muy orgullosos de nuestros productos y esperamos que usted estC igualmente satisfecho con su calidad y rendimiento.
- Page 17 VISTA DE LA VISTA DE LA PARTE FRONTAL PARTE POSTERIOR VISTA DE LA PARTE FRONTAL VISTA DE LA PARTE POSTERIOR 1. Asa de metal 16. Contenedor de la manguera 2. Turbo Toolm 17. Guia del Cordon Electrico 3. Accesorio para Hendiduras (en la 18.
- Page 18 CUERPO A LA BOQUILLA Para asegurar inserte dos (2 Deslice la cubierta posterior tornillos en la seccion front: en la base. de la cubierta posterior. ENSAMBLAJE DEL CONTENEDOR CONTENEDOR DE ACCESORIOS DE LA TURBOBOQUILLA (FRENTE) SUPERIOR (FRENTE) Y DEL ASA (PARTE POSTERIOR) Coloque el contenedor Empuje suavemente de la manguera en la...
-
Page 19: Almacenamiento De Accesorios
TURBOBOQUILLA GUERA POSTERIOR MANGUERA LATERAL Sujete la turboboquilla en la Enrolle la rnanguera alrededor Alinee las lenguetas de la tapa parte frontal de su contenedor. de la parte posterior del con- con las ranuras en el recipi- tenedor (Diagrarna 1). Ernpuje ente. - Page 20 funcionando. ~anfenoa lejos d d h a del cepillo elpelo, la ropa suelta, ios dedos otGs parfes del cuerpo cuando la aspiradora esie funcionando. La aspiradora debe estar en posicion vertical aara levantar de la alfombra el cepillo giratorio cuando limpie por encima del nivel del piso.
- Page 21 Para el filtro.de reemplazo (No. de Pa.rle2-JCO280:OOO) por favor llame al 1-800-321-1134 o visite www.dirtdev11.com para localizar al dlstrlbuidor mas cercano a usted. NOTA: Desconecte la aspiradora antes de cambiar el filtro. NOTA: Para on rnejor desempeiio, reernplace el filtro cada aiio. VAC~E Y LlMPlE EL REClPlENTE DE POLVO Oprirna el seguro para Retire la tapa al tornar el...
- Page 22 ADVERTENCIA: PARA REDUCIR EL RIESGO DE LESIONES CAUSADAS POR LAS PARTES MOVILES, DESCONECTE LA ASPIRADORA ANTES DE CAMBIAR LA BANDA 0 EL CEPILLO GIRATORIO. Acueste la aspiradora y volteela Levante la proteccion de la Levante y retire el cepillo para ver la base de la boquilla. boquilla.
- Page 23 ANTES DE RETIRAR 0 REEMPLAZAR EL FOCO. Esta aspiradora utiliza un foco automotor comun No.906, 13.0 voltios. Para focos de reemplazo, llame al 1-800-321-1134 o a su tienda de partes automotrices. Incline hacia atras el asa de Para retirar el foco, saquelo del Fije la lente de la luz frontal recepiAculo.
- Page 24 as esten rnetidas v aire para cerrar el alojamiho inferior. PROBLEMA SOLUCIONES POSIBLES La aspiradora no 1. Conecte la unidad con firrneza. 1. El cordon electrico no esti bien funciona conectado en la torna de corriente 2. Fusible quernado o interruptor 2.
- Page 25 attaches et fates pivoter "-7-7 le boitier inferieur pour le fermer. 1. Branchez fermement le cordon L'aooareil ne fonkiionne pas n'est pas bien inseree dans la d'alimentation. prise de courant. 2. Un fusible est grille ou le 2. Verifiez le fusible ou le disjoncteur. Remplacei disjoncteur est d6clenche.
- Page 26 AVANT D'ENLEVER ET DE REMPLACER L'AMPOULE. Cet aspirateur utilise une ampoule automobile courante : no 906,13,0 volts. Pour acheter une ampoule composez le 1-800-321-1134 ou contactez votre magasin de pieces automobiles. TETE OUTlL NECESSAIRE : TOURNEVIS A PLATE Tirez sur I'ampoule pour la sor- Fixez-la lampe a I'aide des Basculez la poignee de Paspi- rateur.
- Page 27 OUTlL NECESSAIRE : TOURNEVIS A POINTE CRUCIFORME AVERTISSEMENT : POUR EVITER DE VOUS BLESSER AVEC LES PIECES EN MOUVEMENT, DEBRANCHEZ L'APPAREIL AVANT DE REMPLACER LA COURROIE OU LE ROULEAU-BROSSE. Posez I'aspirateur a plat Soulevez le dispositif de pro- Les fleches indiquent I'em- placement des vis.
- Page 28 L'APPAREIL AVANT DE PROGEDER A SON ENTRETIEN. Pour obtenir un filtre de rechange (no de piece 2-JC0280-000) veuillez appeler le 1-800-321-1134 ou visitez le site www.dirtdevil.com pour connaitre le centre de service le plus proche. REMARQUE: Dkbranchez I'aspirateur avant de changer le filtre. REMARQUE: Pour on meilleur rendement, remplacez le filtre chaque annee.
- Page 29 lorsque I'aspirateur fonctionne. Ganlez les cheveux, les vt?ements amples, et toute partie du corps a I'ecart de la zone de la brosse l o ~ q u e I'aspiratur est en marche. L'aspirateur doit I r e en position verticale pour pouvoir lever la brosse rotative el nettoyer au-dessus du sol. PEDALE DE NETTOYAGE DU SOLIDES TAPlS DEGAGEMENT DE...
- Page 30 POUR INSTALLER POUR FIXER LE POUR FIXER LE L'ACCESSOIRE TURBO Attachez I'accessoire turbo a Enroulez le tuyau a I'arriere Alignez les languettes situees I'avant du support a acces- du support de tuyau (Schema sur la fendre du passage de la 1).
Need help?
Do you have a question about the Vacuum Cleaner and is the answer not in the manual?
Questions and answers