Dirt Devil Vacuum Cleaner Owner's Manual
Vacuum cleanerdirt devil
Hide thumbs
Also See for Vacuum Cleaner:
- Owner's manual (36 pages) ,
- Owner's manual (28 pages) ,
- Owner's manual (18 pages)
Advertisement
Available languages
Available languages
Find GENUINE Replacement Parts at
www.dirtdevil.com
• Please read these instructions
carefully before using your
Lightweight Upright.
• Let us help you put your vacuum
together or answer any questions,
call:
1-800-321-1134
(USA & Canada)
www.dirtdevil.com
WARNING:
Cleaner assembly may include small parts.
Small parts can present a choking hazard.
Warranty Registration
• Online at: www.dirtdevil.com
• Mail: Royal Appliance Mfg
7005 Cochran Rd.
Glenwillow, Ohio 44139
Español - página E1
OWNER'S MANUAL
Operating and Servicing Instructions
BELT STYLE
This cleaner uses the
following parts:
FILTER TYPE
For quick reference, please record your
vacuum information below.
Model #:
Mfg. Code:
(Mfg. code located on the lower backside of cleaner)
©2007 All rights reserved # 1-113224-000
19
F22
3/07
Advertisement

Subscribe to Our Youtube Channel
Related Manuals for Dirt Devil Vacuum Cleaner


Summary of Contents for Dirt Devil Vacuum Cleaner
- Page 1 OWNER’S MANUAL Operating and Servicing Instructions BELT STYLE Find GENUINE Replacement Parts at This cleaner uses the www.dirtdevil.com following parts: FILTER TYPE • Please read these instructions carefully before using your Lightweight Upright. • Let us help you put your vacuum together or answer any questions, call: 1-800-321-1134 (USA & Canada) www.dirtdevil.com...
- Page 2 THIS VACUUM CLEANER IS INTENDED FOR HOUSEHOLD USE ONLY. IMPORTANT SAFETY INSTRUCTIONS When you use an appliance, basic precautions should always be followed, including the following: • READ ALL INSTRUCTIONS BEFORE USING THE APPLIANCE. • ALWAYS FOLLOW THESE SAFETY INSTRUCTIONS. • BRING VACUUM CLEANER TO UPRIGHT POSITION WHEN USING THE HOSE AND ATTACHMENTS. • DO NOT LEAVE VACUUM CLEANER UNATTENDED WHEN PLUGGED IN. • REGULARLY CHECK THE FILTER TO CLEAN OR REPLACE. • WARNING: FULLY ASSEMBLE CLEANER BEFORE OPERATING. • WARNING: DO NOT USE SHARP OBJECTS TO CLEAN OUT THE HOSE SINCE THEY COULD CAUSE DAMAGE. • OCCASIONALLY REMOVE BRUSH AND CLEAN DEBRIS FROM END CAPS TO KEEP BRUSH ROTATING SMOOTHLY. • WARNING: THE CORDS, WIRES, AND/OR CABLES SUPPLIED WITH THIS PRODUCT CONTAINS CHEMICALS, INCLUDING LEAD OR LEAD COMPOUNDS, KNOWN TO THE STATE OF CALIFORNIA TO CAUSE CANCER AND BIRTH DEFECTS OR OTHER REPRODUCTIVE HARM. WASH HANDS AFTER USING.
- Page 3 • Keep the vacuum cleaner on the floor. Only the hand-held vacuum cleaners may be set on furniture. • Vacuum cleaner must be in the upright position to lift the rotating brush off the carpet when doing above floor cleaning.
-
Page 4: Table Of Contents
Troubleshooting Guide ....... . Page 10 LIMITED WARRANTY To the consumer, Royal Appliance Mfg. Co. warrants this vacuum cleaner to be free of defects in material or workmanship commencing upon the date of the original purchase. Refer to the data plate label on your vacuum cleaner for the length of warranty and save your original sales receipt to validate start of warranty period. -
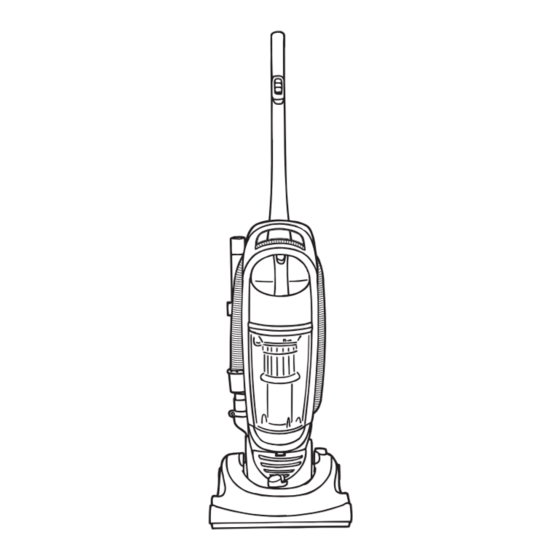
Page 5: Features
FEATURES FRONT BACK FRONT BACK 12. Cord guide 1. Handle grip 13. Upper handle release button 2. On/Off switch 14. Stretch hose 3. Carry handle 15. Upper cord wrap with quick cord release 4. Dirt container release button 16. Long power cord 5. Filter 17. Dust brush 6. Filter frame 18. Lower cord wrap 7. Dirt container 19. Handle release pedal 8. Pre-Motor Filter (located 20. Wheels under dirt container) 21. Lower hose/Clog clean-out 9. Exhaust filter 22. Extension wand 10. Height adjust lever 23. Crevice tool 11. Nozzle... -
Page 6: How To Assemble
HOW TO ASSEMBLE SECURE BACK HOSE TOOL STORAGE Attach tools: (a) Slide the dust Flip handle up until it Wrap hose around back of hose caddy (Diagram locks into place. 2). Push hose wand down into the right side of brush onto post on the back of cleaner (Diagram 2a). - Page 7 HOW TO OPERATE: CONTINUED CAUTION: Brush agitator continues to rotate while hose is removed or in use and at all times while cleaner is on. Keep hair, loose clothing, fingers, and all parts of body away from brush area while cleaner is on. Cleaner must be in the upright position to lift the rotation brush off the carpet when cleaning above the floor. ABOVE FLOOR CLEANING Choose of the handy a c c e s s o r i e s hose alone. Simply push the attachment...
-
Page 8: Dirt Container & Filter: Removal & Replacement
DIRT CONTAINER & FILTER: REMOVAL & REPLACEMENT WARNING: TO REDUCE THE RISK OF INJURY FROM MOVING PARTS - UNPLUG BEFORE REMOVING OR REPLACING FILTER. NOTE: For best performance, replace HEPA filter every 6 months. Please use reminder label located on filter cap to record replacement date. FILTER TYPE For F22 filter replacement, please visit our website at www.dirtdevil.com to buy online or call customer service at 1-800-321-1134. -
Page 9: Exhaust Filter: Removal & Replacement
DIRT CONTAINER & FILTER: REMOVAL & REPLACEMENT: CONTINUED REPLACE FILTER FRAME REPLACE HEPA FILTER 10a. Reattach filter frame to dirt Return HEPA filter to Return lid to dirt Return dirt container to tube (Diagram 10). Return lid. Twist clockwise container. Twist base of unit. filter frame assembly to dirt to secure in place. clockwise container (Diagram 10a). -
Page 10: Belt Or Brushroll: Removal & Replacement
BELT OR BRUSHROLL: REMOVAL & REPLACEMENT TOOL REQUIRED: PHILLIPS SCREWDRIVER WARNING: TO REDUCE THE RISK OF INJURY FROM MOVING PARTS - UNPLUG BEFORE CHANGING BELT OR BRUSHROLL. BELT STYLE For Belt Style 19 replacements, please visit our website at www.dirtdevil.com to buy online or call customer service at 1-800-321-1134. TO REMOVE BELT Lay cleaner flat and flip cleaner to Rotate/pivot the nozzle guard Lift and remove brushroll. -
Page 11: Clog Maintenance
CLOG MAINTENANCE TOOL REQUIRED: PHILLIPS SCREWDRIVER WARNING: TO REDUCE THE RISK OF INJURY FROM MOVING PARTS - UNPLUG BEFORE CLEANING CLOG. NOTE: First check brushroll for clog, if clog persists, then check lower hose. Locate lower hose/clog clean-out Press the two tabs and pull lower To replace lower hose, snap (see “FEATURES”, number 21 hose down and away from cleaner. - Page 13 MANUAL DEL PROPIETARIO Instrucciones de Funcionamiento y Servicio ESTILO DE Encuentre piezas de repuesto BANDA Esta aspiradora usa GENUINAS en las siguientes piezas: TIPO DE www.dirtdevil.com FILTRO • Por favor lea estas instrucciones con cuidado antes de usar su aspiradora ligera. • Permítanos ayudarle a ensamblar su aspiradora o a contestar sus preguntas, llame al: 1-800-321-1134 (EE.UU. y Canadá)
- Page 14 ESTA ASPIRADORA ESTÁ DISEÑADA PARA USO DOMÉSTICO SOLAMENTE LIMPIEZA DE ATASCOS INSTRUCCIONES DE SEGURIDAD IMPORTANTES HERRAMIENTA NECESARIA: DESTORNILLADOR PHILLIPS Cuando use un electrodoméstico se deben seguir precauciones básicas, ADVERTENCIA: PARA REDUCIR EL RIESGO DE LESIONES CAUSADAS POR LAS PARTES MÓVILES, DESCONECTE LA ASPIRADORA ANTES DE LIMPIAR EL ATASCO. incluyendo las siguientes: NOTA: Primero inspeccione si hay atascos en el cepillo giratorio. Si el atasco continúa inspeccione la manguera inferior. • LEA TODAS LAS INSTRUCCIONES ANTES DE USAR EL APARATO.
- Page 15 • Mantenga lejos de las aperturas y partes móviles, el pelo, ropa suelta, dedos y BANDA Y CEPILLO: QUITAR Y REEMPLAZAR todas las partes del cuerpo. HERRAMIENTA REQUERIDA: DESTORNILLADOR PHILLIOPS • No aspire objetos que estén quemándose o emitiendo humo, tales como cigarrillos, ADVERTENCIA: PARA REDUCIR EL RIESGO DE LESIONES CAUSADAS POR LAS PARTES MÓVILES, cerillos o cenizas calientes.
- Page 16 RECIPIENTE DE POLVO Y FILTRO: RETIRO Y REEMPLAZO: FELICITACIONES CONTINUACIÓN Usted es ahora el orgulloso propietario de una Dirt Devil ® . Confiamos REPOSICIÓN DEL REPOSICIÓN DEL en que su nueva adquisición le ofrecerá muchos años de satisfacción. BASTIDOR DEL FILTRO FILTRO HEPA Nuestra compañía diseñó y desarrolló este producto teniéndolo a 10a. usted en mente. Estamos muy orgullosos de nuestros productos y esperamos que usted esté igualmente satisfecho con su calidad y rendimiento. Gracias por su apoyo a los productos Dirt Devil ® Visite nuestro sitio Web en www.dirtdevil.com Vuelva a fijar el bastidor del Vuelva a colocar el filtro Coloque de nuevo la Regrese el recipiente...
- Page 17 RECIPIENTE DE POLVO Y FILTRO: RETIRO Y REEMPLAZO CARACTERÍSTICAS ADVERTENCIA: PARA REDUCIR EL RIESGO DE LESIONES CAUSADAS POR LAS PARTES MÓVILES, DESCONECTE LA PARTE FRONTAL PARTE POSTERIOR ASPIRADORA ANTES DE RETIRAR O COLOOCAR EL FILTRO. NOTA: Para un mejor desempeño, reemplace el filtro HEPA cada 6 meses. Por favor use la etiqueta ubicada en la tapa del filtro para registrar la fecha de reemplazo. TIPO DE FILTRO Para el reemplazo del filtro F22, por favor visite nuestro sitio Web en www.dirtdevil.com para comprar en línea o llame a servicios al cliente al 1-800-321-1134.
- Page 18 CÓMO ENSAMBLAR CÓMO FUNCIONA: CONTINUACIÓN FIJACIÓN DE LA MANGUERA ALMACENAMIENTO PRECAUCIÓN: El agitador del cepillo continúa girando cuando usted usa o retira la manguera o si la aspirdora POSTERIOR DE ACCESORIOS está funcionando. Mantenga lejos del área del cepillo el pelo, la ropa suelta, los dedos y otras partes del cuerpo cuando la aspiradora esté funcionando. La aspiradora debe estar en posición vertical para levantar de la alfombra el cepillo giratorio cuando limpie por encima del nivel del piso. LIMPIEZA POR ENCIMA DEL NIVEL DEL PISO Elija cualquiera de los útiles accesorios o use la manguera sola.
Need help?
Do you have a question about the Vacuum Cleaner and is the answer not in the manual?
Questions and answers