Table of Contents
Advertisement
Available languages
Available languages
Find GENUINE Replacement Parts at
www.dirtdevil.com
• Please read these instructions
carefully before using your
lightweight vacuum.
• Let us help you put your vacuum
together or answer any questions,
call:
1-800-321-1134
(USA & Canada)
www.dirtdevil.com
WARNING:
Cleaner assembly may include small parts.
Small parts can present a choking hazard.
Warranty Registration
• Online at: www.dirtdevil.com
• Mail: Royal Appliance Mfg
7005 Cochran Rd.
Glenwillow, Ohio 44139
Español - página E1
OWNER'S MANUAL
Operating and Servicing Instructions
BELT STYLE
This cleaner uses the
following parts:
FILTER TYPE
For quick reference, please record your
vacuum information below.
Model #:
Mfg. Code:
(Mfg. code located on the lower backside of cleaner)
©2006 All rights reserved # 1-113256-000
THIS VACUUM CLEANER IS INTENDED FOR HOUSEHOLD USE ONLY.
IMPORTANT SAFETY INSTRUCTIONS
When you use an appliance, basic precautions should always be followed,
including the following:
• READ ALL INSTRUCTIONS BEFORE USING THE APPLIANCE.
• ALWAYS FOLLOW THESE SAFETY INSTRUCTIONS.
• BRING VACUUM CLEANER TO UPRIGHT POSITION WHEN USING THE HOSE
15
AND ATTACHMENTS.
• DO NOT LEAVE VACUUM CLEANER UNATTENDED WHEN PLUGGED IN.
F15
• REGULARLY CHECK THE FILTER TO CLEAN OR REPLACE.
• WARNING: FULLY ASSEMBLE CLEANER BEFORE OPERATING.
• WARNING: DO NOT USE SHARP OBJECTS TO CLEAN OUT THE HOSE
SINCE THEY COULD CAUSE DAMAGE.
• OCCASIONALLY REMOVE BRUSH AND CLEAN DEBRIS FROM END CAPS TO
KEEP BRUSH ROTATING SMOOTHLY.
• WARNING: THE CORDS, WIRES, AND/OR CABLES SUPPLIED WITH THIS
PRODUCT CONTAINS CHEMICALS, INCLUDING LEAD OR LEAD COMPOUNDS,
KNOWN TO THE STATE OF CALIFORNIA TO CAUSE CANCER AND BIRTH
DEFECTS OR OTHER REPRODUCTIVE HARM. WASH HANDS AFTER USING.
WARNING: TO REDUCE THE RISK OF FIRE,
ELECTRIC SHOCK OR INJURY:
• Do not leave appliance when plugged in. Unplug from outlet when not in use
and before servicing.
• Do not use outdoors or on wet surfaces. Electrical shock could occur.
• Do not allow to be used as a toy. Close attention is necessary when used by or
near children.
• Use only as described in this manual. Use only manufacturer's recommended
attachments.
• Do not use with damaged cord or plug. If appliance is not working as it should, has
been dropped, damaged, left outdoors, or dropped into water, return it to a service
center for inspection. Call 1-800-321-1134 for the nearest service center.
• Do not pull or carry by cord, use cord as handle, close a door on cord, or pull cord
around sharp edges or corners. Do not run appliance over cord. Keep cord away
from heated surfaces.
• Do not unplug by pulling on cord. To unplug, grasp the plug, not the cord.
• Do not handle plug or appliance with wet hands.
• Do not put any objects into openings. Do not use with any opening blocked; keep
free of dust, lint, hair, and anything that may reduce air flow.
• Keep hair, loose clothing, fingers, and all parts of body away from openings and
moving parts.
• Do not pick up anything that is burning or smoking, such as cigarettes, matches,
or hot ashes.
5/06
2
Advertisement
Table of Contents

Related Manuals for Dirt Devil Vacuum


Summary of Contents for Dirt Devil Vacuum
-
Page 1: Important Safety Instructions
• READ ALL INSTRUCTIONS BEFORE USING THE APPLIANCE. • ALWAYS FOLLOW THESE SAFETY INSTRUCTIONS. • BRING VACUUM CLEANER TO UPRIGHT POSITION WHEN USING THE HOSE BELT STYLE AND ATTACHMENTS. • DO NOT LEAVE VACUUM CLEANER UNATTENDED WHEN PLUGGED IN. -
Page 2: Table Of Contents
Troubleshooting Guide....... . . Page 10 LIMITED WARRANTY To the consumer, Royal Appliance Mfg. Co. warrants this vacuum cleaner to be free of defects in material or workmanship commencing upon the date of the original purchase. Refer to your vacuum cleaner carton for the length of warranty and save your original sales receipt to validate start of warranty period. -
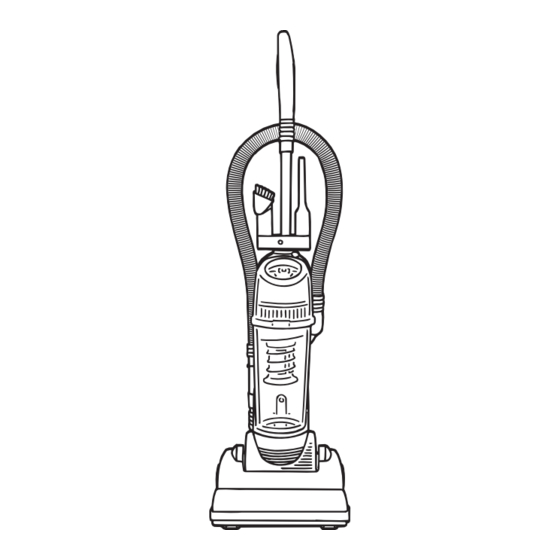
Page 3: Features
FEATURES FRONT VIEW FRONT VIEW 1. Handle Grip/Carry Handle 13. Hose Clip 2. Stretch Hose 14. Upper Cord Wrap with Quick 3. Crevice Tool 4. Tool Caddy 15. Long power cord 5. On/Off switch 16. Lower Hose/Clog Clean-out 6. Dirt Container Release Button 17. -
Page 4: Floor/Carpet Cleaning
HOW TO OPERATE: CONTINUED FLOOR/CARPET CLEANING Move the handle and adjust it to the desired position for (a) operating the cleaner, and (b) lowering handle to clean under furniture. DIRT CONTAINER & FILTER: REMOVAL & REPLACEMENT WARNING: TO REDUCE THE RISK OF INJURY FROM MOVING PARTS - UNPLUG BEFORE REMOVING OR REPLACING FILTER. -
Page 5: Hose And Tool Usage
BELT OR BRUSHROLL REMOVAL & REPLACEMENT: CONTINUED TO REPLACE BELT OR BRUSHROLL MOTOR SHAFT END CAP Slide belt onto motor shaft. Place new belt in area of brushroll without bristles. Reattach nozzle guard by Flip cleaner back over and replace firmly pushing down until it all six (6) screws. -
Page 6: Manuel Du Propriétaire
MANUEL DU PROPRIÉTAIRE Notice d’utilisation et d’entretien Vous trouverez des pièces de Cet aspirateur rechange d’ORIGINE sur le site fonctionne avec les www.dirtdevil.com pièces suivantes : • Veuillez lire attentivement ces instructions avant d’utiliser votre aspirateur léger. • Nous pouvons vous aider à assembler votre aspirateur et à... -
Page 7: Garantie Limitée
à être utilisé. REMARQUE : L’aspirateur doit rester débranché pendant la période de refroidissement de 30 minutes. FÉLICITATIONS ! Vous êtes désormais l’heureux propriétaire d’un Dirt Devil persuadés que cet appareil vous satisfera pendant plusieurs années. Nous avons conçu ce produit pour vous faciliter la vie. -
Page 8: Caractéristiques
CARACTÉRISTIQUES AVANT AVANT 1. Manche de la poignée/Poignée de transport 13. Collier de serrage 2. Tuyau flexible 14. Dispositif d’enroulement supérieur du 3. Suceur plat 4. Support à accessoires 15. Cordon d’alimentation long 5. Interrupteur marche/arrêt 16. Tuyau inférieur/Porte anti-obstruction 6. -
Page 9: Courroie Et Rouleau-Brosse : Retrait Et Réinstallation
FONCTIONNEMENT : SUITE NETTOYAGE DU SOL/DES MOQUETTES POIGNÉE DE TRANSPORT Déplacez la poignée et réglez-la à position souhaitée lorsque vous (a) faites fonctionner l’aspirateur, et (b) abaissez-la pour nettoyer sous les meubles. VIDE-POUSSIERE ET FILTRE : RETRAIT ET RÉINSTALLATION AVERTISSEMENT : POUR ÉVITER DE VOUS BLESSER AVEC LES PIÈCES EN MOUVEMENT, DÉBRANCHEZ L’APPAREIL AVANT D’ENLEVER OU DE RÉINSTALLER LE FILTRE. -
Page 10: Utilisation Du Tuyau Et Des Accessoires
COURROIE OU ROULEAU-BROSSE RETRAIT ET RÉINSTALLATION : SUITE POUR REMPLACER LA COURROIE OU LE ROULEAU-BROSSE ARBRE MOTEUR COURONNE D’EXTRÉMITÉ Glissez la courroie sur l’arbre de Placez la nouvelle courroie moteur. dans la partie du rouleau- brosse n’ayant pas de crins. Réinstallez le dispositif protection suceur en appuyant... -
Page 11: Instrucciones De Seguridad Importantes
MANUAL DEL PROPIETARIO Instrucciones de Funcionamiento y Servicio Encuentre piezas de repuesto Esta aspiradora usa GENUINAS en las siguientes piezas: www.dirtdevil.com • Por favor lea estas instrucciones con cuidado antes de usar su aspiradora ligera. • Permítanos ayudarle a ensamblar su aspiradora o a contestar sus preguntas, llame al: 1-800-321-1134... - Page 12 30 minutos. FELICITACIONES Usted es ahora el orgulloso propietario de una Dirt Devil en que su nueva adquisición le ofrecerá muchos años de satisfacción. Nuestra compañía diseñó y desarrolló este producto teniéndolo a usted en mente.
-
Page 13: Cómo Ensamblar
CARACTERÍSTICAS PARTE FRONTAL PARTE FRONTAL 1. Empuñadura del asa/Asa de transporte 13. Abrazadera de la manguera 2. Manguera extensible 14. Gancho superior para el cordón 3. Accesorio para Hendiduras de polvo 4. Contenedor de la Accesorios 15. Cordón eléctrico largo 5. -
Page 14: Limpieza De Pisos/Alfombras
CÓMO FUNCIONA: CONTINUACIÓN LIMPIEZA DE PISOS/ALFOMBRAS Mueva el asa y ajústela en la posición deseada para (a) operar la aspiradora y (b) bajar el asa para limpiar debajo de los muebles. RECIPIENTE DE POLVO Y FILTRO: RETIRO Y REEMPLAZO ADVERTENCIA: PARA REDUCIR EL RIESGO DE LESIONES CAUSADAS POR LAS PARTES MÓVILES, DESCONECTE LA ASPIRADORA ANTES DE RETIRAR O COLOOCAR EL FILTRO. -
Page 15: Uso Del Accesorio Y La Manguera
BANDA Y CEPILLO RETIRO Y REEMPLAZO: CONTINUACIÓN REEMPLAZO DE LA BANDA O DEL CEPILLO GIRATORIO EJE DEL MOTOR TAPA FINAL Deslice la banda en el eje del Coloque la banda nueva en motor. el área sin cerdas del cepillo giratorio. Vuelva a colocar la protección boquilla empujándola...
Need help?
Do you have a question about the Vacuum and is the answer not in the manual?
Questions and answers
What are regular cleaning instructions (filter,etc.)? DD Multi-Surface UD76210V