Table of Contents
Advertisement
Advertisement
Table of Contents

Related Manuals for Honeywell Accenta


Summary of Contents for Honeywell Accenta
-
Page 1: User Guide
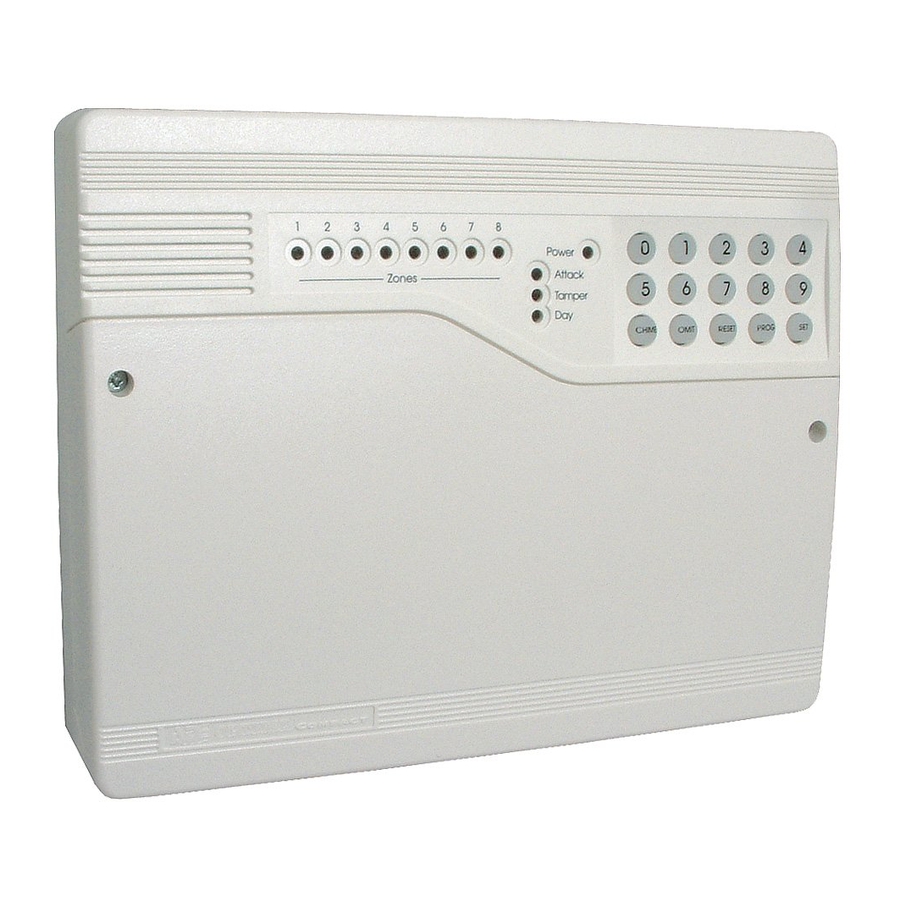
Accenta/Optima User Guide ZONE 1 2 3 4 5 6 7 8 Zones Accenta + mini ccenta Servicing Organisation (Installer) name: Telephone Number: Date of Installation: Account Number: Honeywell Security EKZ014500A English... -
Page 3: Table Of Contents
Accenta/Optima User Guide Table of Contents Contents Introduction......................1 Codes ........................1 Alarm System Operation ..................1 Personal Attack ...................... 1 Fire Zones ......................1 Power Indicator ...................... 1 Signalling Device ....................1 How to Set the System ..................2 How to Unset the System .................. - Page 4 Accenta/Optima User Guide Table of Contents...
-
Page 5: Introduction
This booklet describes three versions of the alarm system. The Optima version has the keypad and indicators on the main control panel. The Accenta version has the keypad and indicators on a small remote LCD or LED keypad. You operate the alarm system by pressing keys on the keypad and viewing the indicators. Both alarm systems work the same way. -
Page 6: How To Set The System
Ensure that pets do not have access to the protected areas as they can cause a false alarm. NOTE: The Accenta Remote LED keypad is not shown. It will have the same indications as the Optima compact panel with built-in keypad. -
Page 7: How To Unset The System
Accenta/Optima User Guide How to Unset the System How to Unset the System When you enter your premises you need to unset (turn off) the system. LCD Keypad: S u n d a y 0 1 - J a n •... -
Page 8: How To Part Set The System
Accenta/Optima User Guide How to Part Set How to Part Set the System If your installer has programmed your system for part set operation you can set certain zones of the system while others remain unset. Part set operation is often used at night time, and it permits you to freely walk around the bedrooms while the living area and outside doors are protected. -
Page 9: How To Silence An Alarm And Reset The System
Accenta/Optima User Guide How to Silence an Alarm LED Keypad: 1 2 3 4 5 6 7 8 The LED should be on. Zones • Enter your code [0][1][2][3]. The exit beep starts. [0][1][2][3] then • Press the key. The exit tone stops and the zone LED’s 1to 3 come on. -
Page 10: How To Omit Zones
Accenta/Optima User Guide How to Omit Zones LED Keypad: • Enter your code [0][1][2][3]. [0][1][2][3] The alarm stops, and the Zone, LED’s come on to show the cause of the alarm. 1 2 3 4 5 6 7 8 NOTE: When 2 or more LED’s are on, the flashing indicator shows the first... -
Page 11: How To Quick Set The System
Accenta/Optima User Guide How to Quick Set LED Keypad: [4-digit code] • Enter your [4-digit code] to start the exit procedure (for more information see How to Set the System). 1 2 3 4 5 6 7 8 Zones •... -
Page 12: How To Set Up Chime Mode
Accenta/Optima User Guide How to Set Up Chime Mode How to Set Up Chime Mode Chime is a low security facility for use when the system is unset. It is particularly useful in a shop to warn of customers presence, or in a house to warn when a back door has been opened. When a Chime zone detects movement the system produces a brief two–tone sound, and the Zone LED comes on. -
Page 13: How To Change The Language
Accenta/Optima User Guide How to Change the Language How to Change the Language This option allows you to display the screen information in one of the following languages: English, French, Italian, Spanish, German, Dutch and Portuguese. LCD Keypad: [0] [1] [2] [3] To change the display language: 0>Walk Test... -
Page 14: Changing Codes Using User 1
Accenta/Optima User Guide How to Change User Codes Changing Codes Using User 1 You should change your code regularly to prevent potential intruders from knowing your code. All codes are 4-digits. The factory set code is [0][1][2][3]. User code 1 can only be changed by user 1. -
Page 15: Changing Codes Using User 2
Accenta/Optima User Guide How to Delete User Code 2 Changing Codes Using User 2 Your alarm system can have a second user code. You may find it useful to set up user code 2 for use by a neighbour for use when you are on holiday. User code 2 operates like user code 1, but it cannot be used to change or delete user code 1. -
Page 16: To Delete User Code 2 Using User Code 1
Accenta/Optima User Guide How to Delete User Code 2 How to Delete User Code 2 You can delete the second code to prevent it being used. User 1 or user 2 can delete user code 2. then [0][1][2][3] To delete user code 2 using user code 1 0>Walk Test... -
Page 17: To Delete User Code 2 Using User Code 2
Accenta/Optima User Guide Duress Code To delete user code 2 using user code 2 LCD Keypad: then [4-digit code] • Press and then enter the user 2 [4-digit code] . LED goes off to indicate that you are in Programming 0>Walk Test... -
Page 18: Duress Code
Accenta/Optima User Guide Duress Code Duress Code Your alarm system can have a duress code. The Duress code is used in a hold-up situation where there is pressure to set or unset the system. The Duress code operates like your normal code but in addition it silently sends a signal to the Alarm Receiving Centre. -
Page 19: How To View The Event Log
Accenta/Optima User Guide How to View Event Log How to View the Event Log 1 = LCD Keypad: The event log gives a display of all the events that have taken place. The events are arranged by date and time. -
Page 20: How To Test Your Alarm System
Accenta/Optima User Guide How to Test Alarm System 2 = LED Keypad: The LED keypad is limited to show the last eight set periods with the eighth being the oldest. Zone, LEDs are on, to show zone in alarm . A flashing LED indicates the first zone in alarm. indicates the status of the panel at the time of the alarm. - Page 21 Accenta/Optima User Guide How to Test Alarm System LCD Keypad: then [0][1][2][3] • Press and then enter your code [0][1][2][3]. The LED goes off to indicate that you are in Programming mode. The first 0>Walk Test menu, Walk Test appears on the screen.
-
Page 22: How To Do A Walk Test
Accenta/Optima User Guide How to do a Walk Test How to do a Walk Test Walk around your property, and in turn cause each detector to go into alarm. Also, open and close all door and windows that are protected by the system. For each detector (including door or window sensor) that is activated the system produces a series of beeps, and the associated zone is indicated on the keypad. -
Page 23: How To Set Up The Time And Date
Accenta/Optima User Guide How to Set up Time & Date How to Set up the Time and Date LCD Keypad: then [0][1][2][3] • Press and then enter your code [0][1][2][3]. The goes off, indicating that you are in Programming mode. - Page 24 Accenta/Optima User Guide...
- Page 25 Accenta/Optima User Guide External Siren Time: Siren delay: Area Zone Name Program 1 Program 2 Program 3 Protected Zone 1 Zone 2 Zone 3 Zone 4 Zone 5 Zone 6 Zone 7 Zone 8 T = Timed (Entry/Exit Zone) TI = Time Inhibited (Access zone to keypad)
Need help?
Do you have a question about the Accenta and is the answer not in the manual?
Questions and answers
Is this device SSAIB or NACOSS certified
The Honeywell Accenta device is associated with installation services that are SSAIB accredited and inspected. However, the document does not confirm whether the device itself is SSAIB or NACOSS certified.
This answer is automatically generated
how do I reset tamper
How to reset after power cut