Classe Audio CDP-102 Owner's Manual
Disc players
Hide thumbs
Also See for CDP-102:
- Owner's manual (82 pages) ,
- Owner's manual (42 pages) ,
- Owner's manual (82 pages)
Table of Contents
Advertisement
Quick Links
Download this manual
See also:
Owner's Manual
Advertisement
Table of Contents

Related Manuals for Classe Audio CDP-102


Summary of Contents for Classe Audio CDP-102
- Page 1 Owner’s Manual CDP-102 and CDP-202 Disc Players...
- Page 2 WARNING: TO REDUCE THE RISK OF FIRE OR ELECTRIC SHOCK, DO NOT EXPOSE THIS APPLIANCE TO RAIN OR MOISTURE. CAUTION RISK OF ELECTRIC SHOCK DO NOT OPEN CAUTION: TO REDUCE THE RISK OF ELECTRICAL SHOCK, DO NOT REMOVE COVER. NO USER-SERVICEABLE PARTS INSIDE. REFER SERVICING TO QUALIFIED PERSONNEL.
- Page 3 Important Safety Instructions Read these instructions. Keep these instructions. Heed all warnings. Follow all instructions. Do not use this apparatus near water. If a liquid does enter your component, immediately disconnect it from the AC mains and take it to your Classé dealer for a thorough checkup Clean only with dry cloth.
-
Page 4: Table Of Contents
14 coaxial digital output ............... 15 AES/EBU digital output ..............15 optical digital output................ 15 The Remote Control..................18 Using the CDP-102 and CDP-202 ..............22 CD operational menu................22 playlist ..................... 23 controls menu.................. 23 repeat mode ..................23 shuffle.................... - Page 5 The Menu System ..................25 main menu system ................. 25 system setup ..................25 teach IR ................... 26 display setup..................26 triggers..................... 26 remote Fkeys ................... 27 cautionary note on Fkey use ............27 status ....................28 version info..................28 sensors..................... 28 display setup menu ................
-
Page 6: Welcome To The Classé Family
Welcome to the Classé family Congratulations on your purchase of a Classé product. It is the result of many years of continuous refinement, and we are sure that you will enjoy it for many years to come. We value our relationship with our customers. Please allow us to stay in touch with you by returning your warranty card now, before you pack up the shipping carton of your new product and forget all about it. -
Page 7: Unpacking And Placement
Unpacking and Placement unpacking your player Carefully unpack your disc player according to the supplied instructions, and remove all accessories from the carton. Important! Keep all packing materials for future transport of your Classé product. Shipping your new component in anything other than its purpose-designed packing material may result in damage that is not covered by the warranty. -
Page 8: Serial Number
serial number The serial number for your disc player is found on the rear of the unit. Please note and record this number on the page entitled Important Safety Instructions for your future reference. register your purchase! Having found the serial number, now would be a good time to register your purchase. -
Page 9: Warm Up/Break-In Period
warm up/break-in period Your new Classé disc player will deliver outstanding performance immediately. However, you should expect to hear it improve somewhat as it reaches its normal operating temperatures and its various components “break-in.” It has been our experience that the greatest changes occur within the first 300 hours, as the player reaches thermal equilibrium and the capacitors fully form. -
Page 10: Special Design Features
Special Design Features flexible GUI The LCD touchscreen on the front panel of your new component supports an extremely flexible and versatile graphical user interface (GUI) while maintaining a clean, uncluttered appearance. The touchscreen accesses a range of controls that might otherwise require dozens of buttons and knobs on the front panel. Despite this power and flexibility, it remains simple to operate in day-to-day use. -
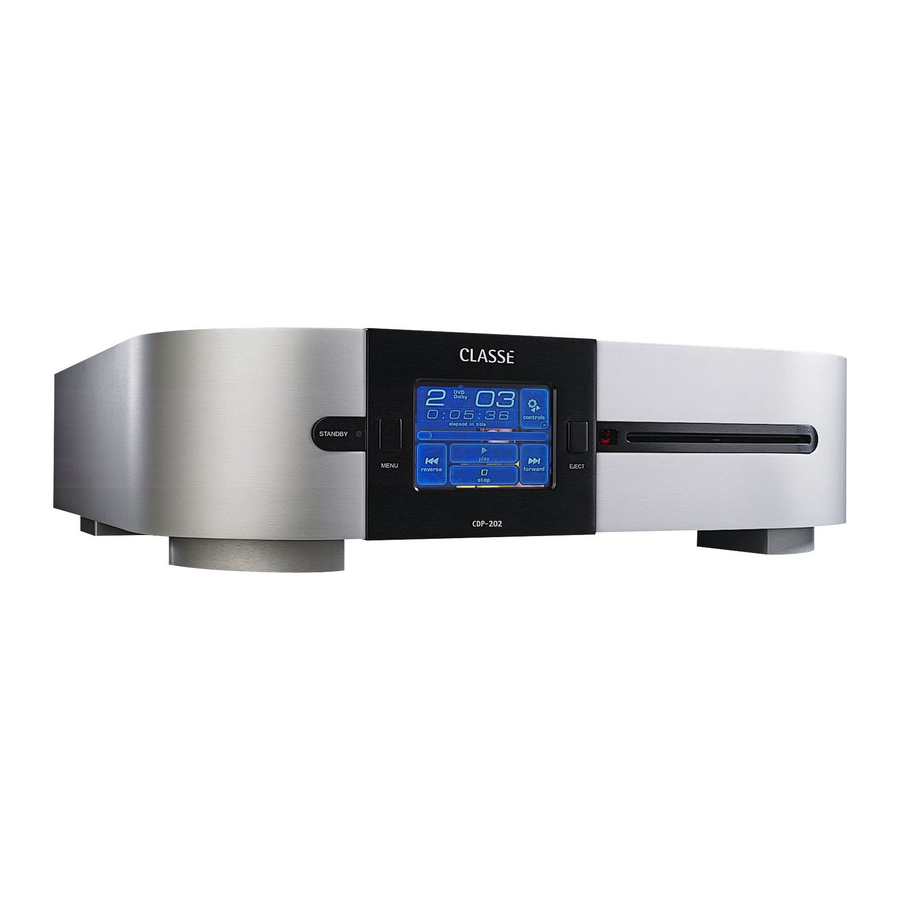
Page 11: Front Panel
MENU LOAD CDP-202 Front Panel Standby button & LED indicator The front panel Standby button will toggle the player between its fully operational status and a standby mode that leaves the player off, yet ready to respond to system commands via any of the supported control options (e.g. - Page 12 Menu button Pressing the front panel Menu button will call up the menu system, replacing the normal status display in the LCD touchscreen. LCD touchscreen You may control the player by using the front panel LCD touchscreen. It will usually display the information you are accustomed to seeing on the front of most CD and disc players (track number, time, etc.), as well as the basic transport controls.
-
Page 13: Rear Panel
� � � � � � � � � Rear Panel Analog Outputs The front left and right channels are supported with both balanced analog outputs on XLR connectors and single-ended analog outputs on RCA connectors. using the balanced outputs If your preamplifier/processor has balanced inputs for the front left and right channels, connect these XLR outputs to them using high quality balanced interconnects. -
Page 14: Using The Single-Ended(Rca) Analog Outputs
The pin assignments of these XLR-type female output connectors are: Pin 1: Signal ground Pin 2: Signal + (non-inverting) Pin 3: Signal – (inverting) Connector ground lug: chassis ground These pin assignments are consistent with the standards adopted by the Audio Engineering Society. -
Page 15: Coaxial Digital Output
coaxial digital output The coaxial digital output provides a digital audio signal via a 75Ω coaxial cable equipped with RCA-type connectors. Connect this output to a corresponding coaxial digital input on your preamplifier/processor. AES/EBU digital output The AES/EBU output provides a digital audio signal via a 110Ω balanced cable equipped with XLR-type connectors. - Page 16 Note: Many IR repeater systems do not yet support the stripped-carrier signal format required by your disc player. If yours does not, a Delta IR Interface may be required to ensure compatibility between your IR repeater system and your Delta-series Classé equipment.
- Page 17 RS-232 Control Port This port has two purposes: • downloading new operating software into your player (should new features ever be added, for example) • external control of your preamplifier by systems such as i-Command , AMX and Crestron ™ ®...
-
Page 18: The Remote Control
The Remote Control Your new disc player comes with a versatile remote control which can control both the disc player and several aspects of the rest of a Classé-based system. The keys are arranged in logical groups according to their functions. �������... - Page 19 • Time cycles through the four time display modes: time elapsed on track time elapsed on disc time remaining on track time remaining on disc • Prog (for Program) allows you to quickly and easily create a programmed sequence of tracks (or chapters) to be played on the current disc.
- Page 20 • Disc Menu presents the menu of available chapters, within whatever title you are watching at the moment. (See explanation of DVD menus in this section.) • Title gives you a list of available “titles” on the disc you are watching.
- Page 21 System Controls The remote control can also be programmed to perform user defined functions through the Fkeys. • F1/F2/F3/F4 keys are available for controlling features not covered by the other buttons on the remote control. You are able to choose what the disc player does when it receives the infrared signal from a particular Fkey.
-
Page 22: Using The Cdp-102 And Cdp-202
Using the CDP-102 and CDP-202 Your disc player includes a versatile touchscreen LCD display which supports both an attractive information display and a flexible menu system. Because of this flexibility, the disc player can present different controls and capabilities when playing a CD, and when playing a DVD. We will present these separately. -
Page 23: Playlist
playlist Pressing the playlist button on the display brings up the playlist for the current disc. If you have not created a custom program for the disc, the playlist will simply be a list of all the available tracks on the CD, in order. If you have created a custom program (see below), it will be presented to you here. -
Page 24: Dvd Operational Menu
DVD operational menu When a DVD is inserted, a different set of controls is displayed. the home screen The home screen for DVDs is presented at left in the graphic above, and contains basic information about where you are within the disc, as well as basic navigation buttons similar to those on your remote control. -
Page 25: The Menu System
The Menu System The disc player uses its versatile touchscreen display to make a wide variety of setup choices and system defaults readily available. Using these menus, you can easily customize the behavior of your disc player to suit your particular system’s configuration, as well as your personal preferences. -
Page 26: Teach Ir
teach IR The disc player has discrete infrared (IR) command codes for all its functions, a list that extends far beyond what is required by normal remote controls. However, many of these functions are critical if you plan to create a customized remote control with macros that take command of your entire system. -
Page 27: Remote Fkeys
remote Fkeys This button brings up the remote Fkeys menu. The remote control supplied with your Classé product includes four user- programmable function keys, or “Fkeys.” They are labeled F1, F2, F3, and F4, and are located near the bottom of the remote control. The “remote Fkeys” menu allows you to define how the disc player responds to these Fkey signals. -
Page 28: Status
status The status screen provides several items of information on the currently playing disc, as well as access to information on the software and internal sensors of the disc player. version info The version info button on the status screen takes you to the version information screen. -
Page 29: Brightness
brightness The brightness setting has three possible values: low, medium, and high. Select the appropriate setting based on the level of ambient light typically found in your listening room while using the system. A high brightness setting usually works best in brightly-lit rooms; you may find that a lower setting is less visually intrusive under more subdued lighting conditions. -
Page 30: Volume Display
volume display If you elect to use the variable volume capability, you have two choices as to how the volume setting is displayed. • Absolute is how most volume controls work, namely that a setting of “0” indicates no sound, while larger numbers represent higher volumes. •... -
Page 31: System Setup
System Setup Pressing the menu button to the left of the LCD touchscreen, followed by pressing the on screen system setup button, will bring you to a menu system that gives you a wide range of control over how the disc player works both on its own and as a part of your overall system. -
Page 32: Audio Delay
audio delay When a disc has been incorrectly authored, the audio can be out of sync from the video. Audio Delay allows you to compensate for this by inserting a delay that repositions the audio in relation to the video and brings them into sync. The delay is adjustable in 10ms steps and operates within a range of +/- 200 ms digital output The digital outputs can be configured in any of three ways, based on how you plan to use the player:... -
Page 33: Distance
distance The distance setting adjusts the speaker distance settings manually. Simply measure the distance with a tape measure or equivalent, and enter the distance into the menu. The disc player will automatically convert this distance to the appropriate delay, to ensure that you hear the sound from each speaker when you are supposed to hear it, despite the varying distances usually involved. -
Page 34: Aspect Ratio
aspect ratio You have three choices for the way widescreen movies will be displayed on your television. The choice should be determined by the capabilities of your television as well as your personal preference. • 4:3 — If you have a 4:3 display and prefer to have it filled at all times, the disc player will look for an available 4:3 version of the movie on any disc you insert, and play that version. -
Page 35: Audio Language
audio language You can also set a preference for the spoken language used in the soundtrack being played. Automatic defers to the default soundtrack on the disc itself. If you prefer, you can insist that the unit play an English, French, German, Spanish, or Italian soundtrack (assuming one is available). -
Page 36: Updating Your Unit
Updating Your Unit From time to time Classé designs new software that will enhance the performance of your component. Updating your unit with the latest software is a matter of downloading a file from the Classé website (www.classeaudio.com) so it is worth ensuring that your component is fully updated. -
Page 37: Troubleshooting
Troubleshooting In general, refer any service problems to your Classé dealer. Before contacting your dealer, however, check to see if the problem is listed here. If it is, try the suggested solutions. If none of these solves the problem, contact your Classé dealer. -
Page 38: Care & Maintenance
The disc is spinning but there is no sound in one or both channels. ✓ Check that both interconnect cables are properly connected between the outputs of the disc player and the inputs of your preamplifier. ✓ Ensure that the preamplifier/amplifier units being used are properly configured. -
Page 39: Specifications
Specifications All specifications are accurate at the time of printing. Classé reserves the right to make improvements without notice. ■ Frequency response 20Hz – 20kHz ± 0.1dB ■ Distortion (THD+noise) 0.001% ■ Output voltage (single-ended) 2Vrms ■ Output voltage (balanced) 4Vrms ■... -
Page 40: Dimensions
Dimensions ������� ����� ������ ���� ������ ����... - Page 42 Canada H8T 1B3 +1 (514) 636-6384 +1 (514) 636-1428 (fax) http://www.classeaudio.com email: cservice@classeaudio.com North America: 1 800 370 3740 email: classe@bwgroupusa.com Europe: 44 (0) 1903 221 700 email: classe@bwgroup.com Asia: (852) 2790 8903 email: classe@bwgroup.hk All Others: +1 514 636 6394 email: cservice@classeaudio.com...
Need help?
Do you have a question about the CDP-102 and is the answer not in the manual?
Questions and answers