Malibu Boats 2011 Wakesetter 247 LSV Owner's Manual
Malibu boats
Hide thumbs
Also See for 2011 Wakesetter 247 LSV:
- User manual (206 pages) ,
- Owner's manual (142 pages) ,
- Owner's manual (132 pages)
Table of Contents
Advertisement
Quick Links
Advertisement
Table of Contents

Related Manuals for Malibu Boats 2011 Wakesetter 247 LSV


Summary of Contents for Malibu Boats 2011 Wakesetter 247 LSV
- Page 1 Owner’s Manual 2011...
- Page 2 RECORD IMPORTANT INFORMATION In addition to this manual, your Malibu Owner’s Packet contains instructions, warranties and other important information from component manufacturers. Read these materials carefully since improper registration, operation and maintenance can void the warranty and jeopardize the safety of you and others. Fill in the information below and keep a copy of it in a safe place.
- Page 3 Indmar, Indmar is a registered trademark of Indmar Products Co., Inc. All other product names are copyright and registered trademarks/trade names of their respective owners. © 2000, 2001, 2002, 2003, 2004, 2005, 2006, 2007, 2008, 2009, 2010, 2011 Malibu Boats LLC. All Rights reserved.
-
Page 5: Table Of Contents
ONTENTS Navigational Lights ... 2-49 Storage Areas ....2-49 Drain Plugs....2-50 Speedometer Pickup. - Page 6 ABLE OF IGURES Figure 1-1 Personal Flotation Figure 2-31 Bow Light ....2-49 Devices ......1-5 Figure 2-32 Lockable Transom Storage .
- Page 7 Please read carefully and familiarize yourself with the craft before using it. We at Malibu Boats thank you for choosing us as your boat manufacturer and assure you that your satisfaction and boating enjoyment will continue to be our #1 priority.
- Page 8 Your Hull Identification Number can be found on the starboard transom of your boat below the rubber rub rail. Federal law prohibits the tampering or removing of the number in any way. Use this number to register your boat with your local and state authorities. US MB2GXXXXA001 The engine in your boat meets the strict requirements set forth by the California Air Resources Board (CARB).
- Page 9 & ODEL EATURES PECIFICATIONS...
- Page 10 viii...
- Page 15 xiii...
- Page 16 Notes...
-
Page 17: General Precautions
Chapter 1 OATING AFETY At Malibu, safety is not an option! General Precautions Safety Statements Indicates an imminently hazardous situation that, if not avoided, will result in death or serious injury. Indicates a potentially hazardous situation that, if not avoided, could result in death or serious injury. Indicates a potentially hazardous situation that, if not avoided, could result in minor or moderate injury or property damage. - Page 18 Remember — always use common sense when operating your boat! Teak/Drag Surfing SAFETY ALERT From August 28, 2001:...
-
Page 19: Regulations
Regulations Responsibilities Registration Education Insurance Restricted Areas Our Environment DO NOT put anything in the water you would not want to eat or drink! - Page 20 Conserve Fishery Resources Foreign Species Fuel and Oil Spillage Fumes from rags can collect in bilge and be extremely hazardous. Never store rags used to wipe up fuel or solvent spills in the boat. Dispose of rags properly ashore. Discharge and Disposal of Waste Excessive Noise Wake and Wash Exhaust Emissions...
-
Page 21: Devices
Cleaning Agents Safety Equipment TYPE I TYPE II TYPE IV TYPE V TYPE III KC-0318C-A Figure 1-1. Personal Flotation Devices... -
Page 22: Emergencies
Notice: If a type V PFD is to be counted toward the minimum carriage requirements, it must be worn. OVERCHARGED RECHARGE KC-0009C-A Figure 1-2. Fire Extinguisher Emergencies Giving Assistance Fires... -
Page 23: Hazardous Conditions
Reporting Accidents Hazardous Conditions Weather Figure 1-3. Weather Hazards Dam Spillways Weeds Shallow Water Operation... - Page 24 Damage to underwater gear caused by shallow water maneuvering is not covered by your warranty. Warning Markers KC-0250M...
-
Page 25: Carbon Monoxide
Carbon Monoxide EXTREME HAZARD – Carbon monoxide gas (CO) is colorless, odorless and extremely dangerous. All engines and fuel burning appliances produce CO as exhaust. Direct and prolonged exposure to CO will cause BRAIN DAMAGE or DEATH. Signs of exposure to CO include nausea, dizziness and drowsiness. -
Page 26: Operation By Minors
1-10 Operation by Minors Passenger Safety Federal and state laws prohibit operating a boat under the influence of alcohol and other drugs. These regulations are actively enforced. Impaired operation may result in severe personal injury or death. Basic Rules of the Road The nautical rules of the road must be followed to prevent collisions between vessels. -
Page 27: Types Of Buoys
1-11 Types of Buoys UNLIGHTED SPAR BUOY CAN BUOY BELL BUOY SPHERICAL SAFE LIGHTED BUOY NUN BUOY WATER MARKER KC-0052C-A Mooring Buoys KC-1901 Regulatory Markers CONTROLLED DANGER BOATS INFORMATION AREA KEEP OUT KC-1903... - Page 28 1-12 Right-of-Way Notice: In general, boats with less maneuverability have right-of-way over more agile craft. You must stay clear of the vessel with right-of-way and pass to his stern. Privileged Boats 12 O'CLOCK PRIVILEGED VESSEL Burdened Boats DANGER ZONE Crossing Situation BURDENED VESSEL 4 O'CLOCK...
-
Page 29: Another Craft
1-13 Overtaking HORN HORN (2 SHORT (2 SHORT BLASTS) BLASTS) HORN BURDENED PRIVILEGED HORN (SHORT (SHORT VESSEL VESSEL BEING BLAST) BLAST) OVERTAKING OVERTAKEN KC-0196C-B Figure 1-10. Overtaking Another Craft The General Prudential Rule Night Running... - Page 30 1-14 Notes...
-
Page 31: Standard Gauges
Chapter 2 & C AUGES ONTROLS No other ski boat manufacturer incorporates in their product as many innovative and technically advanced features as Malibu. Standard Gauges The following gauges are included on all models. It is important for the safe and proper operation of your boat to fully understand these gauges. - Page 32 MaliView Gauge Screens 102 °F CRUISE ° PRE-SETS DEPTH ON / OFF MEDIA ENTER STOW SETUP GAUGES STEREO SPEED 17.0 101.7 MPH ACT MaliView Edit Pre-Sets Screen Analog Selection Video Selection STEREO SPEED STEREO SPEED 17.0 17.0 101.7 101.7 MPH ACT Digital Selection 102 °F LAKE...
-
Page 33: Volt Hourmeter
Tachometer Located to the left side of the dash panel, the tachometer registers the operating speed of your engine in revolutions per minute (RPM). This gauge is used to provide you with information needed to ensure the engine is kept within the engine manufacturer’s recommended proper range of operation. -
Page 34: Figure 2-5 Dash Gauges
Figure 2-5. Dash Gauges Engine Temperature Oil Pressure Do not continue to run engine if pressure is low. If you do the engine can become so hot that the surrounding components could catch fire. Notice: Damage caused from neglected oil problems can be costly. Such damage is not covered by your warranty. -
Page 35: Figure 2-6 In-Dash Display
Fuel The fuel gauge is located at the lower center right bottom panel of the dash display. The fuel gauge indicates the approximate quantity of fuel remaining in the tank when the ignition is in the “On” position. Although your fuel tank will still have some fuel remaining even though the gauge reads empty, it is recommended that the tank be filled when the gauges indicates 1/4 full. - Page 36 Graphical In-Dash Display Setup Screen When you first turn on the ignition of your boat, you will see one of the screens shown in Figure 2-6 or 2-7, followed by a Setup menu. To navigate the system menus, use the up/down ↑↓...
- Page 37 MaliView Setup Screen • The up and down arrows toggle through all the options in each edit screen. • Use the “ON/OFF/ENTER” button to toggle between edit screens and select changes. Return to Factory Default Screen • This will return all settings back to factory settings. •...
- Page 38 Depth Level Alarm Screen Speed Calibration Screen Wedge Setup Screen English Metric Mode (English or Metric Conversion) Video ON/OFF Setup Turns on or off all available video screens...
- Page 39 Gauge Diagnostic Mode (Gauge Sweep Mode Test) Current Software Version System Diagnostic Screen Active and Inactive Engine Fault Screen...
- Page 40 2-10 MALIBU PRE-SETS How to Use the Malibu Pre-Sets The Malibu pre-sets Save, Store and Control 3 different parameters: • 1 – Boat Speed/Cruise Control • 2 – Wedge Angle/Boat Angle Control • 3 – Ballast Level The system is easy to operate once you understand what you are controlling and know what to expect from it.
- Page 41 2-11...
- Page 42 2-12 MaliView Pre-Sets Screen RIDER R MLS CRUISE CRUISE 21.8 STOW HALEY WAKEBOARD PRE-SETS STOW ED SURF LEFT ON / OFF MEDIA ENTER 15.0 STOW SETUP BLANK GAUGES EDIT PRE-SET • Enter pre-sets using the “PRE-SETS” button. • Press the “EDIT PRE-SET” button to edit the highlighted pre-set. (See MaliView Edit Pre-Sets Screen.) •...
- Page 43 2-13 MaliView Edit Pre-Sets Screen RIDER R MLS CRUISE CRUISE 21.8 STOW HALEY WAKEBOARD PRE-SETS PRE-SET EDIT PRE-SET EDIT MLS FRONT PICTURE OPTIONS: ON / OFF MEDIA ENTER SETUP GAUGES EXIT EXIT SAVE SAVE NO SAVE NO SAVE • Press the “SAVE” button to save any changes to the pre-set. •...
- Page 44 2-14 Speed Edit Screen RIDER R MLS 21.8 STOW HALEY WAKEBOARD PRE-SET EDIT SET POINT 20.2 EXIT EXIT SAVE SAVE NO SAVE NO SAVE • Use the up and down buttons to change the speed. • Press “ENTER” to accept. •...
- Page 45 2-15 Boat Alarms and Engine Faults Malibu Boats are equipped with two separate computers connected to many sensors and controllers that constantly monitor various functions of the boat and engine. Certain functions, if outside of a pre-determined operational parameters, may activate an alarm.
- Page 46 2-16 A warning for the “WEDGE MOVING” “WEDGE FAULT UNBALANCED” is a only appears when the wedge is moving up signal from the Lenco box indicating an past the wake zones. actuator failure, alignment or fault. The “WEDGE FAULT STARBOARD “LOSS OF CAN SIGNAL”...
- Page 47 2-17 To Enter the On-board-Diagnostics-Marine Tool, you will need to scroll the “UP” or “DOWN” button to the “Setup” screen, then press “E (Enter).” Once in the “Setup” screen, use the “UP” or “DOWN” arrows to highlight “Service.” Press “E (Enter).” Then use the “UP”...
-
Page 48: Figure 2-8 Cruise Control
2-18 Notice: The Depth graphical display only displays the bottom of the lake up to 20 feet of depth. For boats equipped with optional depth finders, the depth system may lose its lock on the bottom if speeds exceed 20 MPH. This is normal. The depth system should reacquire the bottom once the boat has slowed to under 20 MPH. - Page 49 2-19 Malibu Precision Pro Speed Control Operation of Precision Cruise 2011 Control Favorite Adjust set points by pressing up and down arrows. Adjustments can be done with system on or off Turn Cruise on/off by pressing the RED button cruise Typical screen for the WKBRD A preset of a boat that has a Power wedge and Front MLS...
- Page 50 2-20 In the upper port corner of the display menu is the CRUISE button. To activate, turn the engine on. While in NEUTRAL, press the cruise button on your display to get the system into speed control mode. Press the red button to turn the speed control ON. Adjust the target speed on the display if necessary with the “UP ↑”...
- Page 51 2-21 MaliView Cruise Speed Screen Ballast Tank Levels and Fill Status RIDER R MLS Wedge STOW angle Rider screen Picture A STEP BEYOND CURRENT Rider Name Red indicates the filling status Green indicates the target level Indicates the wake shaping zone RIDER R MLS...
- Page 52 2-22 MaliView RPM Cruise Screen RIDER R MLS CRUISE STOW A STEP BEYOND CURRENT PRE-SETS RPM ON RPM SET RPM ACTUAL 2500 ON / OFF MEDIA ENTER 100% SETUP GAUGES VOLT 11.8 V STEREO TEMP 185 ºF 101.7 65 PSI •...
-
Page 53: Power Wedge
2-23 Ballast Monitoring System (BMS) (Standard on Wakesetter Model) Figure 2-9. BMS All Wakesetter models come standard with the Ballast Monitoring System (BMS) display. The BMS can be used to visually see the amount of water ballast that is in each tank. -
Page 54: Figure 2-11 Power Wedge
2-24 Figure 2-11. Power Wedge The Power Wedge (PW) is an adjustable wake enlargement device designed specifically for wakeboarding. It is not intended to be used over 25 MPH. The PW alarm will activate if the foil is not in the “stowed” or “all the way up” position and the boat speed exceeds 25 MPH. -
Page 55: Figure 2-12 Power Wedge
2-25 Models equipped with the Power Wedge option also have a built-in feature that monitors the condition of the Power Wedge Actuators. This feature will disable the use of the Wedge for 10 seconds to prevent damage to the Wedge while also indicating to the operator there is a fault. -
Page 56: Circuit Breakers
2-26 Circuit Breakers All major boat circuits are protected from shorting and overload by resettable circuit breakers. If a problem develops with one of the following circuits, switch off the circuit and wait about one minute. Then push the appropriate breaker button fully and switch on the circuit. - Page 57 2-27 2011 Malibu Touch Command System The Malibu Touch Command system consists of 4 main screens and one optional screen. The Main screens are the CODE ENTER screen, the MLS screen, the LIGHTS screen, the SWITCH screen and the optional NAVIGATION screen.
- Page 58 2-28 2011 Malibu Code Entry Screen Use the KEY PAD to enter the four-digit start code. The numbers will appear on the left. The numbers will disappear when the correct numbers have been entered. The ENTER CODE button The START button will Press the STOP button to will appear until the code appear after the code has...
- Page 59 2-29 2011 Malibu MLS Screen The MLS screen is set up to control the available water tanks on the boat. The user has the ability to fill or drain all the tanks at once or control the tanks individually. The tank configurations can be changed in the SETUP menu located on the SWITCH screen.
- Page 60 2-30 2011 Malibu Lights Screen The LIGHTS screen is where all the available lights for the boat are controlled. Depending on how many lights are available on the boat a button will be displayed in approximate location of the light. Optional lights can be added or removed in the setup screen located on the SWITCH screen.
- Page 61 2-31 2011 Malibu Setup Screen The SWITCH screen is where all the available options for the boat are controlled. Depending on how many lights are available on the boat a button will be displayed in approximate location of the light. Optional heater switch can be added or removed in the setup screen.
- Page 62 2-32 2011 Malibu Setup Screens The setup screen is used to keep the software up to date and adjust and troubleshoot the Touch Command/MaliView system. Use the UP and DOWN buttons to highlight the setup mode desired. Press ENTER button to access the mode highlighted. Pressing the ENTER button will activate the RESET TO FACTORY SETTINGS.
- Page 63 2-33 Pressing the ENTER button will activate the UPDATE TOUCHCOMMAND mode. The UPDATE will read a USB and load the SmartTouch.mem file. The update will not work unless the file is named SmartTouch.mem. The system will reset automatically when complete. The UPDATE can also be done by just turning off and on the power with the USB stick attached to the smart touch command USB port.
- Page 64 2-34 2011 Malibu Set Dim Level Screens The setup screen is used to keep the software up to date and adjust and troubleshoot the Touch Command/MaliView system. Use the UP and DOWN buttons to highlight the setup mode desired. Press ENTER button to access the mode highlighted. Pressing the ENTER button will activate the BACKLIGHT DIM LEVEL mode.
- Page 65 2-35 2011 Malibu Setup Outputs Screens The setup screen is used to keep the software up to date and adjust and troubleshoot the Touch Command/MaliView system. Use the UP and DOWN buttons to highlight the setup mode desired. Press ENTER button to access the mode highlighted. Pressing the ENTER button will activate the SETUP OUTPUTS mode.
- Page 66 2-36 2011 Malibu Setup Lights Screens The setup screen is used to keep the software up to date and adjust and troubleshoot the Touch Command/MaliView system. Use the UP and DOWN buttons to highlight the setup mode desired. Press ENTER button to access the mode highlighted. Pressing the ENTER button will activate the SETUP LIGHTS mode.
- Page 67 2-37 2011 Malibu Setup Navigation Screens The setup screen is used to keep the software up to date and adjust and troubleshoot the Touch Command/MaliView system. Use the UP and DOWN buttons to highlight the setup mode desired. Press ENTER button to access the mode highlighted. Pressing the ENTER button will activate the NAVIGATION mode.
- Page 68 2-38 2011 Malibu About TouchCommand Screens...
-
Page 69: Lx Switch Panel
2-39 Accessory Switch Panels These panels are located in the dash directly below the standard gauges and are used to activate the following features. You will find the feature or accessory provided within each button face for description. • Horn •... -
Page 70: Figure 2-17 Optional Rear Mux Switch
2-40 Stereo Power The optional stereo system can be activated by either turning the ignition key on, or can be used without the engine started by turning the key to the left position; for boats equipped with Malibu TouchCommand, the power button will turn on the stereo. Accessory #1 This switch is used to supply power to the optional heater unit. - Page 71 2-41 Pressing the BILGE button will toggle the POWER module output and MUX display from OFF to ON and back to OFF again. Pressing the DASH LIGHTS button will toggle the POWER module output and MUX display from OFF to ON to DIM 1 to DIM2 and back to OFF again. DIM 1 and 2 are two lower levels of brightness for the dash.
- Page 72 2-42 Function Edit Mode Enter Function Edit 1. Hold PAGE, button #4, and button #5 at the same time for 3 seconds. 2. Press button 1(YES) to enter edit mode or 2(NO) to exit edit mode. 3. Press the PAGE button to switch between the edit modes CHANGE, DELETE, and INSERT.
- Page 73 2-43 Insert Mode 1. Press button 1(YES) to enter INSERT mode or 2(NO) to exit edit mode. 2. If 1(YES) is pressed return to icon page in INSERT mode. If you do not change a button and cycle through all the pages by pressing the page button you will also exit the edit screen.
-
Page 74: Throttle Control
2-44 Throttle Control The throttle lever is located to the right of the driver. When the throttle is vertical, it is in the “NEUTRAL” position. At the base of the throttle you will find the shift lock knob. Pulling outward on this knob disengages the transmission, thereby allowing use of the throttle without engaging the transmission. -
Page 75: Steering System
2-45 Electronic Throttle Control (ETC) All 2006-2011 Malibu Boats are equipped with electronic throttle control AKA “Drive-By- Wire.” The throttle cable has been removed and several components on the engine and helm throttle control have been changed. The helm throttle control “E-MV3” is now dual, variable voltage potentiometer that sends electronic signals back to the engine ECM via a shielded wire harness with the highest quality water-tight connectors that mates to the engine ECM. -
Page 76: Motorbox Cover
2-46 Motorbox Cover The upholstered motorbox reduces engine noise and provides protection for the passengers on board. To open, stand on the port side of the box near the observer seat, grasp the handle near the floor and pull open. The motor box is equipped with either one or two gas-filled shock absorbers (depending on model) to provide support for the compartment when opened. -
Page 77: Ice Chest
2-47 Integral Self Draining Ice Chest Sundeck The Sundeck is not to be used while the boat is in operation. Serious injuries or death could occur to persons not seated properly should the boat come to an abrupt halt. Figure 2-25. Sundeck V-Drive Engine Access Hatch Ensure the hatches are securely latched. -
Page 78: Swim Platform
2-48 Malibu Boats’ “Pivoting-Head” ski pylon is designed for normal water skiing activities: slalom, jumping, kneeboarding, tricks, and barefooting. Any other uses such as parasailing, kite flying, towing pyramids of skiers, etc., may over-stress the pylon and possibly cause personal injury and/or equipment damage. -
Page 79: Navigational Lights
2-49 Navigational Lights Figure 2-31. Bow Light Storage Areas Bow Storage Area Gunnel Ski Storage Floor Ski Storage Transom Storage Figure 2-32. Lockable Transom Storage... -
Page 80: Drain Plugs
2-50 Glove Box Storage Located on the port side of the boat above the observers’ seat for easy access and storage. This small area can be used to store registrations, tools, wallets, cell phones, etc. The glove box is not water-tight. To prevent water damage to paperwork and/or electronics, we suggest placing electronics such as cell... -
Page 81: Speedometer Pickup
2-51 Bilge Drain Plug(s) A T-handled, brass bilge drain plug is located in the engine compartment of all models. Location is normally directly below the drive-train unit. To access, lift motor box and look aft of the ski-tow pylon, and forward of the engine. -
Page 82: Exhaust
2-52 Exhaust The exhaust system is used to remove engine exhaust fumes. To ensure that your boat’s exhaust system is working correctly, it is important that you inspect for exhaust leaks. The following information will allow you to check these systems. Keep in mind that you will be checking engine while turned on, and that you will need to take safeguards against getting yourself or others caught in the moving parts. -
Page 83: Ventilation
2-53 Ventilation The ventilation is used to remove potentially hazardous accumulation of explosive vapors from the bilge areas of your boat’s hull and engine compartment. Therefore, proper ventilation is essential to the safety of the boat and persons in or around the boat structure. Your boat is equipped with a ventilation system that will ensure complete removal of these dangerous fumes. -
Page 84: Optional Equipment
Figure 2-39. Boat Cover Damage caused to your boat as a result of improper cover use is not covered under your Malibu Boats warranty. Damage can result from wind whipping, and possibly cause abrasions to your gelcoat surface or upholstery. Use the proper shipping cover for travel purposes. - Page 85 2-55 Stereo Controls When in the radio screens, the left and right buttons will respond to the label directly inside the button. For example, the CRUISE button is now the BACK TO VIPER button in all PAGE 1 screens in every mode. Fosgate FM/AM Radio Screens 2011 AUX Radio Screens 2011...
- Page 86 2-56 Fosgate USB DRIVE Radio Screens 2011...
- Page 87 2-57 SIRIUS Radio Screens 2011...
- Page 88 2-58 Fosgate IPOD Radio Screens 2011...
- Page 89 2-59 Fosgate Video Radio Screens 2011 The Fosgate radio with video has a menu screen that can be navigated and controlled using the Viper buttons. To use this ability, the radio video screen with button needs to be enabled in the MEDIA SETUP screen in SETUP. This mode will bring up buttons on the side for 5 seconds.
- Page 90 2-60 Video Operation The POV option includes the ability to start and stop a recording using the display’s ENTER button. To use this ability, the video screen with button needs to be enabled in the MEDIA SETUP screen in SETUP. There is also a new module that will be needed to make the Viper system work with the POV.
-
Page 91: Figure 2-42 Maliview Media
2-61 Auto-Volume for MaliView One of the enhancements to the software for the MaliView is the addition of auto- volume. This feature will automatically increase and decrease the volume of the stereo as boat speed increases and decreases. You can access the auto-volume feature through the MaliView Setup Screen (see page 2-7). -
Page 92: Viper Chart Plotting Instructions
2-62 Viper Chart Plotting Instructions Map Screen This section will attempt to familiarize the operator with the features and functions of this system. The Medallion Navigation system uses GPS (Global Positioning System) satellites, and a map database to calculate and display route directions. The GPS is based on satellites which orbit the earth and continuously emit signals. - Page 93 2-63 Squash Pad Above is the main navigation menu screen. From here the operator can get to any area of the navigation system. Pressing the ENTER button will display the MAP screen. At the center of the screen is an image of the SQUASH PAD. Pressing the associated arrow on the squash pad will bring up that menu.
- Page 94 2-64 Navigation Menu Map View Starting at the Navigation Menu screen, the MAP screen can be adjusted to show the MAP on the entire screen or show gauge information along the right hand side of the display. Underneath the words “MAP VIEW” are the words “FULL” and “GAUGE”. The word that is highlighted indicates how the MAP screen will be displayed.
- Page 95 2-65 Map Orient The MAP screen can be adjusted to orient the map with north always at the top of the screen, or with the boat heading at the top of the screen. Underneath the words “MAP ORIENT”, toward the top left of the screen, are the words “BEARING” and “NORTH”. The word that is highlighted indicates how the MAP screen will be oriented.
- Page 96 2-66 Select Course Creating a New Course...
- Page 97 2-67 Using the arrow buttons, highlight the “SELECT WAYPOINT LOCATION”. Using the arrow buttons, move the cursor (cross) to the beginning location of the desired course and press the “WAYPOINT” button A new window will appear showing the available waypoint options. Use the arrows to highlight the desired waypoint and press “ENTER”.
- Page 98 2-68 Select Auto Course Creating a New Auto Course...
- Page 99 2-69 After selecting “START COURSE RECORD,” the map will appear. Your location is the boat image (in the screen to the left it is within the blue box). The navigation software will track your movements until the STOP COURSE option is selected.
- Page 100 2-70 Filter The FILTER menu allows the operator to adjust/change what is displayed throughout the various screens. From the Navigation Menu screen press the DOWN/RIGHT arrow on the squash pad to adjust the filters. The screen above shows the objects that may be available to display. If there is an object that is not desired, remove the check box and that object will not be displayed in the map.
- Page 101 2-71 GPS Status From the Navigation Menu screen press the DOWN arrow on the squash pad to access the GPS STATUS screen. The GPS STATUS menu allows the operator to view up to a 16 position satellite signal strength graph on the right side of the display, and a 4 point compass graphic showing the relative position of each satellite on the left side of the display.
- Page 102 2-72 Setup From the Navigation Menu screen press the DOWN/LEFT arrow on the squash pad to access the SETUP menu. The SETUP menu allows the operator to adjust, view and configure the navigation system through eight menus.
- Page 103 2-73 Screen Level SCREEN LEVEL is the contrast adjustment menu. Highlight the SCREEN LEVEL and press the ENTER button. The screen below will appear. Using the arrows, UP/DOWN changes between the low/high scale, Normal Mode, High Contrast, and Night View. The LEFT/RIGHT arrows control the slide on the Low to High brightness scale.
- Page 104 2-74 Transparency Level TRANSPARENCY LEVEL can be set to enable the user to see the map while viewing the menus. Highlight the TRANSPARENCY LEVEL and press the ENTER button. The screen below will appear. Using the arrows, UP/DOWN changes between the transparency scale and the EXIT. The LEFT/RIGHT arrows control the slide on the transparency scale.
- Page 105 2-75 GPS Setup GPS SETUP can be set to enable what data and accuracy the user wants to see on the map while operating the menu features. Highlight the GPS SETUP and press the ENTER button. The screen below will appear. Using the arrows, UP/DOWN changes between the Coordinate styles and WAAS status options.
- Page 106 2-76 GPS Status Map GPS STATUS MAP will display the satellite signal strength. Highlight the GPS STATUS MAP and press the ENTER button. The screen below will appear. The GPS STATUS menu allows the operator to view up to a 16 position satellite signal strength graph on the right side of the display, and a 4 point compass graphic showing the relative position of each satellite on the left side of the display.
- Page 107 2-77 System Gauge Setup SYSTEM SETUP will display the gauge options that can be shown when the gauge information is displayed on the right side of the screen. Highlight the SYSTEM SETUP and press the ENTER button. The screen below will appear. Any of the options listed above can be displayed in the gauge area of the MAP screen.
- Page 108 2-78 Depth Level Setup DEPTH LEVEL SETUP will display the options for how to draw the mapped depth contours of the various waterways. Highlight the DEPTH LEVEL SETUP and press the ENTER button. The screen below will appear. The options listed above will change how the waterways are to be displayed on the MAP screen.
- Page 109 2-79 System Units Setup SYSTEM UNITS SETUP will enable the operator to change speed units between Knots and Miles Per Hour. This menu also allows the operator to change distance units between Nautical Miles and Miles. Highlight the SYSTEM UNITS SETUP and press the ENTER button.
- Page 110 2-80 Color Setup COLOR SETUP will enable the operator to change the color settings on most menu options. Highlight the COLOR SETUP and press the ENTER button. The screen below will appear. The options listed above will change the color of that feature that is to be displayed on each screen.
- Page 111 2-81 Exit Setup Highlighting the EXIT SETUP and pressing ENTER will bring the display back to the MENU screen.
- Page 112 2-82 NAV BY Map—Compass—OFF From the Navigation Menu screen press the LEFT arrow on the squash pad to change the way the system navigates. There are three modes of navigation: MAP, COMPASS and OFF. MAP mode shows the Course name, Next Waypoint and Destination.
- Page 113 2-83 Compass From the Navigation Menu screen press the LEFT arrow on the squash pad to change the highlight to COMPASS. This will change the top three options in the menu to the screen below. POI NOTIFY (ON/OFF) — Indicates when you are near a Point Of Interest on the map.
-
Page 114: Figure 2-44 Shower Head
2-84 Hot Water Shower If your boat is equipped with a hot water shower, you will find an ON/OFF accessory switch located in the rear storage area. You will find the valves located on the port side of the motorbox compartment. The shower head can be found in the port gunnel sides. You should find specific instructions on the use of your hot water shower in the packet of materials you received with your boat. -
Page 115: Figure 2-48 Proper Stowage Of Bimini
Only factory pre-drilled holes should be used to install factory accessories on the tower. The use of aftermarket accessories not supplied by Malibu Boats may cause damage not covered by the tower warranty. Drilling any additional holes in the tower will void any structural warranty. -
Page 116: Wedge
2-86 Wedge The Malibu Manual Wedge foil is a solid, one piece, welded design constructed from solid stainless steel. The wedge foil no longer locks in the down position. It is designed to move up or down freely and locate in the down position. -
Page 117: Trailering
Chapter 3 PERATION Everyone benefits from the safety of others. Trailering The trailering information contained in this section describes general guidelines and procedures used by many boaters. We recommend, in addition, that you always follow the specific information provided by the manufacturer of your trailer. Load Carrying Capacity The certification label attached by the manufacturer on the left forward side of the trailer will show the maximum load carrying capacity of the trailer. -
Page 118: Figure 3-2 Safety Chains
Safety Chains Safety chains on your boat trailer CRISSCROSS SAFETY CHAINS provide added insurance that it will not become completely detached from the TRAILER towing vehicle when underway. VEHICLE Crisscross the chains under the trailer tongue to prevent the tongue from dropping to the road if the trailer separates from the hitch ball. - Page 119 Backing the Trailer Backing the boat trailer may sometimes be a difficult task. It is recommended that you practice backing the trailer in a vacant lot or open area before attempting it at a congested boat launch. Follow these basic rules when backing: 1) Turn the front vehicle wheels in the opposite direction in which the trailer is to travel.
-
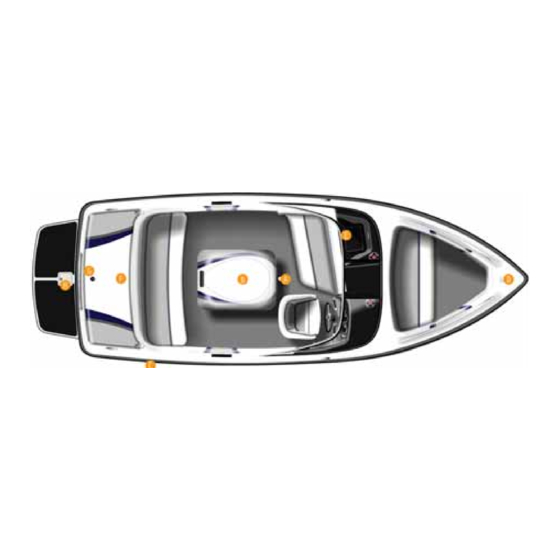
Page 120: Warning Labels
Warning Labels Figure 3-5. Warning Labels... - Page 121 Warning Label Locations Refer to the diagrams below for the location of each label.
- Page 122 9 lbs/gal (1.1 kg/L). Malibu Boats reminds you that when your boat is fully loaded with the maximum number of persons and gear as indicated on the capacity plate, boat speed and performance will be affected.
-
Page 123: Fueling
Fueling It is very important to take special precautions to avoid spillage while fueling your boat. Gasoline vapors are heavier than air and will develop in the lower cavities of the boat, such as the bilge. Do not allow the fuel tank to empty completely during operation. -
Page 124: Starting
Starting First Start-Up of the Day On the first start-up of the day, you may find it beneficial to “key up” once or twice to prime the fuel system prior to cranking the engine to start. The fuel system pressure will drop after a few hours of non-use. - Page 125 Starting the Engine Malibu boats are equipped with sensors that constantly monitor various functions of the boat. Certain functions, if outside of pre-determined operating parameters, may activate an alarm located under the dash. When the ignition is turned ON, the alarm will sound to indicate it is operating.
-
Page 126: Shifting/Running
3-10 Shifting/Running The throttle lever is located to the right of the driver. When the throttle is vertical, it is in the “NEUTRAL” position. Located at the base of the throttle you will find the shift lock knob. Pulling outward on this knob disengages the transmission, thereby allowing use of the throttle without engaging the transmission. -
Page 127: Figure 3-8 Turning With A Rudder
3-11 RIGHT TURN LEFT TURN BACKING TO LEFT Turn wheel to right—Stern Turn wheel to left—Stern Turn wheel to left—Stern will move to left. will move to right. will pull to left. KC-0199-A Figure 3-8. Turning with a Rudder The steering system must be in good operating condition for safe boat operation. -
Page 128: Stopping
3-12 Maneuvering Techniques STERN CIRCLE CIRCLE KC-0201-A Figure 3-9. Stern Push Stopping Do not use the engine stop switch for normal shut down. Doing so may impair your ability to restart the engine quickly or may create a hazardous swamping condition. -
Page 129: Docking
3-13 Docking Docking procedures for the new boat owner usually bring surprising results. Remember, operate your boat at slow speeds to avoid accidents and practice docking to gain experience and confidence. Once away from the dock, practice docking in open water with an imaginary dock. Pull up to the dock at a slow rate of speed. -
Page 130: High-Speed Operation
3-14 Before tying up the boat, be sure to use enough fenders to protect the boat from damage. If possible, tie up with the bow toward the waves with a good-quality, double-braided nylon line. Tie up only to the lifting or tie-down eyes; never use the handrails or windshield frames. -
Page 131: Figure 3-11 Hand Signals
3-15 Communication between the skier and driver is essential. Standard signals have been developed by the American Waterski Association and have been accepted by most waterskiers. Once the skier is in the water and ready, the driver of the boat will take the slack out of the tow line. -
Page 132: Towing Another Boat
3-16 Towing Another Boat Towing is normally a last resort because damage can be created by stress from the towing lines or uncontrollability of the boat being towed. Only when ideal conditions arise — lake is calm, the disabled boat is smaller than yours, and both boat operators know correct technique —... -
Page 133: Propellers
3-17 Propellers • A propeller can be very sharp. Be careful when you handle it. Wear a pair of protective gloves when handling any propeller. • Remove your key from the ignition to prevent accidental starting of the engine. • DO NOT reuse the nylon locknut or the cotter pin. •... -
Page 134: Malibu Exclusive Adjustable Rudder System
3-18 Removal Installation Malibu Exclusive Adjustable Rudder System Figure 3-14. Adjustable Rudder... -
Page 135: Corrosion Protection
3-19 Make sure the set-screws are tightened after each adjustment. Failure to tighten the set-screws could cause erratic steering and serious damage could result. If you are unsure of the correct procedure to conduct this adjustment, it is recommended that you return your boat to your local Malibu Boat dealership for assistance. - Page 136 3-20 Notes...
-
Page 137: Interior
If this should occur, it is recommended that you contact Final Finish/MSG to get assistance in cleaning. Upholstery finish stains caused by secondary sources are not covered under your Malibu Boats Warranty. - Page 138 It is important to keep your vinyl clean at all times. Some substances can stain the vinyl if you leave them on for even a short period. Remove any contaminant and clean the area immediately. Some household cleaners, powdered abrasives, steel wool, industrial cleaners, dry cleaning fluids and lacquer solvents can damage and discolor.
-
Page 139: Exterior
The fiberglass hull and deck of your Malibu boat consist of a molded shell and exterior gelcoat. The gelcoat protects the fiberglass shell and gives all Malibu boats a smooth and shiny surface. The following are some general instructions which will help you maintain your boat’s sleek appearance:... - Page 140 Surface Stains Stains can appear as a result of dust, road tar, plant sap, rust from metal fittings and other materials coming in contact with your boat’s exterior. Listed below is a step-by-step procedure to remove stains from your boat: 1) Wash area with dish washing soap 2) Apply a mild cleanser on a small area (3 x 3 ft) 3) Rinse with fresh water...
-
Page 141: Engine/Drive Train
Engine/Drive Train Engine For information on engine service, maintenance and break-in period, please refer to your engine owner’s manual. The Required Maintenance Schedule included in this manual covers the minimum maintenance required for Indmar engine packages. The Maintenance Worksheet included in this manual outlines safety checks, lubrication and general service that should be performed at regular intervals. -
Page 142: Engine Specifications
Engine Specifications 2011 Malibu Engines Engine Models 5.7L MPI (335/350 Monsoon) Number of Cylinders Displacement 350 CID (5.7L) 376 CID (6.2L) 364 CID (6.0L) 4.0012 x 3.480 in. 4.065 x 3.622 in. 4 x 3.622 in. Bore/Stroke (101.63 x 88.39 mm) (103.25 x 92 mm) (101.6 x 92 mm) Compression Ratio... -
Page 143: Dipstick
Transmission Check fluid only with engine OFF and boat floating level, or level on trailer. The transmission dipstick is located on the top of the transmission. Dipsticks may be marked “FULL” or “H” (high) and “ADD” or “L” (low); maintain fluid level between the two marks. -
Page 144: Figure 4-6 Drip Less Shaft Packing
Damaged caused from loosened coupler bolts and improper engine alignment is not covered under your Malibu Boats warranty, and should be part of the owner’s service responsibilities to ensure system is correct. See Malibu Boats and Indmar Owner’s Manuals for appropriate timelines for... -
Page 145: Fuel System
Fuel System Fuel System All 2011 Malibu Boats are equipped with Pump-in-tank (PIT) fuel systems. This means the fuel pump is no longer mounted on the engine and is now located in the fuel tank. There are many benefits to using Pump-in-Tank; most notably is the prevention of vapor lock and improved filtration of contaminants. -
Page 146: Electrical
Boat Alarms Malibu boats are equipped with sensors that constantly monitor various functions of the boat. Certain functions, if outside of pre-determined operating parameters, may activate an alarm located under the dash. Both the engine Electronic Control Module (ECM) and the dash gauge computer may activate the alarm. -
Page 147: Figure 4-8 Battery Level
4-11 Battery A minimum of 650 cold cranking amps is the recommended battery size for 2011 models. TERMINAL VENT CAP Do not connect POST battery cables to VENT WELL incorrect Terminal MAXIMUM Post ±. Doing so LIQUID may cause a LEVEL reverse polarity MINIMUM... - Page 148 4-12 When the engine is off, you will pull current for both the house and cranking circuit on which ever battery you have selected or both batteries. With this system you are required to manage the battery system, keeping both batteries charged and never run the second battery dead.
-
Page 149: Figure 4-9 Battery Switch
4-13 The cranking battery is the primary battery that is only used to start and operate the engine. Having the cranking circuit truly isolated from the house circuit is the ultimate upgrade; it prevents cranking voltage spikes from causing any problems with the onboard computer network. -
Page 150: Miscellaneous
4-14 Miscellaneous Hardware Most of the metal hardware on your boat consists of brass, stainless steel, or aluminum and should be cleaned on a periodic basis with soap and water. In fresh water, metal fittings and hardware should be sprayed regularly with a rust inhibitor and after every use in saltwater. - Page 151 4-15 Storage and Winter Lay-up Due to the problems that can occur from improper winterization, we recommend that you take your boat to a certified Malibu dealership to perform this task. Without proper preparation, storage for long periods of time may cause parts of the engine and transmission to rust due to lack of lubrication.
- Page 152 4-16 Winterization Re-Commission • Remove boat cover or shrink-wrap from boat. • Remove Duct tape from exhaust flaps. • Charge and install battery in boat. Follow all safety precautions associated with changing batteries. • De-winterize engine using engine manufacturer’s specifications. •...
-
Page 153: Troubleshooting
4-17 Troubleshooting The following charts will assist you in finding and correcting minor mechanical and electrical problems with your boat. Problems are listed in the order of the most likely event to the least likely. To correct a problem, first determine what the problem is. Start with the first cause and eliminate the possibility of each until the problem is corrected. - Page 154 4-18 PROBLEM POSSIBLE CAUSE SOLUTION Engine will not turn • Throttle control in gear. • Shift into neutral. over • Main circuit breaker open. • Reset circuit breaker. Engine turns over, but • No fuel in tanks. • Fill fuel tank. will not start •...
- Page 155 4-19 PROBLEM POSSIBLE CAUSE SOLUTION Throttle/shifting • Corroded cables. • Clean and lubricate cables. problems • Defective throttle return • Replace the throttle return spring. spring. • Low transmission oil level. • Replenish the transmission fluid. • Sticking transmission • Clean and lubricate detent shift detent ball.
-
Page 156: Glossary
FibECS II: An engine mounting method, using fiberglass instead of other materials such as aluminum or steel; patented by Malibu Boats LLC. that provides major reduction in noise and vibration. FIBERGLASS: Fibers similar to wool or cotton, but made from fibrous glass. -
Page 157: Index
4-21 Index Anchoring ......3-16 Navigational Lights....2-49 Operation by Minors . - Page 158 4-22...
- Page 159 4-23...
- Page 160 4-24 Notes...
- Page 161 Thank you for choosing to purchase a Malibu Boats, LLC (“Malibu Boats”) product. Malibu Boats is committed to assuring your satisfaction with your new boat. Malibu Boats will provide for repairs to your boat during the applicable warranty periods in accordance with the following terms, conditions and limitations.
- Page 162 (a) the date the boat was purchased by the first retail purchaser through an authorized Malibu Boats sales facility, or (b) the date the boat was first put into service as a demonstrator or otherwise, and qualify for and complete a warranty transfer as explained below, are provided coverage under the Malibu Boats Limited Warranty.*...
- Page 163 Malibu Boats Limited Warranty beyond that which were available to the boat’s original owner. Malibu Boats retains the right to deny warranty transfers to boats that are damaged or have been abused.
- Page 164 The Gelcoat Limited Warranty is Not Transferable. Lifetime Hull Limited Warranty For the life of the boat, Malibu Boats will repair substantial manufacturing defects related to structural materials or structural workmanship supplied by it during the construction of the hull, deck, liner, stringer or upholstery frame.
- Page 166 Malibu Boats, within thirty (30) days of discovery of the defect; and, 2. Promptly schedule an appointment with and deliver your boat to Malibu Boats or an authorized Malibu Boats service facility for repairs. Warranty service must be performed by Malibu Boats or an authorized Malibu Boats dealer.
- Page 167 Important Additional Things to Know about the Malibu Boats Limited Warranty Boat Operation, Care and Maintenance Pre-Delivery Service Design and/or Manufacturing Changes Other Warranties...
- Page 168 Satisfaction with your boat is very important to Malibu Boats. Ordinarily all concerns related to your boat can be addressed by your authorized Malibu Boats service facility. If for some reason your concerns are not satisfied, the following steps should be followed: First, ask to discuss your concern with a member of the authorized service facility’s...
- Page 169 SERVICE/MAINTENANCE LOG HOUR DATE READING SERVICE/REPAIRS PERFORMED...
- Page 170 Corporate Headquarters Tennessee Plant Australian Headquarters Malibu Boats, L.L.C. Malibu Boats, L.L.C. Malibu Boats, L.L.C. One Malibu Court 5075 Kimberly Way 813 Hope Court Merced, CA 95341 Loudon, TN 37774 Albury, N.S.W. 2640 Phone: (209) 383-7469 Phone: (865) 458-5478 Phone: (026) 040-1174...
Need help?
Do you have a question about the 2011 Wakesetter 247 LSV and is the answer not in the manual?
Questions and answers