Table of Contents
Advertisement
Advertisement
Table of Contents

Related Manuals for Teac T-H380DNT


Summary of Contents for Teac T-H380DNT
- Page 1 CQX1A1406Z T-H380DNT DAB/AM/FM Stereo Tuner OWNER’S MANUAL...
-
Page 2: Important Safety Instructions
< IF YOU ARE EXPERIENCING PROBLEMS WITH THIS PRODUCT, 6) Clean only with dry cloth. CONTACT TEAC FOR A SERVICE REFERRAL. DO NOT USE THE 7) Do not block any ventilation openings. Install in accordance with PRODUCT UNTIL IT HAS BEEN REPAIRED. -
Page 3: Table Of Contents
Contents Before use Read this before attempting any operations. Thank you for choosing TEAC. Read this manual carefully to get the best performance from this unit. < As the unit may become warm during operation, always leave sufficient space around the unit for ventilation. -
Page 4: Connection
Connection T-H380DNT A-H380 CAUTION: < Switch off the power to all equipment before REMOTE CONTROL making connections. TUNER < Read the instructions of each component you (LINE IN) intend to use with this unit. A DIGITAL OUT terminal B LINE OUT jacks Digital audio signal of DAB, Internet radio and the Music Player These jacks transmit an analog 2-channel audio signal. -
Page 5: Connecting Antennas (Dab)
REMOTE CONTROL jack of each component by a remote control connection cord, and set the REMOTE CONTROL SELECTOR switch on the rear panel of the T-H380DNT to ”SYSTEM”. < You can use the remote control unit RC-1179 (provided for A-H380). -
Page 6: Connecting Antennas (Am/Fm)
Connecting Antennas (AM/FM) AM Indoor Loop Antenna FM Indoor Antenna The high-performance AM loop antenna provided for this unit is Connect the lead-type FM antenna to the FM 75Ω socket, extend sufficient for good reception in most areas. the lead and tune in your favourite station (see page 14). To stand the loop antenna on a surface, fix the claw to the slot in Adjust the antenna in a suitable location like a window frame or the antenna base. -
Page 7: Parts Identification
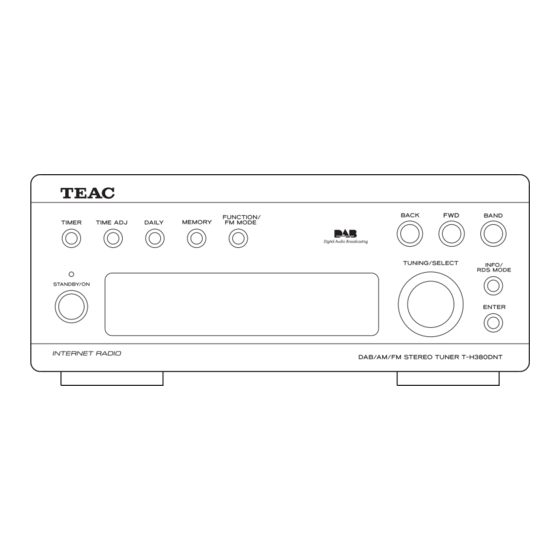
Parts Identification STANDBY/ON Press this button to turn the unit on or put in the standby mode. While entering characters, press this button to select a character. The standby indicator is orange when the unit is in the standby mode. When the unit is turned on, it lights in blue. The standby indicator lights in blue and orange alternately when BAND the timer is set. -
Page 8: Dab Basic Operations
DAB Basic operations Setting up your DAB Tuner Using the Channel List The first time you select DAB as the source, the unit will scan for DAB channels and build a channel list. Select DAB by pressing the BAND button repeatedly. Press the STANDBY/ON button to turn the unit on. -
Page 9: Using Dab Menu 1
Using DAB Menu 1 Note DAB menu operations < To display the channel list while listening to a DAB channel, turn In DAB mode, use DAB menu to access various functions. There are 7 the TUNING/SELECT knob. options in the DAB menu. <... -
Page 10: Manual Tune
Using DAB Menu 2 Manual Tune Channel Scan The signal strength is displayed. This may be useful when If you move the unit to a new area or you want to check to see if adjusting or positioning an antenna for better reception. there are new channels available in your area, you can scan DAB bands to find new channels. -
Page 11: Drc Value
Preset Tune DRC value Use this to select the DAB preset station. This option sets the Dynamic Range Control (DRC) value to be applied to received broadcasts. DRC is used to reduce the range < See page 15 for the procedure of presetting DAB stations. between high and low volumes of audio and is sometimes applied at the broadcast source. -
Page 12: Station Order
Using DAB Menu 3 Alphanumeric Station order This is the default order. Channels are listed by name with You can select the order in which stations are listed. numbers first and then alphabetically by letters in the channel name. Open the DAB menu. Press the FUNCTION/FM MODE button while DAB is selected as Ensemble the source. -
Page 13: Changing Display Settings
Changing Display Settings You can choose the type of information displayed in the second line Channel and frequency of the display while listening to a DAB channel. This displays the channel and frequency of the current playing broadcast. BBC Radio 5 Live 220.35MHz Bitrate mode This displays the bitrate of the current playing broadcast. -
Page 14: Listening To Fm/Am
Listening to FM/AM Select the station you want to listen to. Manual tuning mode Select FM or AM by pressing the BAND button repeatedly. Turn the TUNING/SELECT knob until the station you want to listen to is found. The frequency changes by a fixed step (FM: 50 kHz steps, AM: 9 kHz steps). -
Page 15: Preset Tuning 1
Preset Tuning 1 Within 4 seconds, press the MEMORY button. Manual Preset (DAB/AM/FM) You can store up to 30 FM, 30 AM and 20 DAB stations. The station is stored. < To store more stations, repeat steps < If you do not press the MEMORY button within 4 seconds after Select DAB, AM or FM by pressing the BAND button selecting the preset number, presetting will be cancelled. -
Page 16: Rds
Preset Tuning 2 The Radio Data System (RDS) is a broadcasting service which allows How to select preset stations (FM/AM) stations to send additional information along with the regular radio programme signal. RDS works on the FM waveband in Europe only. Tune in an FM station (see page 14). -
Page 17: Pty Search
PTY Search When T-H380DNT and A-H380 are connected by remote control cords After selecting TRAFFIC ANNOUNCE, you can select any other source by turning the INPUT SELECTOR of the A-H380. If a station broadcasting traffic announcement is found, the INPUT SELECTOR of the A-H380 will be automatically switched to “TUNER”. -
Page 18: Internet Radio Initial Setup
Internet Radio Initial Setup When you use the Internet radio function for the first time, the unit Enter the correct password for the network if required. starts an initial setup procedure to connect to the Internet. < See “How to input characters” on page 19. Now the unit starts to connect to the Internet. -
Page 19: Listening To Internet Radio 1
Listening to Internet Radio 1 How to input characters BACK Listening to an Internet radio station/a TUNING/SELECT ENTER Podcast Key:Ge < Select Internet Radio by pressing the BAND button 0123456789 repeatedly. 1. Turn the TUNING/SELECT knob to select a set of characters. 2. - Page 20 Listening to Internet Radio 2 Select “Stations” for Internet radio stations, or “Podcasts” If you have selected “Location”, “Genre” or “Search for Podcasts. stations” in step , search for the channel you want. Turn the TUNING/SELECT knob to select the item, and then press Turn the TUNING/SELECT knob to select the item, and then press the ENTER button.
- Page 21 Finding stations/Podcasts Changing the displayed information The Internet radio menu contains various ways of finding stations and Podcasts. Last listened You can select the station/Podcast from the ones you listened to recently. Station list My favourites List of stations/Podcast you stored as favourite is displayed. Select a station/Podcast you want to listen to.
-
Page 22: Radio Portal
3. Input your access code and log in. Checking the “access code” of your unit Each unit of T-H380DNT has its “access code”. This code is required to log in the Internet radio portal. Select Internet Radio by pressing the BAND button repeatedly. -
Page 23: Setting Up Music Player
To use file sharing method, you need to configure your music Right click on the music folder to share. Select “Sharing and files open to access, so that other computers or T-H380DNT can Security”, and set it as read-only. read those files. -
Page 24: Listening To Music Player (Media Sharing)
Listening to Music Player (Media Sharing) Select Internet Radio by pressing the BAND button Select “Browse”, then “Shared Media”. repeatedly. Turn the TUNING/SELECT knob to select the item, and then press the ENTER button. Open the Internet radio menu. Press the FUNCTION/FM MODE button. A list of shared media library appears. -
Page 25: Listening To Music Player (File Sharing)
Listening to Music Player (File Sharing) Select Internet Radio by pressing the BAND button Select “Browse”, then “Shared folder”. repeatedly. Turn the TUNING/SELECT knob to select the item, and then press the ENTER button. Open the Internet radio menu. Press the FUNCTION/FM MODE button. The names of connected Domains and Workgroups appear. -
Page 26: Network Configuration
Network Configuration Performing the setup wizard Software update If you have moved or modified your network environment, or The software of the unit can be updated via the Internet connection, if you have a problem connecting to the Internet, perform the so that you are able to use the latest features of the unit. -
Page 27: Setting The Clock
Setting the Daily Timer 1 < The unit uses the 24-hour clock. This function is available only when REMOTE CONTROL jacks of the T-H380DNT and the A-H380 are connected with a remote control Press the TIME ADJ button. connection cord. - Page 28 Setting the Daily Timer 2 To turn on the timer Turn the TUNING/SELECT knob to set the start time (minutes), and press the ENTER button. Press the TIMER button repeatedly until “Timer On” is displayed. Off time00:00:00 CH12 108.00MHz The on-time is set. “Off time” appears on the display, and the hour value flashes.
-
Page 29: Troubleshooting
If your unit is not working properly, it might help to reset it to the problem yourself before you call your dealer or a TEAC service factory default. -
Page 30: Specifications
Specifications FM Tuner Accessories Tuning range ....87.50 - 108.00 MHz (50 kHz steps) AM loop antenna x 1 Usable sensitivity......... . 6 dBμ FM Lead-type antenna x 1 Harmonic distortion . - Page 32 7733 Telegraph Road, Montebello, California 90640 Phone: (323) 726-0303 TEAC CANADA LTD. 5939 Wallace Street, Mississauga, Ontario L4Z 1Z8, Canada Phone: (905) 890-8008 TEAC MEXICO, S.A. de C.V Rio Churubusco 364, Colonia Del Carmen, Delegación Coyoacàn, CP 04100, México DF, México Phone: (5255)5010-6000 TEAC UK LIMITED Unit 19 &...
Need help?
Do you have a question about the T-H380DNT and is the answer not in the manual?
Questions and answers