Table of Contents
Advertisement
9A10490600
Z
T - H300DABmk #
DAB/AM/FM Stereo Tuner
OWNER'S MANUAL
Important Safety Instructions . . . . . . . . . . . . . . . . . . . . . . 2
Before Use . . . . . . . . . . . . . . . . . . . . . . . . . . . . . . . . . . . 2
Connection . . . . . . . . . . . . . . . . . . . . . . . . . . . . . . . . . . . 3
Connecting Antennas (AM/FM) . . . . . . . . . . . . . . . . . . . . 4
Connecting Antennas (DAB) . . . . . . . . . . . . . . . . . . . . . . 5
Names of Each Control . . . . . . . . . . . . . . . . . . . . . . . . . . 6
Setting up your DAB Tuner . . . . . . . . . . . . . . . . . . . . . . . 7
Auto Tuning . . . . . . . . . . . . . . . . . . . . . . . . . . . . . . . . . . 7
Using the Channel List. . . . . . . . . . . . . . . . . . . . . . . . . . . 8
Using Function Control . . . . . . . . . . . . . . . . . . . . . . . . . . 9
Changing Display Settings . . . . . . . . . . . . . . . . . . . . . . . 12
Listening to FM/AM . . . . . . . . . . . . . . . . . . . . . . . . . . . . 13
Preset Tuning . . . . . . . . . . . . . . . . . . . . . . . . . . . . . . . . 14
RDS . . . . . . . . . . . . . . . . . . . . . . . . . . . . . . . . . . . . . . . . 16
PTY Search . . . . . . . . . . . . . . . . . . . . . . . . . . . . . . . . . . 17
Sleep Timer . . . . . . . . . . . . . . . . . . . . . . . . . . . . . . . . . . 18
Dimmer . . . . . . . . . . . . . . . . . . . . . . . . . . . . . . . . . . . . . 18
Setting the Clock. . . . . . . . . . . . . . . . . . . . . . . . . . . . . . 19
Setting the Daily Timer . . . . . . . . . . . . . . . . . . . . . . . . . 20
How to Reset the Settings to the Factory Defaults . . . . . 21
Troubleshooting . . . . . . . . . . . . . . . . . . . . . . . . . . . . . . 22
About DAB . . . . . . . . . . . . . . . . . . . . . . . . . . . . . . . . . . 23
Specificatioins . . . . . . . . . . . . . . . . . . . . . . . . . . . . . . . . 23
Thank you for choosing TEAC. Read this manual carefully to get the best performance from this unit.
Advertisement
Table of Contents

Related Manuals for Teac T-H300DABmkIII


Summary of Contents for Teac T-H300DABmkIII
-
Page 1: Table Of Contents
Specificatioins ....... . 23 Thank you for choosing TEAC. Read this manual carefully to get the best performance from this unit. -
Page 2: Important Safety Instructions
6) Clean only with dry cloth. < IF YOU ARE EXPERIENCING PROBLEMS WITH THIS PRODUCT, 7) Do not block any ventilation openings. Install in accordance CONTACT TEAC FOR A SERVICE REFERRAL. DO NOT USE THE with the manufacturer’s instructions. PRODUCT UNTIL IT HAS BEEN REPAIRED. -
Page 3: Connection
AC power cord or speaker cables. REMOTE CONTROL jack AC Power Cord If you have TEAC A-H300mkIII, convenient system control After all other connections are complete, connect the plug operations are available: to the AC wall socket. -
Page 4: Connecting Antennas (Am/Fm)
Connecting Antennas (AM/FM) AM Indoor Loop Antenna FM Indoor Antenna The high-performance AM loop antenna provided with this Connect the lead-type FM antenna to the FM 75Ω socket, unit is sufficient for good reception in most areas. extend the lead and tune the tuner to your favorite station To stand the loop antenna on a surface, fix the claw to the (see page 13). -
Page 5: Connecting Antennas (Dab)
Connecting Antennas (DAB) DAB Indoor Antenna DAB Outdoor Antenna Connect the T-type DAB antenna to the DAB socket, extend In an area where DAB signals are weak, it will be necessary to the lead vertically and attach it to a window frame or wall use an outdoor DAB antenna. -
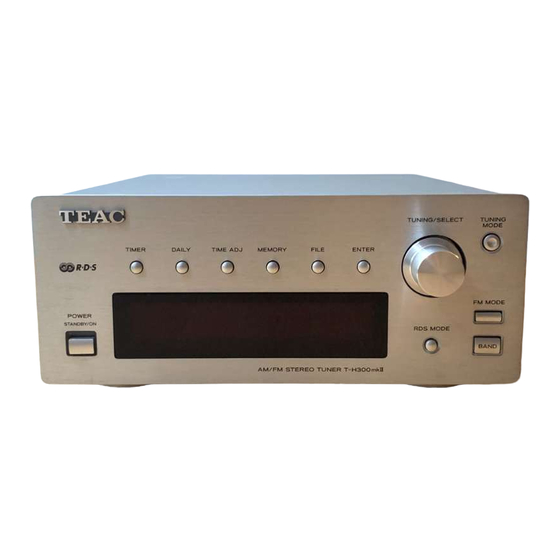
Page 6: Names Of Each Control
When the unit is turned on, it goes off. ENTER < If the T-H300DABmkIII is connected to the A-H300mkIII with Use this button to enter your selection. a remote control cord, you can switch ON/standby both the... -
Page 7: Setting Up Your Dab Tuner
Setting up your DAB Tuner Auto Tuning The first time you turn on the unit, it will scan for DAB channels If you move the unit to a new area or you want to check to see if and build a channel list. there are new channels available in your area, you can scan to find new channels automatically. -
Page 8: Using The Channel List
Using the Channel List Follow the steps below to tune in and listen to the channels < To display the signal strength of a channel, press the ENTER found by the unit. button again. The signal strength is display. Press the ENTER button once again to cancel the signal strength display. -
Page 9: Using Function Control 1
Using Function Control 1 Turn the TUNING/SELECT knob until the desired option TUNING/SELECT ENTER is displayed in the second line of the display. FUNCTION/FM MODE In DAB mode, use function control to set system options. There are 6 options in the function control. Station order Signal error rate Fav Station (Favourite station) - Page 10 Using Function Control 2 Sig error rate (Signal error rate) Preset tune This option shows the digital bit error rate (0-99) of the currently Use this option to select the DAB preset station. tuned channel. This is for information only and no adjustment is available.
- Page 11 DRC value Manual tune This option sets the Dynamic Range Control (DRC) value to be This option allows you to manually tune in a channel and view a applied to received broadcasts. DRC is used to reduce the range continuously updated display of the strength of the signal. This between high and low volumes of audio and is sometimes may be useful when adjusting or positioning an antenna for applied at the broadcast source.
-
Page 12: Changing Display Settings
Changing Display Settings You can choose the type of information displayed in the second Multiplex name line of the display while listening to a DAB channel. This displays the name of the Mulitplex that is broadcasting the programme. Each time the INFO/RDS MODE button is pressed, the information is displayed as follows. -
Page 13: Listening To Fm/Am
Listening to FM/AM FUNCTION/FM MODE Button Pressing this button alternates between Stereo mode and Mono mode. Select AM or FM by pressing the BAND button. Stereo: FM stereo broadcasts are received in stereo and the ‘STEREO’ is displayed. Select the desired tuning mode by pressing the ENTER button. -
Page 14: Preset Tuning
Preset Tuning Preset Manuallly (FM/AM/DAB) You can store up to 30 FM, 30 AM and 10 DAB stations. TUNING/SELECT MEMORY BAND Select DAB, AM or FM by pressing the BAND button. You can also use the numeric buttons of the remote control unit provided with the A-H300mkIII. - Page 15 Preset Automatically (FM/AM only) How to select FM/AM preset stations Select AM or FM by pressing the BAND button. Select AM or FM by pressing the BAND button. Press the MEMORY button for more than 3 seconds. Select ‘Preset tune’ by pressing the ENTER button. Up to 30 of the best received stations in your area will be stored automatically.
-
Page 16: Rds
The Radio Data System(RDS) is a broadcasting service which When the A-H300mkIII and T-H300DABmkIII is connected allows stations to send additional information along with the by remote control cords regular radio programme signal. After selecting TRAFFIC ANNOUNCEMENT, you can select any other source by turning the INPUT SELECTOR of the A- RDS works on the FM waveband in Europe only. -
Page 17: Pty Search
PTY Search < When the programme that you have selected is found, searching stops and the programme type will be displayed. < If the same programme type is not found during PTY Search, it will stop at the beginning frequency. <... -
Page 18: Sleep Timer
< This function will be cancelled when the unit is turned off. < If the PD-H300mkIII is connected to the T-H300DABmkIII with a remote control cord, the display of both the PD-H300mkIII SLEEP 90 (80 ... 10 ) and the T-H300DABmkIII will be dimmed. -
Page 19: Setting The Clock
Setting the Clock TUNING/SELECT ENTER TIME ADJUST Press the TIME ADJ button. Turn the TUNING/SELECT knob to set the current minute. ‘C-time’ (current time) appears on the display, and the ‘hour’ value blinks. < You cannot adjust the clock when the unit is in the standby Press the ENTER button. -
Page 20: Setting The Daily Timer
(hour), and press the ENTER button. TIMER DAILY This function is available only when the T-H300DABmkIII Turn the TUNING/SELECT knob to set the stop time (tuner) is connected to the A-H300mkIII (amplifier) with a (minutes), and press the ENTER button. -
Page 21: How To Reset The Settings To The Factory Defaults
How to Reset the Settings to the Factory Defaults Press the STANDBY/ON button of the A-H300mkIII to If the power supply is interrupted for 14 days or longer, all the settings kept in memory (such as preset stations and timer turn all the units standby. -
Page 22: Troubleshooting
Ensure you have pressed the ENTER button when you want problem yourself before you call your dealer or a TEAC service to listen to your selection. The station you are currently center. -
Page 23: About Dab
About DAB Specificatioins With this unit you can receive and listen to Digital Audio FM Tuner Broadcast (DAB) programmes. DAB uses digital, not analogue Tuning range ..87.50 - 108.00 MHz (50 kHz steps) signals, resulting in near CD-quality audio with virtually Signal-to-Noise ratio . - Page 24 7733 Telegraph Road, Montebello, California 90640 Phone: (323) 726-0303 TEAC CANADA LTD. 5939 Wallace Street, Mississauga, Ontario L4Z 1Z8, Canada Phone: (905) 890-8008 TEAC MEXICO, S.A. De C.V Campesinos N°184, Colonia Granjas Esmeralda, Delegacion Iztapalapa, CP 09810, México DF Phone: (525) 581-5500 TEAC UK LIMITED Unit 19 &...
Need help?
Do you have a question about the T-H300DABmkIII and is the answer not in the manual?
Questions and answers