Table of Contents
Advertisement
Quick Links
Advertisement
Table of Contents

Subscribe to Our Youtube Channel
Related Manuals for Gefen EXT-VGAAUD-444


Summary of Contents for Gefen EXT-VGAAUD-444
- Page 1 4x4 VGA Matrix EXT-VGAAUD-444 User’s Manual www.gefen.com...
- Page 2 Notice Gefen LLC reserves the right to make changes in the hard ware, packaging and any accompanying doc u men ta tion without prior written notice. 4x4 VGA Matrix is a trademark of Gefen LLC © 2011 Gefen LLC, All Rights Reserved...
-
Page 3: Table Of Contents
CONTENTS Introduction Operation Notes Features Panel Layout Panel Descriptions Connecting And Operating The 4x4 VGA Matrix IR Remote Description 4x4 VGA Matrix Remote Installation Using the IR Remote Control Unit 10 RS-232 Interface 11 Rack Mount Installation 12 Specifi cations 13 Warranty... -
Page 4: Introduction
VGA and Analog Audio from any of four VGA/audio sources to any of 4 VGA displays and audio devices. The Gefen 4x4 VGA Matrix works with a wide variety of VGA sources such as computers, security cameras and DVRs. Every source is accessible at any time by any display by selecting it with the included IR remote, front panel buttons, or RS-232 control. -
Page 5: Operation Notes
Standard VESA resolutions should be output by most computers without the need of an EDID. If using a non-VESA standard resolution or if EDID is needed, an EDID storage and relay device is necessary. Gefen recommends the use of a DVI Detective (part# EXT-DVI-EDIDN) with two... -
Page 6: Features
RS-232 Control • Includes discrete IR remote control Package Includes (1) Gefen 4x4 VGA Matrix (4) 6 ft. VGA Cables (M - F) (4) 6 ft. 3.5mm, mini-stereo Analog Audio Cables (1) 24V DC Power Supply (1) IR Remote Control Unit... -
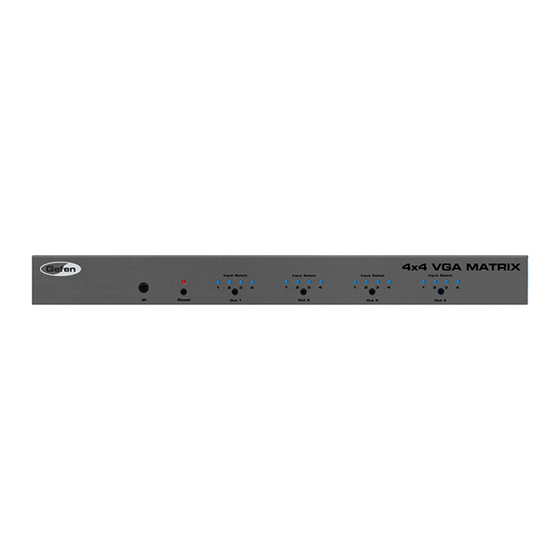
Page 7: Panel Layout
PANEL LAYOUT Front Panel Back Panel 28 29... -
Page 8: Panel Descriptions
PANEL DESCRIPTIONS Power LED This LED indicator glows RED when power is connected properly and suffi cient power is being received by the Matrix. Selected Input LED Indicators For Outputs 1-4 Each of the four output ports has an associated bank of 4 LED indicators that shows which input source 1-4 is active for that output. -
Page 9: Connecting And Operating The 4X4 Vga Matrix
Wiring Diagram for the 4x4 VGA Matrix MINI STEREO AUDIO CABLE VGA CABLE Computer RS-232 CABLE Computer Computer Computer Switcher VGA Monitor VGA Monitor VGA Monitor RS-232 Controller VGA Monitor EXT-VGAAUD-444... -
Page 10: Ir Remote Description
IR REMOTE DESCRIPTION Remove battery cover from the back of the RMT-16-IR remote (see picture below). Locate the DIP Switches and verify that DIP switches 1 & 2 are in the down (OFF) position. Insert the battery, holding the battery so that you can see the positive side facing up. -
Page 11: 4X4 Vga Matrix Remote Installation
4X4 VGA MATRIX REMOTE INSTALLATION How to Resolve IR Code Confl icts In the event that IR commands from other remote controls confl ict with the supplied RMT-16IR remote control, changing the remote channel will alleviate this issue. The RMT-16IR remote control has a bank of DIP (Dual Inline Package) switches (see page 7) for confi... -
Page 12: Using The Ir Remote Control Unit
USING THE IR REMOTE CONTROL UNIT IR Remote Control Key Mapping Each input and output on the 4x4 VGA Matrix is represented by a button on the IR Remote Control unit. The table below lists the corresponding inputs and outputs. RMT-16-IR RMT-16-IR Source... - Page 13 RS-232 SERIAL CONTROL INTERFACE 5 4 3 2 1 1 2 3 4 5 9 8 7 6 6 7 8 9 Only Pins 2 (RX), 3 (TX), and 5 (Ground) are used on the RS-232 serial interface Binary Table ASCII Corresponding Binary...
-
Page 14: Rack Mount Installation
RACK MOUNT INSTALLATION Rack mount ears are provided for installation of this unit into a 1U rack mount space. Locate the side screws on the unit. Remove the front 2 screws that are located closest to the front of the unit. Using the removed screws, screw the rack mounting bracket into the unit. -
Page 15: Specifi Cations
SPECIFICATIONS Video Amplifi er Bandwidth ................ 350 MHz Input Video Signal ................1.2 Volts p-p Input Sync Signal ................. 5 Volts p-p (TTL) Horizontal Frequency Range ..............15-70 KHz Vertical Frequency Range ..............30-170 Hz Video Connectors ........... 8 x HD15, female (4 input, 4 output) Audio Connectors .... -
Page 16: Warranty
Gefen warrants the equipment it manufactures to be free from defects in material and workmanship. If equipment fails because of such defects and Gefen is notifi ed within two (2) years from the date of shipment, Gefen will, at its option, repair or replace the equipment, provided that the equipment has not been subjected to mechanical, electrical, or other abuse or modifi... - Page 19 Rev A5 20600 Nordhoff St., Chatsworth CA 91311 1-800-545-6900 818-772-9100 fax: 818-772-9120 www.gefen.com support@gefen.com This product uses UL listed power supplies.
Need help?
Do you have a question about the EXT-VGAAUD-444 and is the answer not in the manual?
Questions and answers