Table of Contents
Advertisement
Quick Links
Download this manual
See also:
Quick Reference Manual
Advertisement
Table of Contents

Related Manuals for MicroBoards Technology DX-2


Summary of Contents for MicroBoards Technology DX-2
- Page 1 DX-2 Disc Publisher Users Manual Microboards Technology LLC Version 2.1...
- Page 2 • Introduction...
-
Page 3: Table Of Contents
RONT ANEL NDICATORS AND UTTONS ..................................28 LIGNMENT Print Test Disc ................................29 Align Disc ...................................31 ................................33 OADING ISCS CONFIGURING DX-2 DISC PUBLISHER ........................33 HOW TO USE ZULU2 ..............................38 ............................38 NSTALLING AND AUNCHING ..................................38 NINSTALL ROBOTICS ..................................39 ...................................39 IZARD QUICK START ................................40 DX-2 D ..................40... - Page 4 Window Menu ................................55 Help Menu ..................................55 ................................56 ASKBAR Taskbar Menu ................................56 RECORDING ACTIONS ..............................56 ................................56 CTION AYOUT .............................57 CTION OMMON ECTION EXTRACTION & TOOLS ..............................60 ..................................60 UDIO File Naming ................................60 Digital Audio Format..............................60 File Menu..................................61 Edit Menu..................................61 Drive Menu .................................61 Track Menu.................................61 View ....................................62 ..............................62...
-
Page 5: Introduction
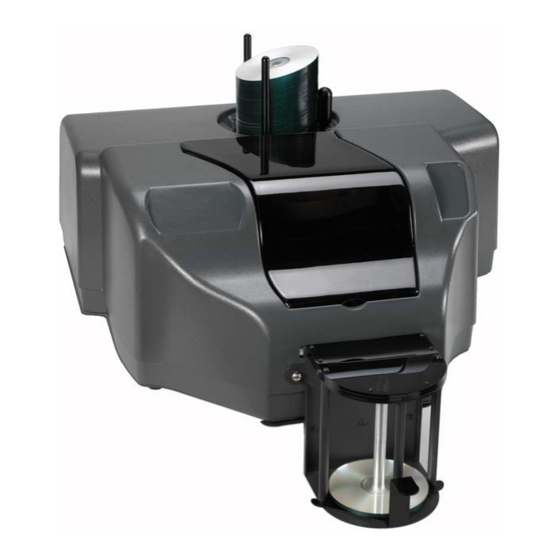
DX-2 DISC PUBLISHER Introduction The Microboards DX-2 Disc Publisher is a two drive, 100 disc, print and record system. The DX-2 combines industrial strength printing and recording into a single, easy to use duplicator. The system includes two 16x DVD recorders or two 52x CD recorders. The Microboards PrintFactory print engine is incorporated, allowing up to 4800 x 1200 dpi printing. -
Page 6: System Requirements
Remove the DX-2 Disc Publisher system from the shipping box and confirm you received all of the items listed. Place the DX-2 Disc Publisher on a stable, flat surface. You will need room both in front and in back of the system, as discs will be accessed from both locations. -
Page 7: Ieee 1394 Pci Card Installation
Plug in the AC power cord to the back of the DX-2 Disc Publisher. Connect the square shaped end of the USB cable to the back of the DX-2 Disc Publisher. Connect the flat, rectangular end of the USB cable into a USB 2.0 port in your PC. -
Page 8: Windows Xp
Windows will now boot up and Windows XP will start stating that new hardware is found, much like this screen: The operating system will next display the following screen: Insert the Microboards DX-2 Disc Publisher CD into a drive in your computer. Click on Next. The following screen will appear: Click Continue Anyway. - Page 9 MICROBOARDS TECHNOLOGY, LLC DX-2 DISC PUBLISHER The files will now be copied from the CD to the operating system: When completed, the following screen will appear: Click on Finish. Next, the operating system will find some additional new hardware. When all new hardware is found and installed, the following message will appear: The hardware has now been successfully installed.
-
Page 10: Windows 2000
Windows 2000 Turn on power to the DX-2 Disc Publisher. Turn on power to the PC. Windows will now boot up and Windows 2000 will start stating that new hardware is found, much like this screen: Next, the operating system will state that it has found new hardware: Click Next. - Page 11 MICROBOARDS TECHNOLOGY, LLC DX-2 DISC PUBLISHER Insert the Microboards DX-2 Disc Publisher Install CD into the reader drive in your computer. Select “Search for a suitable driver for my device” and click Next. Check the box labeled “CD-ROM drives and click Next.
- Page 12 The driver will be found on the CD. Click Next. The Completed screen will now appear. Click Finish. • Hardware Installation...
- Page 13 MICROBOARDS TECHNOLOGY, LLC DX-2 DISC PUBLISHER The operating system will now request the driver files for the printer. Click Next. Select “Search for a suitable driver for my device” and click Next.
- Page 14 Check the box labeled “CD-ROM drives” and click Next. The printer driver will be located on the CD. Click Next. • Hardware Installation...
- Page 15 MICROBOARDS TECHNOLOGY, LLC DX-2 DISC PUBLISHER The Digital Signature screen will appear. Click Yes. The files will now be copied to the operating system. The Completed screen will now appear. Click Finish.
- Page 16 Next, the following screens will appear: Click Next. The following screen will appear: • Hardware Installation...
- Page 17 MICROBOARDS TECHNOLOGY, LLC DX-2 DISC PUBLISHER Select Search for a suitable driver for my device (recommended) and click Next. Select CD-ROM drives and click Next.
- Page 18 Click Next. The operating system will now find the remaining new hardware. Proceed to the Software Installation section. • Hardware Installation...
-
Page 19: Software Installation
DX-2 DISC PUBLISHER Software Installation DX-2 Disc Publisher Install Place the Microboards DX-2 Disc Publisher CD into the computer CD/DVDROM drive. Click on Start and select Run. Click Browse and select the drive with the install CD. Select Publisher.exe and click Open... - Page 20 The DX-2 Disc Publisher Install screen appears: Click next. • Software Installation...
- Page 21 MICROBOARDS TECHNOLOGY, LLC DX-2 DISC PUBLISHER Click Install. Once the files have been transferred, the Finish screen appears: Click Finish. Next, the Zulu2 software install screen will appear:...
- Page 22 Click Next. The files will now be copied from the CD to the operating system. Once finished, this screen will appear: Uncheck the box for Reboot computer. We do not wish to reboot at this time. • Software Installation...
-
Page 23: Surething Labeler Software Installation
MICROBOARDS TECHNOLOGY, LLC DX-2 DISC PUBLISHER SureThing Labeler Software Installation Click on the Start button and select Run. Click Browse and select the drive with the Microboards DX-2 Disc Publisher CD. Select Surething.exe. Click on Open. Click on OK. The SureThing software will now start to install. - Page 24 Click on I Accept. Click on Next. • Software Installation...
- Page 25 MICROBOARDS TECHNOLOGY, LLC DX-2 DISC PUBLISHER If you wish to change the default Install directory, it can be done here. Click Next when completed. Next, you have options to add an icon to your desktop and/or a folder in the Start Menu. Once selected, click Next.
- Page 26 The files will now be transferred from the CD to the operating system. Once completed, the finished screen will appear. You can choose to register the software online at this screen. Click on Finish. You will need to restart the computer for the Zulu2 and SureThing software packages to work correctly.
-
Page 27: Installing Ink Cartridges
Supported Ink Cartridges The DX-2 Disc Publisher uses a color and black ink cartridge. The color ink cartridge comes in two sizes, 38 ml and 19 ml. The 38 ml cartridge is a Microboards PRF38ML. The 19 ml cartridge is a Microboards PRF19ML. -
Page 28: Front Panel Indicators And Buttons
When the action is completed, press the resume button to continue printing. 4. Power Button and Light – The Power button turns the DX-2 Disc Publisher on and off. It may take a few seconds for the DX-2 Disc Publisher to turn on after you press the Power button. -
Page 29: Print Test Disc
To confirm the computer is communicating with the DX-2 Disc Publisher, print a Test Disc. This can be done with one of the inkjet printable CD’s included with your DX-2 Disc Publisher, or an inkjet compatible disc you may already have. To print the Test Disc: •... - Page 30 • Select Print Test Disc. • A disc will be dropped onto the belts and then printed. • Once printing is complete, the disc will be ejected into the output hopper. • If the alignment is OK, proceed with your printing project. •...
-
Page 31: Align Disc
Publisher, referring to the top and left margin sizes, respectively. These can be found on the label under the DX-2 Disc Publisher cover. You may need to adjust the values, depending on the images you are printing. To run the alignment utility, first confirm the Top and Left values are 0 (zero). If they are not, press the Factory Settings button, to reset these values. - Page 32 Once the new numbers are entered, click Apply. The Alignment CD pattern is also included on the DX-2 Disc Publisher CD, so you can print additional Alignment patterns with your DX-2 Disc Publisher, once it is aligned. The alignment circle is 8 cm in diameter and is 2 cm from the outer edge of the CD.
-
Page 33: Loading Discs
Load the rest of the discs at an angle, against the wide input rod, as seen in figure 2. The DX-2 Disc Publisher will hold a maximum of 100 discs. DO NOT load more than 100 discs in the system, as this may cause the discs to feed incorrectly. - Page 34 The Computer Management screen will appear. Open up the Ports (COM & LPT) selection. • Configuring DX-2 Disc Publisher...
- Page 35 MICROBOARDS TECHNOLOGY, LLC DX-2 DISC PUBLISHER You will see an entry labeled “USB Serial Port (COMx) enter for each DX-2 Disc Publisher you have installed. The COMx will be the COM port number to be entered into the Configure screen.
- Page 36 When the T is pressed for the Printer, the belts will move in reverse. Once you have completed your selections, check the Don’t show this window again box to bypass this step when launching Zulu2 again. • Configuring DX-2 Disc Publisher...
- Page 37 DX-2 DISC PUBLISHER Click the OK button The system will now initialize the DX-2 Disc Publisher. The belts will be cleared of any discs and any discs in the recorders will be removed and rejected. Once initialization is complete, the system is ready for use.
-
Page 38: How To Use Zulu2
How to use Zulu2 Installing and Launching Zulu2 is installed as part of the initial setup of the Microboards DX-2 Disc Publisher. Please refer to the Software Installation section for details. Zulu2 is small and, apart from the device driver, does not “share” any system components as it links directly to the main Windows support libraries. -
Page 39: Robotics
If the driver is removed, you should reboot your system to fully unload it from the memory. Robotics The Robotics menu allows users to run specific functions associated with the Microboards DX-2 Disc Publisher system. These functions are explained in the Main Window Menu section. -
Page 40: Quick Start
This is highly recommended, in order to allow the system to record at full speed. • Recorder drives available to Zulu2 will be listed in the Drive box. If both recorders in the DX-2 Disc Publisher were selected in the Zulu2 main window, Robotic Drives will be displayed. -
Page 41: Rip An Audio Cd To Wma Files
The Rip Audio function will work with CD’s placed into a drive inside your computer. The recorders inside the DX-2 Disc Publisher system are not used for this function. When you have an Audio CD from which you want to extract one or more tracks as audio files into your hard drive: •... -
Page 42: Record An Audio Compilation
• Click the Rip button to start the operation. The Status column of each track reports the progress and, when done, the size of the file. The music that you transfer from an Audio CD should not be distributed to other user if it is protected by Copyright, and most of the commercial music is indeed copyrighted material. - Page 43 MICROBOARDS TECHNOLOGY, LLC DX-2 DISC PUBLISHER • You can add the Album CD Text by clicking Options and filling the Album Artist (CD Text) and Album Title (CD Text) fields. You can then add each track Artist and Title highlighting a track and selecting the menu Edit >...
-
Page 44: Record Data To Cd Or Dvd
Record Data to CD or DVD To copy files and folders to a CD or a DVD: • Highlight the drive(s) you want to record to in the Zulu2 main window and then double-click on the Data Mastering icon. The Data Mastering window (Zulu2 calls that an “action”) will open, with the drive already set and an empty list. -
Page 45: Record Advd Movie (Video_Ts)
MICROBOARDS TECHNOLOGY, LLC DX-2 DISC PUBLISHER • Select the number of copies you wish to make. • If you wish to print on the recorded discs, click on the Select Print File box and select a print file. This file can be a .prn file or a SureThing .std file. -
Page 46: Extract And Record A Discimage
A “DiscImage” is a set of files that completely describe either a CD or a DVD. Extracting a DiscImage, therefore, means to completely copy a disc on the hard drive. The Extract DiscImage can only be used with drives outside of the DX-2 Disc Publisher. The recorders inside the DX-2 Disc Publisher are not used for this Action: •... - Page 47 MICROBOARDS TECHNOLOGY, LLC DX-2 DISC PUBLISHER • Type in the DiscImage filename or use Edit > Browse… to select it. After selecting the DiscImage, a string will appear below the name, indicating if the file is valid, and its size.
-
Page 48: Erase An Rw Disc
To erase a CD-RW, a DVD-RW, or a DVD+RW: • Highlight the drive(s) from the DX-2 Disc Publisher you wish to use to erase in the Zulu2 main window and then double-click the Erase Disc icon. The Erase Disc window will open, with the drive already set. -
Page 49: Main Window
MICROBOARDS TECHNOLOGY, LLC DX-2 DISC PUBLISHER Main Window When you initially launch the application, the Zulu2 main window starts. This is the place to monitor all your drives, to launch Actions, to control many Actions if several operations are running at once, and from where to launch the Zulu2 tools and set its options. -
Page 50: Action List
Action List The Action List has been designed to control the progression of many simultaneously open and/or running actions. All the actions that are currently open appear In the Action List; 2 columns display which drives the Action is operating, and the Action status. Zulu2 can manage several actions at a time on different drives, such as a Data Mastering recording on one drive and an Audio Compilation recording on another drive. -
Page 51: Main Window Menu
Main Window Menu Action Menu Wizard The Wizard function does not apply when using the Microboards DX-2 Disc Publisher system. Launch » Launches any Zulu2 action, just like double-clicking in the Action Launch Pad. Open…... -
Page 52: Robotic Menu
Drive List. The disc is placed into the output bin. Reject Unloads a disc from the DX-2 Disc Publisher drive selected in the Drive List. The disc is rejected and placed in the reject bin, on the back of the DX-2 Disc Publisher. - Page 53 MICROBOARDS TECHNOLOGY, LLC DX-2 DISC PUBLISHER Sure Thing This selection launches the SureThing label design application. SureThing is used to create labels for printing onto the surface of the discs. These labels can be used inside any of the Zulu2 Action screens or in the Print Only function.
-
Page 54: View Menu
View Menu Toolbar Shows/Hides the toolbar of the main window. Logo Shows/Hides the logo in the toolbar of the main window. Status Bar Shows/Hides the status bar of the main window. Drives List » Physical Address Shows/Hides the Bus/ID address of each drive in the list. Drives List »... -
Page 55: Advanced Menu
MICROBOARDS TECHNOLOGY, LLC DX-2 DISC PUBLISHER Reset Options and Defaults... Returns all the Zulu2 options to their original defaults after confirming this action. The location of the various folders used lately, as well as the last accessed documents and disc images, are cleared as well. -
Page 56: Taskbar Icon
Zulu2 even if its main window is closed. Taskbar Menu Wizard Launches the Wizard for simple recording on the spot. Again, the Wizard is not used with the Microboards DX-2 Disc Publisher. Launch » Launches any Zulu2 action, just like from the main window. Open…... -
Page 57: Action Common Section
Details area, you control everything regarding the recording. Target Drive(s) Select the recording drive(s) inside the DX-2 Disc Publisher, or the target DiscImage if you want to create a DiscImage instead of recording. The highlighted drive(s) in the Zulu2 main window Drive Pad become the default drive(s) of a new launched action. - Page 58 The recording section options will change, as many of the settings required for actual recording are not necessary. Enter or browse for a target .DI file to create a DiscImage that can be used as a source at a later time or location. •...
- Page 59 This gives an opportunity to pause long operations, allowing for more discs to be loaded into the DX-2 Disc Publisher, or do another urgent task with your computer. The pause cannot happen in the middle of the recording; the operation will pause only at the completion of a round.
-
Page 60: Extraction & Tools
This is a collection of tools for disc extraction or for other purposes. Rip Audio The Rip Audio function works outside of the DX-2 Disc Publisher system. Drives inside the DX-2 Disc Publisher system are not used with this Action. -
Page 61: File Menu
MICROBOARDS TECHNOLOGY, LLC DX-2 DISC PUBLISHER File Menu Load Artist and Title from Text File... Loads the Album Title and all the track names from the selected file. The file is in a simple text format, and can be created by the function below. -
Page 62: View
Forces a reload of the disc. Extract DiscImage The Extract DiscImage function works on an outside of the DX-2 Disc Publisher system. Drives inside the DX-2 Disc Publisher system are not used with this Action. As soon as the disc in the drive becomes ready, its content is shown in a line at the top of the window, as well as the dimension that the DiscImage would take. -
Page 63: Manage Discimage
MICROBOARDS TECHNOLOGY, LLC DX-2 DISC PUBLISHER Manage DiscImage Because a DiscImage can be created by multiple files, and also because Zulu2 keeps the image in an open format, this function provides a way to easily manage and explore DiscImages. The Manage DiscImage window is a standard Windows open file common dialog with a few additions, including a list and few buttons. -
Page 64: View
blank, a warning message is displayed. If no warning or error situation exists, the recording will normally start without interruption. Check this option to have always the Action Check dialog appear, to verify the type of recognized disc and to see which speed has been selected. This option is unchecked by default. -
Page 65: Advanced
MICROBOARDS TECHNOLOGY, LLC DX-2 DISC PUBLISHER All the Zulu2 temporary files are called ~Pzxxxx.TMP, where xxxx can be any combination of up to 4 digits or letters. Advanced Disc Content Auto Refresh Zulu2 always keeps the content of the disc in the drives always updated in its windows. Windows has a “volume tracking”... - Page 66 Actual Recording Speed Depends on the Disc Recording speed is determined by the combination of the drive and the disc inserted in it. A drive that supports 48x burn speed to CD could instead report only 16x on one disc while another disc could report a 24x speed.
-
Page 67: The Discimage Format
MICROBOARDS TECHNOLOGY, LLC DX-2 DISC PUBLISHER The DiscImage Format A “DiscImage” refers to a set of files that completely describe a CD or a DVD. These files contain all the information retrieved from the disc. Extracting a disc into a DiscImage, which is also referred to as “creating a DI from a disc”... -
Page 68: Shortcut Keys
DVD+R At Once Not possible. DVD+R Incremental Blank or Incr. disc, closed or not closed. Short or Long Lead-out if closed. Link or Not the data already on disc (if not blank). Always record, no test. DVD+RW At Once Not possible. DVD+RW Incremental Blank or Incr. -
Page 69: Printer Properties
MICROBOARDS TECHNOLOGY, LLC DX-2 DISC PUBLISHER Printer Properties Setup Tab Print Quality • Best • Normal • Fast Print Modes • Text and Graphics • Photo Remember that when printing in Text and Graphics mode, the HP C8842A Versatile Black Ink cartridge is highly recommended. - Page 70 Text and Graphics – Fast Text and Graphics – Normal • Printer Properties...
- Page 71 MICROBOARDS TECHNOLOGY, LLC DX-2 DISC PUBLISHER Text and Graphics – Best Photo Mode should be used when printing on the entire disc. Here is an example: Photo – Normal, Best and 4800x1200 Modes...
-
Page 72: Features Tab
Features Tab Advanced Features allow you to adjust the amount of ink placed on the disc and adjust the dry time of the disc. Color Tab • Printer Properties... -
Page 73: Utility Tab
Saturation, Brightness and Color Tone allow you to fine tune your print image. The Factory Settings button will set the above values back to the factory defaults. Utility Tab Clean Cartridge Manually place a CD onto the belts in the DX-2 Disc Publisher and click the Clean cartridge button. -
Page 74: Ink Level
If your image looks like this example, it may be necessary to clean the ink cartridges. Click the Clean button. The printer will clean the cartridges and print out the following image: If one cleaning does not fix the issue, repeat the process. If after multiple cleanings, the problem still exists, it may be a defective ink cartridge. -
Page 75: Troubleshooting
Remove any discs that are left on the belt. 2. Lift the cover and check for any discs on the front deck of the DX-2 Disc Publisher. Remove any discs found on the belts. Close the cover. -
Page 76: Printing Specifications
Print Quality, Color: 4800 x 1200 optimized dpi, with HP PhotoREt III Color Technology: HP PhotoREt III Memory: Connectivity: Technical Support For technical questions or support issues, please contact Microboards Technology technical support at PH: 952-556-1639, FAX: 952-556-1628, by email at support@microboards.com or on the web at http://www.microboards.com. -
Page 77: Glossary
MICROBOARDS TECHNOLOGY, LLC DX-2 DISC PUBLISHER Glossary Action Zulu2 refers to a single mastering operation as an action. A Data Recording window is an Action, a Copy window is another Action. Zulu2 can have multiple Actions opened and recording at the same time. - Page 78 Buffer Underrun A buffer underrun occurs when your computer system cannot keep up the steady stream of data required for CD recording. The CD recorder has an internal memory buffer to protect against interruptions and slowdowns, but if the interruption is long enough that the recorder’s buffer is completely emptied, a buffer underrun occurs, writing stops, and most often the recordable CD is ruined.
- Page 79 MICROBOARDS TECHNOLOGY, LLC DX-2 DISC PUBLISHER CD-RW Compact Disc ReWritable. CD recordable media which can be erased and re-recorded. CD-RW media can only be written in a CDRW recorder, not in a normal CD recorder, though a CD-RW recorder can also record standard CD-R discs. More information on the read-back compatibility of CD-RW discs.
- Page 80 DVD+RW Digital Versatile Disc plus Rewritable. Media capable of holding up to 4.7GB data per each side. DVD+RW is compatible with many existing DVD drives and players. See UPC. Error Correction Code. A system of scrambling data and recording redundant data onto disc as it is recorded.
- Page 81 MICROBOARDS TECHNOLOGY, LLC DX-2 DISC PUBLISHER 01, etc.) before a track begins – it is counting down to the next track, not counting up from the end of the last one. Header Field Four bytes recorded at the beginning of each sector which tell the address of the sector (expressed as a Logical Block Number) and the mode in which the sector is recorded.
- Page 82 Lead-Out An area at the end of a session which indicates that the end of the data has been reached. The first lead-out on a disc is 6750 sectors (1.5 minutes, about 13 megabytes) long; any subsequent lead-outs are 2250 sectors (.5 minute, about 4 megabytes). Link Block A sector which is written each time the recording laser is turned on writing a track or a packet.
- Page 83 MICROBOARDS TECHNOLOGY, LLC DX-2 DISC PUBLISHER Multivolume A disc containing multiple sessions which are not linked together, so that each “volume” on the disc must be read as if it were a separate disc. NTSC The standard used for broadcast television in the U.S., whose resolution is 525 horizontal lines at 30 frames per second.
- Page 84 Rock Ridge An extension of the ISO 9660 file system designed to support UNIX file system information (such as longer filenames and deeper directory structures). Run In Blocks Four sectors written just after the Link Block, before the valid data sector start. Run Out Blocks Two sectors written just after the last valid data sector.
- Page 85 MICROBOARDS TECHNOLOGY, LLC DX-2 DISC PUBLISHER Track-at-Once (TAO) A method of writing data to disc. Each time a track (data or audio) is completed, the recording laser is stopped, even if another track will be written immediately afterwards. Link and run blocks are written when the laser is turned on and off.
Need help?
Do you have a question about the DX-2 and is the answer not in the manual?
Questions and answers