Table of Contents

Related Manuals for VTech Vonage IP 8100-2


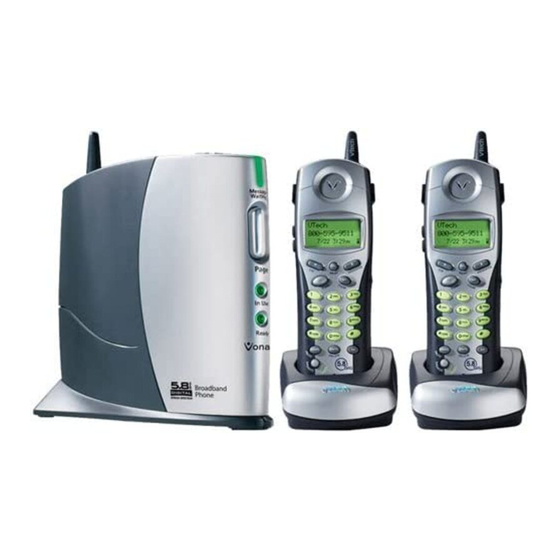
Summary of Contents for VTech Vonage IP 8100-2
-
Page 2: Table Of Contents
Table Of Contents IMPORTANT SAFETY INSTRUCTIONS ............1 Parts Check List ....................3 The Handset Layout ..................4 The Base Unit Layout ..................5 GETTING STARTED..................6 SETUP....................... 6 Connecting power to Base Unit/Handset Charger..........6 Installation of Battery Pack in Handset.............. 6 Charging of the Handset Battery Pack .............. - Page 3 Table Of Contents Ringer Tone ..................... 24 Key Tone (preset to ON).................. 24 Language (preset to English) ................25 Message Waiting ..................... 25 Clear Message waiting ..................25 ADVANCED OPERATION ................26 Headset Operation ..................26 ADDITIONAL INFORMATION ................ 27 In Case Of Difficulty..................
-
Page 4: Important Safety Instructions
11. Do not overload wall outlets and extension cords as this can result in the risk of fire or electric shock. 12. Unplug this product from the wall outlet and contact VTech under the following conditions: A. When the power supply cord or plug is damaged or frayed. - Page 5 Important Safety Instructions E. If the product has been dropped and the handset and/or base unit has been damaged. F. If the product exhibits a distinct change in performance. 13. Avoid using a telephone (other than cordless) during an electrical storm. There may be a remote risk of electric shock from lightning.
-
Page 6: Parts Check List
7. Belt Clips 3. Handset Chargers 8. User Documentation CD 4. Ethernet Cables 9. Quick Start Guide 5. Base Power Adapter 10. Batteries NOTE: USE ONLY VTech Battery 80-5808-00-00 or VTech Replacement 89-1324-00-00. Base Unit Battery Handset Blue Ethernet Cable Handset Charger... -
Page 7: The Handset Layout
The Handset Layout 9. Speakerphone 1. Antenna 2. Earpiece 10. LCD Display 3. Volume Control 11. Select (Menu) 4. CID (Scroll Down) 12. Phonebook (Scroll Up) 5. On (Flash) 13. Headset Jack (2.5mm) 6. Voicemail 14. Off (Clear) 7. Dialing Keys (0-9, *, #) 15. -
Page 8: The Base Unit Layout
The Base Unit Layout � � � � � � � � 1. Message Waiting LED 2. Page key 3. In Use LED 4. Service Status LED 5. LAN Port 6. WAN Port 7. DC Connector Jack 8. Reset Switch... -
Page 9: Getting Started
Setup Connecting power to Base Unit/Hand- set Charger 1. Plug the power adapter into an electrical outlet, and the connector into the connec- tor jack at the bottom of the base unit. 2. Choosethelocationforyourhandsetcharger, and plug its power supply into an electrical outlet. -
Page 10: Reset Switch
After the battery is charged, press ON on the handset. The LCD displays PHONE and shows a call timer, and you will hear a dial tone. If not, see In Case of Difficulty. CAUTION: Use only the VTech power supply provided with your telephone. IMPORTANT! MAXIMUM PERFOR-... -
Page 11: Wall Mounting
Wall Mounting The wall mount brackets are designed for use on standard wall mount plates only. Wall mounting is optional. Only the handset chargers (not the main base unit) can be wall mounted. 1. Plug the power adapters into electrical outlets, and the connector to the bot- tom of the handset charger. -
Page 12: Installation Without A Router
Setup Installation Without A Router INTERNET DSL or Cable Modem IP 8100-2/8100-3 Handset 1 & 2 PC/LAN Port WAN Port IP 8100-2/8100-3 Base Unit NOTE: The IP 8100-2/8100-3 is expand- able up to a total of 4 handsets. Uses model IP 811 (sold separately) Warning: Do not route the ethernet cable to outdoors, and ensure that you are isolation. - Page 13 Setup STEP 2 Disconnect all cables between your Cable or DSL modem and your computer. STEP 3 Connect one end of the yellow ethernet cable to the yellow port, labeled “PC/ LAN,” located on the back of the IP 8100-2/8100-3 base unit and connect the other end of the yellow cable to the ethernet port of your computer.
- Page 14 field, type <http://192.168.15.1> and press ENTER. This displays the login screen. Enter the default password ‘VTech’ and click on login. On the Setup Wizard screen, click Run Wizard to start the set-up. Follow Wizard screens to complete the setup.
-
Page 15: Installation With A Router
Setup Installation With A Router INTERNET IP 8100-2/8100-3 Base Unit DSL or Cable Modem WAN Port Laptop Existing IP 8100-2/8100-3 Network Router Handset 1 & 2 NOTE: The IP 8100-2/8100-3 is expandable up to a total of 4 handsets. Uses model IP 811 (sold separately) Warning: Do not route the ethernet cable to outdoors, and ensure that you are using a safety approved DSL or Cable modem with proper electrical isolation. -
Page 16: Installation With A Modem Router
Setup Installation With A Modem Router INTERNET IP 8100-2/8100-3 Base Unit WAN Port Laptop DSL or Cable Modem IP 8100-2/8100-3 Handset 1 & 2 NOTE: The IP 8100-2/8100-3 is expandable up to a total of 4 handsets. Uses model IP 811 (sold separately) Warning: Do not route the ethernet cable to outdoors, and ensure that you are using a safety approved DSL or Cable modem with proper electrical isolation. -
Page 17: Basic Operation
Handset and Base Indicators Handset Icons Icon Description MUTE • Turns on when the microphone is muted. • Turns on when there are new call log entries. • Turns on when the ringer is muted. • Low battery indicator and charging indicator. Handset LEDs Description SPEAKER • LED is on when in handsfree mode. Base LEDs Description •... -
Page 18: Handset Operation
Handset Operation Making Calls Press ON (or, SPEAKER to use the handset speak- • erphone feature). Dial the phone number. -OR- • Dial the phone number first; then press ON (or SPEAKER). Press OFF to end your call. • Answering Calls •... -
Page 19: Dial Vonage Voicemail
Handset Operation • When the desired entry displays, press DELETE. You’ll hear a confirmation beep. Dial Vonage Voicemail Press and hold #1 key to dial Vonage Voice- mail. Mute Function During an active call, pressing the MUTE/ • DELETE key will disable the microphone. PHONE 00:00:15 MICROPHONE MUTED will display... -
Page 20: Call Forward
Handset Operation Call Forward • While on an external call, one handset (HS1) ENTER HANDSET # can forward it to any other handset: • Press INT on HS1, it will display: • Enter the handset number you wish to for- ward, HS1 will display: CALL FORWARDED HS X can press ON to answer the call. -
Page 21: Phonebook Operation
Phonebook Operation /8100-3 Your IP 8100-2 can store up to 50 numbers with names in memory. Each memory location can hold up to 32 digits for the number and 16 characters for the name. NOTE: The handsets share a common phonebook, which is stored in the base. This means that entries inserted by one handset are available for all handsets, and if one deletes a phonebook entry, it will disappear from all handsets. -
Page 22: Reviewing/Dialing From The Phonebook
The first phonebook entry will be displayed. • Scroll through the phonebook entries using VTech Com keys or enter first character of the name to 800-595-9511 be searched (using the digit keys) and continue... -
Page 23: Editing A Phonebook Entry
595-9511 • Press SEL to confirm the change. A confirmation tone will sound. Delete a Phonebook Entry VTech Com • Follow the first two steps in Reviewing/Dialing 800-595-9511 from the Phonebook on previous page to reach the entry to be deleted. -
Page 24: Calls Log (Caller Id - Call Waiting)
Calls Log (Caller ID - Call Waiting) Caller ID - Call Waiting ID Your IP 8100-2/8100-3 is capable of displaying the name and/or number of the party calling before you answer the phone (caller ID). It is also capable of dis- playing caller ID information in conjunction with a call waiting alert signal (call waiting caller ID). -
Page 25: Storing A Caller Id
Calls Log (Caller ID - Call Waiting) Press SEL. Use • to scroll through the call log entries. VTech Com • When the beginning or the end of the call log 800-595-9511 is reached, a double beep will sound. NEW 2/23 11:59 NOTE: The NEW icon in the left down corner indicates the call is not yet reviewed. -
Page 26: Deleting Caller Id
Calls Log (Caller ID - Call Waiting) Deleting Caller ID Follow the steps in Reviewing Caller ID to • VTech Com scroll to the record to be deleted. 800-595-9511 • Press DELETE key to delete the desired re- NEW 2/23 11:59 cord. -
Page 27: Handset Settings
Handset Settings Ringer Volume >RINGER VOLUME From the idle (off) mode, press MENU then • RINGER TONE key to RINGER VOLUME. • Press SEL. The current ringer volume will be shown: RINGER VOLUME • Press keys or enter digit 0-6 to the desired ringer volume. -
Page 28: Language (Preset To English)
Handset Settings Language (preset to English) >LANGUAGE From the idle (off) mode, press MENU then • CLEAR MSG WAIT key to LANGUAGE. • Press SEL to select this option. Press to scroll from English to French or Span- ish. Press SEL to confirm the setting. •... -
Page 29: Advanced Operation
IP 8100-2/8100-3. To purchase a headset, visit us on the web at www.vtechphones.com or call VTech Customer Service at 1-800-595-9511. Once you have a compatible 2.5mm headset, locate the headset jack on the IP 8100-2/8100-3 handset. Connect the plug on the headset cord to the jack (under a small rubber flap) on the cordless handset. -
Page 30: Additional Information
In Case Of Difficulty The Phone Doesn’t Work At All • Make sure the power cord is plugged in. • Make sure the Ethernet cable is plugged firmly into the base unit and the broad- band connection. Make sure the batteries are properly charged. If you get a LOW BATTERY •... -
Page 31: Maintenance
Maintenance Taking Care Of Your Telephone Your cordless telephone contains sophisticated electronic parts, so it must be treated with care. Avoid rough treatment Place the handset down gently. Save the original packing materials to protect your telephone if you ever need to ship it. Avoid water Your telephone can be damaged if it gets wet. -
Page 32: Warranty Statement
3. Product to the extent that the problem experienced is caused by signal condi- tions, network reliability or cable or antenna systems; or 4. Product to the extent that the problem is caused by use with non-VTech electrical accessories; or... - Page 33 If the Product failure is not covered by this limited warranty, or proof of purchase does not meet the terms of this limited warranty, VTech will notify you and will request that you authorize the cost of repair and return shipping costs for the repair of Products that are not covered by this limited warranty.
- Page 34 • In no event shall VTech be liable for any indirect, special, incidental, con- sequential, or similar damages (including, but not limited to lost profits or revenue, inability to use the product, or other associated equipment, the cost...
-
Page 35: Fcc And Ic Regulations
FCC and IC Regulations This equipment complies with Parts 15 of the Federal Communications Com- mission (FCC) rules for the United States. It also complies with regulations RSS210 of Industry and Science Canada. Operation is subject to the following two conditions: (1) this device may not cause interference, and (2) this device must accept any interference, including interference that may cause undesired operation of the device. - Page 36 FCC and IC Regulations ment must also be installed using an acceptable method of connection. The customer should be aware that compliance with the above conditions may not prevent degradation of services in some situations. Repairs to certified equipment should be made by an authorized Canadian main- tenance facility designated by the supplier.
-
Page 37: Technical Specifications
Technical Specifications FREQUENCY CONTROL WEIGHT Crystal controlled Handset: 146 grams PLL synthesizer (excluding batteries) Base: 323 grams TRANSMIT FREQUENCY Charger: 225 grams Base: 5725 - 5850 MHz Handset: 2400 - 2483.5 MHz POWER REQUIREMENTS RECEIVE FREQUENCY Handset: 3.6V 600mAh NiMH ( battery pack) Base: 2400 - 2483.5 MHz Base: 5.1V, 1.7A... - Page 38 VTECH TELECOMMUNICATIONS LTD. A member of THE VTECH GROUP OF COMPANIES. Distributed in the U.S.A. by VTech Communications, Inc. Beaverton, Oregon, 97008 Distributed in Canada by VTech Telecommunications Canada Ltd., Rich- mond, B.C. V6X 1Z9. Copyright 2005 for VTECH TELECOMMUNICATIONS LTD.
Need help?
Do you have a question about the Vonage IP 8100-2 and is the answer not in the manual?
Questions and answers