Table of Contents
Advertisement
EN
Dear Customer,
Gigaset Communications GmbH is the legal successor to
Siemens Home and Office Communication Devices GmbH &
Co. KG (SHC), which in turn continued the Gigaset business
of Siemens AG. Any statements made by Siemens AG or
SHC that are found in the user guides should therefore be
understood as statements of Gigaset Communications
GmbH.
We hope you enjoy your Gigaset.
DE
Sehr geehrte Kundin, sehr geehrter Kunde,
die Gigaset Communications GmbH ist Rechtsnachfolgerin
der Siemens Home and Office Communication Devices
GmbH & Co. KG (SHC), die ihrerseits das Gigaset-Geschäft
der Siemens AG fortführte. Etwaige Erklärungen der
Siemens AG oder der SHC in den Bedienungsanleitungen
sind daher als Erklärungen der Gigaset Communications
GmbH zu verstehen.
Wir wünschen Ihnen viel Freude mit Ihrem Gigaset.
FR
Chère Cliente, Cher Client,
la société Gigaset Communications GmbH succède en droit
à Siemens Home and Office Communication Devices GmbH
& Co. KG (SHC) qui poursuivait elle-même les activités Giga-
set de Siemens AG. Donc les éventuelles explications de Sie-
mens AG ou de SHC figurant dans les modes d'emploi
doivent être comprises comme des explications de Gigaset
Communications GmbH.
Nous vous souhaitons beaucoup d'agrément avec votre
Gigaset.
IT
Gentile cliente,
la Gigaset Communications GmbH è successore della Sie-
mens Home and Office Communication Devices GmbH &
Co. KG (SHC) che a sua volta ha proseguito l'attività della
Siemens AG. Eventuali dichiarazioni della Siemens AG o
della SHC nei manuali d'istruzione, vanno pertanto intese
come dichiarazioni della Gigaset Communications GmbH.
Le auguriamo tanta soddisfazione con il vostro Gigaset.
NL
Geachte klant,
Gigaset Communications GmbH is de rechtsopvolger van
Siemens Home and Office Communication Devices GmbH &
Co. KG (SHC), de onderneming die de Gigaset-activiteiten
van Siemens AG heeft overgenomen. Eventuele uitspraken
of mededelingen van Siemens AG of SHC in de gebruiksaan-
wijzingen dienen daarom als mededelingen van Gigaset
Communications GmbH te worden gezien.
Wij wensen u veel plezier met uw Gigaset
ES
Estimado cliente,
la Gigaset Communications GmbH es derechohabiente de la
Siemens Home and Office Communication Devices GmbH &
Co. KG (SHC) que por su parte continuó el negocio Gigaset
de la Siemens AG. Las posibles declaraciones de la
Siemens AG o de la SHC en las instrucciones de uso se
deben entender por lo tanto como declaraciones de la Giga-
set Communications GmbH.
Le deseamos que disfrute con su Gigaset.
PT
SCaros clientes,
Gigaset Communications GmbH é a sucessora legal da Sie-
mens Home and Office Communication Devices GmbH &
Co. KG (SHC), que, por sua vez, deu continuidade ao sector
de negócios Gigaset, da Siemens AG. Quaisquer declara-
ções por parte da Siemens AG ou da SHC encontradas nos
manuais de utilização deverão, portanto, ser consideradas
como declarações da Gigaset Communications GmbH.
Desejamos que tenham bons momentos com o seu Gigaset.
Issued by
Gigaset Communications GmbH
Schlavenhorst 66, D-46395 Bocholt
Gigaset Communications GmbH is a trademark
licensee of Siemens AG
DA
FI
SV
NO
EL
HR
.
SL
Kære Kunde,
Gigaset Communications GmbH er retlig efterfølger til Sie-
mens Home and Office Communication Devices GmbH &
Co. KG (SHC), som fra deres side videreførte Siemens AGs
Gigaset-forretninger. Siemens AGs eller SHCs eventuelle
forklaringer i betjeningsvejledningerne skal derfor forstås
som Gigaset Communications GmbHs forklaringer.
Vi håber, du får meget glæde af din Gigaset.
Arvoisa asiakkaamme,
Gigaset Communications GmbH on Siemens Home and
Office Communication Devices GmbH & Co. KG (SHC)-yri-
tyksen oikeudenomistaja, joka jatkoi puolestaan Siemens
AG:n Gigaset-liiketoimintaa. Käyttöoppaissa mahdollisesti
esiintyvät Siemens AG:n tai SHC:n selosteet on tämän
vuoksi ymmärrettävä Gigaset Communications GmbH:n
selosteina.
Toivotamme Teille paljon iloa Gigaset-laitteestanne.
Kära kund,
Gigaset Communications GmbH övertar rättigheterna från
Siemens Home and Office Communication Devices GmbH &
Co. KG (SHC), som bedrev Gigaset-verksamheten efter Sie-
mens AG. Alla förklaringar från Siemens AG eller SHC i
användarhandboken gäller därför som förklaringar från
Gigaset Communications GmbH.
Vi önskar dig mycket nöje med din Gigaset.
Kjære kunde,
Gigaset Communications GmbH er rettslig etterfølger etter
Siemens Home and Office Communication Devices GmbH &
Co. KG (SHC), som i sin tur videreførte Gigaset-geskjeften i
Siemens AG. Eventuelle meddelelser fra Siemens AG eller
SHC i bruksanvisningene er derfor å forstå som meddelelser
fra Gigaset Communications GmbH.
Vi håper du får stor glede av din Gigaset-enhet.
Αγαπητή πελάτισσα, αγαπητέ πελάτη,
η Gigaset Communications GmbH είναι η νομική διάδοχος της
Siemens Home and Office Communication Devices GmbH &
Co. KG (SHC), η οποία έχει αναλάβει την εμπορική
δραστηριότητα Gigaset της Siemens AG. Οι δηλώσεις της
Siemens AG ή της SHC στις οδηγίες χρήσης αποτελούν
επομένως δηλώσεις της Gigaset Communications GmbH.
Σας ευχόμαστε καλή διασκέδαση με τη συσκευή σας Gigaset.
Poštovani korisnici,
Gigaset Communications GmbH pravni je sljednik tvrtke
Siemens Home and Office Communication Devices GmbH &
Co. KG (SHC), koji je nastavio Gigaset poslovanje tvrtke
Siemens AG. Zato sve izjave tvrtke Siemens AG ili SHC koje
se nalaze u uputama za upotrebu treba tumačiti kao izjave
tvrtke Gigaset Communications GmbH.
Nadamo se da sa zadovoljstvom koristite svoj Gigaset
uređaj.
Spoštovani kupec!
Podjetje Gigaset Communications GmbH je pravni naslednik
podjetja Siemens Home and Office Communication Devices
GmbH & Co. KG (SHC), ki nadaljuje dejavnost znamke
Gigaset podjetja Siemens AG. Vse izjave podjetja Siemens
AG ali SHC v priročnikih za uporabnike torej veljajo kot izjave
podjetja Gigaset Communications GmbH.
Želimo vam veliko užitkov ob uporabi naprave Gigaset.
© Gigaset Communications GmbH 2008
All rights reserved.
Subject to availability. Rights of modifications
reserved.
www.gigaset.com
Advertisement
Table of Contents

Related Manuals for Siemens Gigaset E150


Summary of Contents for Siemens Gigaset E150
- Page 1 Nadamo se da sa zadovoljstvom koristite svoj Gigaset de la Siemens AG. Las posibles declaraciones de la uređaj. Siemens AG o de la SHC en las instrucciones de uso se deben entender por lo tanto como declaraciones de la Giga- Spoštovani kupec! set Communications GmbH.
- Page 2 Devices GmbH & Co. KG (SHC), kroz koju je nastavljeno poslovanje kompanije Gigaset kao dela Siemens AG. Stoga sve izjave od strane Siemens AG ili SHC koje se mogu naći u korisničkim uputstvima treba tumačiti kao izjave kompanije Gigaset Communications GmbH.
- Page 3 Be inspired...
-
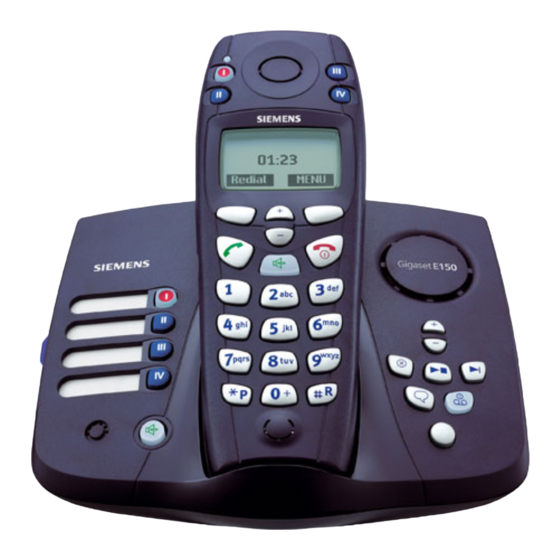
Page 4: The Handset At A Glance
The handset at a glance The handset at a glance Emergency/Direct Dial Key (I) Direct Dial Keys (II to IV) Control Keys Navigation ◆ Volume ◆ Battery status Talk Key Display Answer a call ◆ with icons Initiate dialling ◆ REDIAL MENU Function Keys Switch from... -
Page 5: Base At A Glance
Base at a glance Base at a glance Direct Dial Keys Emergency/Direct (II to IV) Dial Key (I) Tab card Volume Loudspeaker Micro- Registration/Paging Key: phone Answering Machine Keys õ Delete key Handsfree Key ó Playback/Stop key Answer/end a call ô... -
Page 6: Table Of Contents
Contents Contents The handset at a glance ......2 Base at a glance ........3 Safety precautions . - Page 7 Contents Operating the AM ........38 Operating the answering machine ..... . 39 Setting up the answering machine .
- Page 8 Contents Appendix ......... 66 Care .
-
Page 9: Safety Precautions
Safety precautions Safety precautions Only use the power supply unit supplied, as indicated on the underside of the device. Fit only the recommended rechargeable batteries (page 69) of the same type! Use no other types of batter- ies or non-rechargeable batteries, as they could damage health and cause personal injury. -
Page 10: Special Features Of The Gigaset E 150
Special features of the Gigaset E 150 Special features of the Gigaset E 150 Large keys ◆ Large display of messages and icons on the screen ◆ Additional Jumbo Font function (large characters) ◆ Emergency call mode ◆ Direct dial keys ◆... -
Page 11: Emergency Call Mode
Special features of the Gigaset E 150 Emergency call mode Your Gigaset E 150 has a special emergency function, an emer- gency procedure. You can use this function to call for help in an emergency. You can store up to four emergency numbers. These emergency numbers are stored under the Emergency/ Direct Dial Key I, either on the handset or on the base. - Page 12 Special features of the Gigaset E 150 If the emergency call is answered, the other party will first hear the message "This is an emergency call". After this message, your name is announced provided you have programmed the emer- gency key accordingly (see page 30). This is followed by the mes- sage "Please press 5 to accept the emergency call".
-
Page 13: Preparing To Use Your Phone
Preparing to use your phone Preparing to use your phone The pack contains: one Gigaset E 150 base, ◆ one Gigaset E 1 handset, ◆ one power supply unit with power cord, ◆ one telephone cord, ◆ one belt clip for the handset, ◆... -
Page 14: Connecting The Base
Preparing to use your phone Connecting the base Outlet Phone outlet Phone jack with Power supply unit phone cord 230 V with power cord Fit the small jack on the phone cord into the socket until it ◆ clips into place, Place cord in cable recess, ◆... -
Page 15: Preparing To Use The Handset
Preparing to use your phone Keep the power supply unit plugged in at all times ◆ to ensure your phone is ready for use whenever you need it. If ever you purchase a phone cord from a store, ◆ ensure that the phone conductors are correctly con- nected (3-4 connection). - Page 16 Preparing to use your phone Use only the rechargeable batteries recommended by Siemens on page 69! Never use conventional batteries (non-rechargeable) or other battery types as this may cause significant damage to health and property. For example, the jacket of the battery could be destroyed (hazardous).
- Page 17 Preparing to use your phone The battery charging status is correctly displayed only after uninterrupted charging/discharging. You should therefore avoid removing the batteries unnecessarily and ending the charg- ing process prematurely. The charge status of the batteries is only indicated ◆...
-
Page 18: Attaching The Belt Clip
Preparing to use your phone Attaching the belt clip Push the belt clip onto the back of the handset until the lugs click into the recesses on either side of the handset. You can also attach a cord so that you can carry the handset in your hand or around your neck. -
Page 19: Operating The Telephone, Menu Overview
Operating the telephone, menu overview Operating the telephone, menu overview Control keys on the handset The functions of the control keys change depending on the oper- ating situation of the handset. Control Keys Different functions of the control keys. In idle status and Increase ringer vol- Reduce ringer vol- when the tele-... -
Page 20: Function Keys
Operating the telephone, menu overview Function keys The function keys are the right and left keys just below the dis- play. Their functions change depending on the particular operat- ing situation. The current function is shown in the display directly above the key to which it relates. -
Page 21: Making Calls
Making calls Making calls Making external calls and ending a call External calls are calls into the public telephone network. Make an external call: Enter the number and press the Talk key. The number is dialled. You can also press the Talk key first (you hear the dialling tone) and then enter the number. -
Page 22: Calling Line Identification (Clip/Cli)
Making calls or ... On the base ù Press the handsfree key. End the call: Press the handsfree key again. If the handset is in the base and the Auto Answer function is acti- vated (page 51), then you just need to lift the handset out of the base to take the call. -
Page 23: Handsfree Speaking On The Handset
Making calls Screen display with CLIP/CLI If you have stored an entry for a number in your directory, then the directory entry will be displayed instead of the number, e.g. 'Anna'. Anna Telephone number or 'Anna' Accept Silence The screen displays Extern. Call if the number is not identified. The handset displays Withheld if the caller either suppresses call- ing line identification or has not requested it. -
Page 24: Making Internal Calls
Making calls Making internal calls Internal calls are free calls between handsets which you have reg- istered on the same base, or calls between a handset and the base. Before you can make an internal call, one of the direct dial keys must be programmed for internal calling (see page 30). -
Page 25: Transferring A Call Or Conducting A Conference Call
Making calls To answer an internal call either ... On the handset [_____________________________________________________________] Answer the call. Internal Connected or ... On the base ù Press the handsfree key. When an internal call is answered, the displays on all the other registered handsets show Internal busy. Transferring a call or conducting a conference call You can transfer (connect) an external call to another handset, or you can allow an internal party to listen in (conference call). -
Page 26: Accept Call Waiting
Making calls Accept call waiting You hear the call waiting tone (short beep) if you receive an exter- nal call while conducting an internal call. The caller's number will appear in the display if Calling Line Identification is enabled. You can deal with the call as follows: either ... - Page 27 Making calls [_________________________________________] Select the menu item and confirm. Additional Features §OK§ [_________________________________________] Select and confirm to activate or deac- Barge-in ‰ tivate Barge-in ( = On). §OK§ Long press (back to idle status). Barging in On your handset you see Line is in use. You wish to listen in to this external call.
- Page 28 Making calls If the first internal party hangs up, a signal tone sounds. The handset that is 'barging in' is still con- nected to the outside caller however.
-
Page 29: Using The Directory, The Direct Dial Keys And Other Lists
Using the directory, the direct dial keys and other lists Using the directory, the direct dial keys and other lists Directory The directory makes dialling easier for you. You open the direc- tory from the menu. The directory can store up to 30 telephone numbers. Please refer to the Character Set Chart (page 71) to see how to enter text correctly. - Page 30 Using the directory, the direct dial keys and other lists Dialling with the directory §MENU§ Press the function key to open the main menu. [_________________________________________] §OK§ Confirm. The directory is opened. Directory either ... Scroll to the entry: Select entry. Press the key.
- Page 31 Using the directory, the direct dial keys and other lists [_________________________________________] Select the menu item and confirm. Edit Entry §OK§ Change the number and confirm. §OK§ Change the name and confirm. The entry is saved or ... Copy and edit the directory entry: Select...
-
Page 32: Direct Dial And Emergency Keys
Using the directory, the direct dial keys and other lists Direct dial and emergency keys You can use the 4 direct dial keys to store particularly important numbers such as emergency services. You can then dial the stored number by pressing the appropriate direct dial key. At the base station by pressing the relevant direct dial key ◆... - Page 33 Using the directory, the direct dial keys and other lists §MENU§ Press the function key to open the menu. either ... Store an external number [_________________________________________] §OK§ Confirm. Edit Entry §OK§ Enter the number and confirm. §OK§ Enter the name and confirm. The entry is stored.
- Page 34 Using the directory, the direct dial keys and other lists [_____________________________________________________________] When you press the emergency key you Activate intern. call can initiate an internal call as well as §No §Yes§ the stored numbers. [_____________________________________________________________] You can speak a message (e.g. your Record own name/addr.
-
Page 35: Last Number Redial List
Using the directory, the direct dial keys and other lists ‰ [_________________________________________] Switch on or off ( = On). Emergency Call Mode §OK§ Long press (back to idle status). The emergency message which the other party hears consists of 2 or 3 separate sections. First the other party hears section 1 followed by section 2 and finally section 3. - Page 36 Using the directory, the direct dial keys and other lists Dialling telephone numbers from the last number redial list §REDIAL§ Open the last number redial list. Scroll to the required entry and press the Talk key. The telephone number is dialled.
-
Page 37: Calls List
Using the directory, the direct dial keys and other lists [_________________________________________] Select the menu item and confirm. Delete Entry §OK§ If there are still entries on the list, press the key and hold (back to idle status). Delete the entire last number redial or ... - Page 38 Using the directory, the direct dial keys and other lists Open the calls list ’ Open the calls list. [_________________________________________] Select the menu item and confirm. Missed Calls 01+02 §OK§ The entry received last is displayed. Select entry. Calling back a caller Open the calls list and select an entry.
- Page 39 Using the directory, the direct dial keys and other lists Select ... [_____________________________________________________________] Copy to Directory §OK§ and confirm. §OK§ Confirm the number. §OK§ Enter the name and confirm. The entry is stored. or ... View the date and time of arrival: [_________________________________________] Select the menu item and confirm.
-
Page 40: Operating The Am
Operating the AM Operating the AM The Gigaset E 150 has a built-in answering machine (AM) to record calls. To record calls, the answering machine must be switched on (default). The answering machine is operated from the base station. The maximum call recording time is 15 minutes. As well as the built-in answering machine, you can also use an answering machine of your network provider (e.g. -
Page 41: Operating The Answering Machine
Operating the AM Operating the answering machine The answering machine is operated with buttons on the base. You cannot operate the answering machine while it is in the process of recording a message. Explanation of keys Delete the current message during play- back. - Page 42 Operating the AM Activating/deactivating the answering machine ö ö The answering machine is switched on with the key. The ö key lights up. The key flashes if there are new messages on the answering machine which you have not yet listened to. The answering machine switches itself off when its memory is full.
- Page 43 Operating the AM õ Press the key to delete your personal announcement and revert to the pre- recorded announcement. or ... Wait for the confirmation tone. This stores your announcement. Recording ends automatically when the max. ◆ recording time of 170 seconds is exceeded or there was a break in speaking or more than 2 seconds.
- Page 44 Operating the AM If you have not recorded a personal announcement you will hear the pre-recorded announcement. This announcement cannot be changed or deleted. Playing messages The date and time of arrival of each message is logged (provided this function is set, page 50). The caller's number is stored if the calling line is identified.
-
Page 45: Setting Up The Answering Machine
Operating the AM Picking up a call from the answering machine on the handset You can pick up a call while the answering machine is recording it. [_________________________________________] The display indicates that a message is Pick up call being recorded and can be picked up. ×... - Page 46 Operating the AM after 20 seconds if there are no new messages. ◆ §MENU§ Press the function key to open the menu. [_________________________________________] Select the menu item and confirm. Base Settings §OK§ [_________________________________________] Select the menu item and confirm. AM Answer §OK§...
-
Page 47: Registering And De-Registering Handsets
Registering and de-registering handsets Registering and de-registering handsets You can register up to four handsets on your base. The E 1 handset can only be registered on one base however. Registering an E 1 handset is automatic. You can also register the E 1 handset manually however. - Page 48 Registering and de-registering handsets 1. On the handset §MENU§ Press the function key to open the menu. [_________________________________________] Select the menu item and confirm. Settings §OK§ [_________________________________________] Select the menu item and confirm. Handset §OK§ [_________________________________________] Select the menu item and confirm. Register Handset §OK§...
-
Page 49: Manual Registration: Gigaset And Other Handsets With Gap Functionality
Registering and de-registering handsets Manual registration: Gigaset and other handsets with GAP functionality on E 150 1. On the handset Start to register the handset as described in its operating instruc- tions. 2. On the base E 150 ÷ Press the Registration/Paging key on the base until you hear a signal tone. -
Page 50: Paging A Handset
Registering and de-registering handsets [_________________________________________] Select the menu item and confirm. Deregister Handset §OK§ §OK§ Enter the current system PIN (0000) and confirm. [_________________________________________] Press the function key to confirm the Deregister Handset? prompt. §Yes§ Paging a handset If you have mislaid your handset you can 'page' it with the help of the Registration/Paging key on the base. -
Page 51: Handset Settings
Handset settings Handset settings Your handset is already preset when it is delivered to you. You can change the settings to suit your requirements. Changing language You can view the display messages in different languages. §MENU§ Press the function key to open the menu. -
Page 52: Setting The Date And The Time
Handset settings Setting the date and the time Correct date and time settings are essential if you want to know when calls/messages were received. §MENU§ Press the function key to open the menu. [_________________________________________] Select the menu item and confirm. Settings §OK§... -
Page 53: Activating/Deactivating Auto Answer
Handset settings [_________________________________________] Confirm to deactivate or activate the Jumbo Font ‰ function ( = On). §OK§ Long press (back to idle status). Activating/deactivating Auto Answer You use this function when you simply wish to lift your handset off the base when you answer a call instead of pressing the Talk or Handsfree key (the default setting is On). - Page 54 Handset settings Setting volume in the idle status §MENU§ Press the function key to open the menu. [_________________________________________] Select the menu item and confirm. Audio §OK§ either ... Set the earpiece volume: [_________________________________________] §OK§ Confirm. You hear a tone in the current Handset Volume earpiece volume.
-
Page 55: Changing The Ringer Tone
Handset settings Setting volume during a call Adjust the earpiece volume. §OK§ Confirm if you wish to keep the setting. You only set the volume for the mode which you are currently using (the volume of the handset, the handsfree volume or the volume of the headphones in the headset). - Page 56 Handset settings [_________________________________________] §OK§ Confirm. External Calls or ... For internal calls: [_________________________________________] Select the menu item and confirm. Internal Calls §OK§ ... then [_________________________________________] §OK§ Confirm melody, e.g. Melody 1 Melody 1 ‰ = On). Long press (back to idle status). Adjusting the ringer volume §MENU§...
-
Page 57: Activating/Deactivating Advisory Tones
Handset settings You can also adjust the ringer volume while it is ring- ◆ ing by pressing . To save the volume setting, press §OK§. Volume 0 means ringer off. ◆ If the ringer is intrusive, press and hold. This ◆... -
Page 58: Setting Profiles
Handset settings [_________________________________________] §OK§ Select condition (Off, Beep, On) and Key Tones ‰ confirm ( = On). or ... Activate/cancel battery warning: [_________________________________________] Select condition (Off, On, While Call) Battery Warning ‰ and confirm, e.g. On (checked §OK§ or ... Activate/cancel confirmation tones: [_________________________________________] Select the menu item and confirm... - Page 59 Handset settings Motoric Display is illuminated for longer when you make inputs More time for making entries in the direc- tory §MENU§ Press the function key to open the menu. [_________________________________________] Select the menu item and confirm. Settings §OK§ [_________________________________________] Select the menu item and confirm.
-
Page 60: Caller Id Announced
Handset settings Caller ID announced You can have the number of a caller announced (provided the calling line is identified, page 20). §MENU§ Press the function key to open the menu. [_________________________________________] Select the menu item and confirm. Settings §OK§ [_________________________________________] Confirm to deactivate or activate the Caller ID Announced... - Page 61 Handset settings [_________________________________________] Select the menu item and confirm. Handset §OK§ [_________________________________________] Select the menu item and confirm. Handset Reset §OK§ Select ... [_____________________________________________________________] Reset to defaults? and confirm. §Yes§ Long press (back to idle status). Factory settings of the handset Earpiece volume page 51 Handsfree volume...
-
Page 62: Setting The Base
Setting the base Setting the base Use the E1 handset to make settings on the base. Settings which you make on the base itself are only temporary. Changing the loudspeaker volume of the base The loudspeaker volume is the volume that the built-in base loud- speaker uses for message playback and in handsfree mode. -
Page 63: Changing The Ringer Volume And The Ringer Melody
Setting the base Changing the ringer volume and the ringer melody You can choose between different ringer volumes and ringer mel- odies for the base (see page 53). You can also cancel the base ringer. Setting the ringer volume (temporarily) on the base: ñ... -
Page 64: Activating/Cancelling The Key Click On The Base
Setting the base [_________________________________________] Select desired melody (1-10) and con- Melody 1 firm. Melody 1 is the most audible mel- §OK§ ody..then Long press (back to idle status). Activating/cancelling the key click on the base §MENU§ Press the function key to open the menu. -
Page 65: Restoring The Base Factory Settings
Setting the base Restoring the base factory settings Resetting the base will de-register all the handsets and clear all direct dial keys on the handset and the base. §MENU§ Press the function key to open the menu. [_________________________________________] Select the menu item and confirm. Base Settings §OK§... -
Page 66: Connecting The Base To A Pabx
Connecting the base to a PABX Connecting the base to a PABX The following settings are only needed when your PABX requires them, please refer to the operating instructions for your PABX. Setting the dialling mode and recall time §MENU§ Press the display key to open the menu. [_________________________________________] Select the menu item and confirm. -
Page 67: Setting Pauses
Connecting the base to a PABX Setting pauses Changing the pause after line seizure §MENU§ Press the function key to open the menu. 5 O 1 5 Press keys. §OK§ Enter a number for the length of the pause (1 = 1 sec.; 2 = 3 sec.; 3 = 7 sec.) and confirm. -
Page 68: Appendix
72 hours. In many cases, you will then be able to use it again. Questions and Answers If you have any questions about the use of your phone, you can contact us 24/7 at www.my-siemens.com. You will find the most frequently asked questions and answers below. What has hap- Possible Cause Possible solution pened when …... - Page 69 Appendix What has hap- Possible Cause Possible solution pened when … … *--*--* flashes in The handset is out- Move the handset the display? side the range of the nearer to the base. base. Check the power The base is not connector at the switched on.
-
Page 70: Service (Customer Care)
Service (Customer Care) Our online support on the Internet: www.siemens-mobile.com/customercare If you need any repair work, or have a guarantee claim to sub- mit, our Service-Centre Ireland 18 50 77 72 77 Service-Centre United Kingdom 0807 0533 4411 will give you quick and reliable assistance. -
Page 71: Specifications
R&TTE directive. Excerpt from the original declaration "We, Siemens AG, declare, that the above mentioned product is manufactured according to our Full Quality Assurance System cer- tified by CETECOM ICT Services GmbH with ANNEX V of the R&TTE-Directive 99/5/EC. - Page 72 Appendix Handset operating times/charging times Capacity Standby time Calling time Charging time (mAh) (hours) (hours) (hours) up to 100 up to 15 approx. 5 These operating and charging times apply only when using the recommended batteries. Power consumption In standby status (no charging): E 150 approx. 2.2 Watts. ◆...
-
Page 73: Character Set Chart
Appendix Character set chart Standard characters Press the relevant key repeatedly or hold it down 1x 2x 3x 4x 5x 6x 7x 8x 9x 10x 11x 12x 13x 14x â £ ¥ ¤ Space ä á à â ã ç ë... -
Page 74: Guarantee Certificate (United Kingdom)
◆ resulting from manufacturing and/or material faults within 24 months of purchase, Siemens shall, at its own option and free of charge, either replace the device with another device reflecting the current state of the art, or repair the said device. In respect of parts... -
Page 75: Guarantee Certificate (Ireland)
◆ resulting from manufacturing and/or material faults within 24 months of purchase, Siemens shall, at its own option and free of charge, either replace the device with another device reflecting the current state of the art, or repair the said device. In respect of parts... - Page 76 The duration of the Guarantee shall not be extended by services ren- ◆ dered under the terms of the Guarantee. Insofar as no Guarantee default exists, Siemens reserves the right to ◆ charge the customer for replacement or repair. The above provisions does not imply a change in the burden of proof ◆...
-
Page 77: Accessories
You can connect commercially available headsets such as the Plantronics M110 headset to the universal 2.5 mm socket. All accessories and batteries are available from your mobile phone retailer. Or you can order direct online from the my-siemens Online Shop: www.siemens-mobile.de/shop or call: 0180 5333 225 (0.12 Euro/min.). -
Page 78: Index
Index Index Calling Line Identification ..(CLI/CLIP) ....Accessories Care of the telephone .. - Page 79 Index menu key ......On/Off key Handset ....talk key .
- Page 80 Index ....PABX Telephone ..... Pack contents preparing to use Paging/Paging Key...
- Page 81 A3 1 0 0 8 - S2 5 0 - B1 0 2 - 1 - 7 6 1 9 Issued by Information and Communication mobile Schlavenhorst 88 D-46395 Bocholt © Siemens AG 2004 All rights reserved. Subject to availability. Right of modification reserved. Printed in Germany Siemens AG http://www.siemens-mobile.de...
Need help?
Do you have a question about the Gigaset E150 and is the answer not in the manual?
Questions and answers