Sony MAVICA MVC-FD75 Operating Instructions Manual
Hide thumbs
Also See for MAVICA MVC-FD75:
- Specifications (2 pages) ,
- Operating instructions manual (44 pages) ,
- Service manual (90 pages)

Related Manuals for Sony MAVICA MVC-FD75


Summary of Contents for Sony MAVICA MVC-FD75
- Page 1 3-066-544-11 (1) Digital Still Camera Operating Instructions MVC-FD75 ©2001 Sony Corporation...
-
Page 2: Operating Instructions
Owner’s Record The model and serial numbers are located on the bottom. Record the serial number in the space provided below. Refer to these numbers whenever you call upon your Sony dealer regarding this product. Model No. MVC-FD75 Serial No. - Page 3 DISPOSAL OF LITHIUM ION BATTERY. LITHIUM ION BATTERY. DISPOSE OF PROPERLY. You can return you unwanted lithium ion batteries to your nearest Sony Service Center or Factory Service Center. Note: In some areas the disposal of lithium ion batteries in household or business trash may be prohibited.
- Page 4 Never use the plug without the fuse cover. If you should lose the fuse cover, please contact your nearest Sony service station. For the customers in Germany Directive: EMC Directive 89/336/EEC.
-
Page 5: Table Of Contents
Table of contents Before using your camera ............... 7 Parts identification .................. 8 Basic operations Preparation ..................11 1: Charging the battery pack ........... 11 2: Installing the battery pack ........... 12 3: Setting the date and time ..........13 Recording and playing back images .......... -
Page 6: Be Sure To Read Before Using Your Camera
Be sure to read before using your camera Trial recording Before you record one-time events, you may want to make a trial recording to make sure that the camera is working correctly. No compensation for contents of the recording Contents of the recording cannot be compensated for if recording or playback is not made due to a malfunction of the camera, floppy disk, etc. -
Page 7: Before Using Your Camera
Before using your camera This digital still camera uses a floppy disk as media. Use the following floppy disk type. •Size: 3.5 inch •Type: •Capacity: 1.44 MB •Format: MS-DOS format (512 bytes 18 sector) When using 3.5 inch, 2HD floppy disk other than described above, format it using the camera or your computer. -
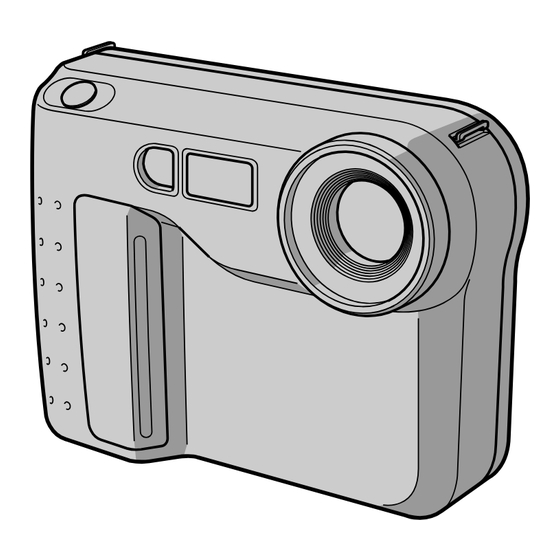
Page 8: Parts Identification
Parts identification See pages in ( ) for more details. Lens Shutter button (16) Photocell window Lens cap for flash Do not block when recording. Flash emitter (10) Slot for AC power adaptor code Self-timer lamp The lamp keeps on blinking until Tripod receptacle recording starts after... - Page 9 Hooks for strap Attaching the shoulder strap BRIGHT +/– button Press to adjust the brightness of the LCD screen. PLAY/CAMERA LCD screen switch (16, 18) POWER switch Slide down to turn on/off the Lithium battery power. compartment (33) ACCESS lamp (16) PICTURE EFFECT button (31) DISK EJECT lever...
- Page 10 Zoom lever “T” side: for telephoto (subject appears closer) “W” side: for wide-angle (subject appears farther away) Move the zoom lever to the “W” side until the focus is sharp. You can shoot a subject that is at least about 100 cm (about 3 1/4 feet) away from the lens surface in the telephoto position, or about 1 cm (about 1/2 inch) away in the wide-angle position.
-
Page 11: Preparation
Preparation Charging the battery pack To charge the battery pack, use the battery charger. For details, refer to the instruction manual of the battery charger. Connect the power cord to a wall outlet. Insert the battery pack in the direction of the CHARGE lamp V mark. -
Page 12: 2: Installing The Battery Pack
k Preparation Installing the battery pack Open the battery cover. While sliding the battery cover in the direction of the arrow. (base) Install the battery pack. Insert the battery pack with the V mark facing toward the battery compartment. Close the cover. Press the cover until it clicks. -
Page 13: 3: Setting The Date And Time
“InfoLITHIUM” L series battery packs have the mark. “InfoLITHIUM” is a trademark of Sony Corporation. Setting the date and time When you use the camera first, set the date and time. - Page 14 k Preparation Select the desired display of the date with the control button, then press it. Y/M/D (year/month/day) M/D/Y (month/day/year) CLOCK SET D/M/Y (day/month/year) Y/M/D M/D/Y D/M/Y 2 0 0 1 1 0 : 2 0 CANCEL ENTER CANCEL Select the date and time with the control button, then press it.
- Page 15 To cancel setting the date and time Select “CANCEL” with the control button, then press it. Note If the “W” indicator appears on the LCD screen, replace the lithium battery according to the procedures on page 33. 15-GB...
-
Page 16: Recording And Playing Back Images
Recording and playing back images Recording images To record the images, slide POWER down to turn on the power and insert the floppy disk until it clicks. ACCESS lamp Set PLAY/CAMERA to CAMERA. Press the shutter button halfway down. The AE lock indicator (green) appears. -
Page 17: The Indicators During Recording
The indicators during recording The indicators on the LCD screen are not recorded. Flash indicator AE lock indicator /Flash level indicator Self-timer indicator Recording mode indicator Image quality Program AE indicator indicator Remaining disk capacity indicator Exposure/Zoom indicator* No. of stored E : 91 : 01 SEPIA images... -
Page 18: 2: Playing Back Images On The Lcd Screen
k Recording and playing back images Playing back images on the LCD screen To watch the recorded images, slide POWER down to turn on the power and insert the floppy disk until clicks. Set PLAY/CAMERA to PLAY. The last recorded image appears on the LCD screen. Select the recorded image with the control button. -
Page 19: The Indicators During Playback
The indicators during playback Image number File type indicator Image quality indicator Remaining disk capacity indicator 11/12 Number of stored images in the floppy disk File name M V C - 0 1 1 S 2 0 0 1 Recording date of the playback 1 2 : 3 0 P M image MENU... -
Page 20: Battery Life/No. Of Images That Can Be Recorded/Played Back
k Recording and playing back images Battery life/No. of images that can be recorded/played back Battery Battery life No. of images (min.) (record/playback) Continuous recording NP-F330 Unusing the flash 70 (60) 950 (850) (Supplied) Using the flash 60 (50) 600 (500) Continuous playing 110 (100) 1700 (1500) -
Page 21: Viewing Images Using Your Computer
Viewing images using your computer The image data recorded with this camera is compressed in JPEG format. This data can be viewed using your computer which has JPEG view ability application installed such as Microsoft Internet Explorer. For detailed procedures using image data with an application, refer to your computer instruction manual. -
Page 22: Changing The Mode Settings
Changing the mode settings Select “MENU” with the control button, then press it. The menu appears on the LCD screen. CAMERA mode PLAY mode CLOCK SET CLOCK SET BEEP BEEP DISK TOOL DISK TOOL FILE NUMBER DELETE FLASH LEVEL COPY QUALITY PROTECT REC MODE... - Page 23 To cancel changing the mode settings Press the left side of the control button. The screen returns to the menu screen. To cancel menu screen, select “ ” with the control button, then press it. Setting the mode of each item * is the default setting.
- Page 24 k Changing the mode settings File name No. of images that Recording Recorded file (ex.) can be recorded mode MVC– STANDARD FINE NORMAL JPEG (640 480) 001S.JPG 25 - 40 15 - 20 For index screen 001S.411 E-MAIL JPEG (640 480) 001S.JPG JPEG (320...
- Page 25 QUALITY <STANDARD*/FINE> •Select STANDARD as a standard image quality. •Select FINE when giving priority to image quality. FLASH LEVEL < HIGH/ NORMAL*/ LOW> •Set to make the flash level higher than normal. •Normally select NORMAL. •Set to make the flash level lower than normal. FILE NUMBER <NORMAL*/SERIES>...
- Page 26 k Changing the mode settings Items in PLAY mode PROTECT Select this item to protect a displayed image(s) from being deleted by mistake. To protect or unprotect an image file, select the desired option from the menu while the image is displayed on the LCD screen. In SINGLE screen mode <ON/OFF*>...
- Page 27 COPY Select this item to copy a displayed image(s) to another floppy disk. To copy an image(s), select the desired copy option from the menu while the image(s) is displayed on the LCD screen. In SINGLE screen mode <OK/CANCEL> •Select OK to copy displayed image. •Select CANCEL to cancel copying image.
- Page 28 k Changing the mode settings Once copying is completed, the message “COMPLETE” is displayed. To copy images to another floppy disk, select “CONTINUE” with the control button and repeat the operations in steps 2 through 4 above. To discontinue copying, select “EXIT” with the control button. Notes •...
- Page 29 Items for both CAMERA and PLAY modes DISK TOOL <FORMAT/DISK COPY> •Select FORMAT to format the floppy disk loaded in the camera. •Select DISK COPY to copy all data stored in a floppy disk to another. To format a floppy disk Select “FORMAT”, then “OK”.
- Page 30 k Changing the mode settings BEEP <ON*/OFF> •Normally select ON. •Select OFF to turn the beep sound off. CLOCK SET Select this item to set the date and time. See page 13. 30-GB...
-
Page 31: Using Various Functions For Recording
Using various functions for recording PROGRAM AE PICTURE EFFECT Enjoying Picture Effect Press PICTURE EFFECT repeatedly to select the desired picture effect mode. NEG. ART: The color and brightness of the picture is reversed. SEPIA: The picture is sepia. B&W: The picture is monochrome (black and white). -
Page 32: Using The Program Ae Function
k Using various functions for recording Using the PROGRAM AE function You can select one of six PROGRAM AE (Auto Exposure) modes to suit your shooting situation, referring to the following. Press PROGRAM AE repeatedly to select the desired PROGRAM AE mode. Soft Portrait mode Creates a soft background for subjects such as people or flowers. -
Page 33: Changing The Lithium Battery In The Camera
When the lithium battery becomes weak or dead, the “W” indicator flashes on the LCD screen. In this case, replace the battery with a Sony CR2025 or Duracell DL-2025 lithium battery. Use of any other battery may present a risk of fire or explosion. -
Page 34: Precautions
Precautions On cleaning Cleaning the LCD screen Wipe the screen surface with a LCD cleaning kit (optional) to remove fingerprints, dust, etc. Cleaning the camera surface Clean the camera surface with a soft cloth slightly moistened with water. Do not use any type of solvent such as alcohol or benzene as it may mar the finish of the casing. -
Page 35: Moisture Condensation
Operational temperature recommendations This camera’s operational temperature is between 0 °C to +40 °C (32 °F to +104 °F). Do not use this camera in extreme climates outside the operational temperature range. Moisture condensation If the camera is brought directly from a cold to a warm location, or is placed in a very damp room, moisture may condense inside or outside the camera. -
Page 36: Using Your Camera Abroad
kPrecautions Using your camera abroad You can use the battery charger BC-V615 within 100 V to 240 V AC, 50/60 Hz. When charging the battery pack, use a commercially available AC plug adaptor [a], if necessary, depending on the design of the wall outlet [b]. -
Page 37: Troubleshooting
Troubleshooting Should any problem persist after you have made those checks, consult your nearest Sony dealer. If “C: ss: ss” appears on the LCD screen, the self-diagnosis function has worked. See page 39. Symptom Cause and/or Solution The camera does not •... - Page 38 kTroubleshooting Symptom Cause and/or Solution • Panfocus mode in PROGRAM AE is working. Zoom does not work. t Cancel it. (p. 32) • PLAY/CAMERA is not set to PLAY. You cannot play back the t Set it to PLAY. (p. 18) images.
-
Page 39: Self-Diagnosis Display
•The unusable disk with the camera is installed. tChange the disk. (p. 8) E:91:ss •A camera malfunction which you can not E:61:ss reverse has occurred. tContact your Sony dealer or local authorized Sony service facility and inform them of the five digits. (example: E:61:10) 39-GB... -
Page 40: Specifications
6.2 cm (2.5 type) LCD panel Total dot number 84 260 dots General Application Sony battery pack NP-F330/F550 Power requirements 7.2 V (battery pack) Power consumption (During shooting) 3.0 W Operation temperature 0 °C to +40 °C (32 °F to +104 °F) Storage temperature –20 °C to 60 °C (–4 °F to 140 °F) -
Page 41: Warning Messages
Warning messages Various messages appear on the LCD screen. Check them with the following list. Meaning Message DRIVE ERROR Trouble is with the disk drive. NO DISK No disk has been inserted. Trouble is with the disk. DISK ERROR Or the floppy disk loaded is not MS-DOS formatted (512 bytes x 18 sectors). -
Page 42: Index
Index J, L Adjusting brightness JPEG ........21, 23 LCD screen ......9 Lithium battery ....... 35 Image ........10 Adjusting the exposure ..10 AE (auto exposure) ....16 Menu ......... 22 Auto power-off function ..12 Moisture condensation ..35 MULTI ........ - Page 44 3 0 6 6 5 4 4 1 1 Sony Corporation Printed in Japan...
Need help?
Do you have a question about the MAVICA MVC-FD75 and is the answer not in the manual?
Questions and answers
Haven't used this camera for years, how long should I recharge original barrery
You should recharge the original battery for the Sony MAVICA MVC-FD75 camera for about one hour after the CHARGE lamp goes out.
This answer is automatically generated