
Related Manuals for Panasonic NV-GS250GC


Summary of Contents for Panasonic NV-GS250GC
-
Page 1: Operating Instructions
使用說明書 Operating Instructions 數位攝錄放影機 Digital Video Camera NV-GS250GC Model No. 使用前,請仔細閱讀本說明書。 Before use, please read these instructions completely. VQT0N70... -
Page 2: 目錄 安全注意事項
安全注意事項 ≥攝像機使用了版權保護技術,並且被日本和美國 的專利技術和知識產權所保護。要想使用這些版 權保護技術,必須得到 Macrovision 公司的授 權。 禁止分解或改裝攝像機。 由於本設備使用時會變熱,請在空氣流通的 地方進行操作,不要將此設備安置在狹窄的 ≥Windows 是美國 Microsoft 公司的商標或註冊商 空間內,例如書櫃或類似的地方。 標。 ≥SD 徽標是商標。 若想降低火災、電擊或產品損壞的危險,請 ≥Leica 是 Leica microsystems IR GmbH 公司的註 勿將本設備暴露於雨中、潮濕、滴水或濺水 冊商標,Dicomar 是 Leica Camera AG 公司的 的環境中,並確保勿將盛滿液體的物體 ( 如 註冊商標。 花瓶 ) 放在本設備上。 ≥使用說明書中的所有其他公司和產品名稱都是各... -
Page 3: Table Of Contents
中文 目錄 安全注意事項 ............2 重播模式 重播錄影帶 ............28 使用之前 慢動作重播 / 逐格重播........28 變速搜索功能............29 附件..............4 在電視機上重播 ..........29 可選件 ..............4 重播記憶卡 ............30 部件的識別和操作 ..........4 刪除記憶卡上錄製的檔案........30 安裝鏡頭蓋 ............6 格式化記憶卡............31 單觸自由式手柄帶 ..........6 保護記憶卡上的檔案........... -
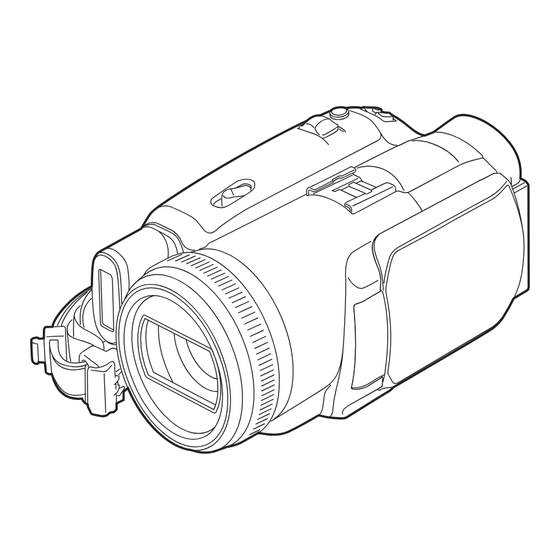
Page 4: 可選件
使用之前 使用之前 17) 三腳架 (VW-CT45E) 18) DV 電纜 (VW-CD1E) 附件 19) 防護袋 (VW-SJ05E) ≥在某些國家和地區有些附件可能無法使用。 隨本攝錄放影機共有下列附件一起提供。 部件的識別和操作 攝錄放影機 ª VSB0484 內置視頻閃光燈 -23- 拍攝燈 -39- 麥克風 ( 內置、立體聲 ) 、 -20- -23- 手柄帶 ( 單觸自由式手柄帶 ) 鏡頭 (LEICA DICOMAR) 白平衡感測器 -26- 1) AC 適配器、DC 輸入線、AC 電源線 遙控感測器... - Page 5 使用之前 DV 端子 [DV] (32) (17) -34- (18) 記憶卡插槽蓋 (33) 記憶卡插槽 (34) -10- (14) (19) (20) (15) (21) (22) (16) (23) (36) (37) (24) (38) S-VIDEO (39) (35) 取景器 (14) 、 -49- 錄影帶盒倉 (35) 錄影帶彈出桿 [OPEN/EJECT] (36) 由於 LCD 生產技術的限制,在取景器熒屏上 錄影帶倉蓋...
-
Page 6: 安裝鏡頭蓋
使用之前 ≥在使用三腳架時,如果從帶麥克風的自由式遙控 取下手柄帶。 把鏡頭蓋吊帶的一端穿過手柄帶 器操作攝錄放影機會比較方便。 ( 在不使用遙控 安裝部分上的小孔,然後把鏡頭蓋穿過鏡頭蓋 器時,把夾子別到手柄帶上會很方便。 當您帶著 吊帶。 裝在口袋裏的遙控器等移動時,請小心不要使攝 錄放影機從三腳架上跌落。) ≥當使用三腳架時不能打開記憶卡插槽蓋。 請先插 入記憶卡,然後再安裝三腳架。 (42) ≥取下的鏡頭蓋可以挂在鏡頭蓋固定器上。 ( 如果手 柄帶作為手挂帶使用時,它就不能挂在上面。) 肩背帶固定器 (42) ≥把肩背帶穿過固定器 1,並使其穿過止動夾 2, 如此帶子將不會脫落。 往外拉伸 3 至少 2 cm。 ≥同樣把肩背帶的另一頭也安裝好。 ≥要安上或者取下鏡頭蓋,可以用兩個手指指尖捏 住鏡頭蓋的兩端。 單觸自由式手柄帶 用作手挂帶 ª 如果將手柄帶作為手挂帶來使用,就可以更加容 (43) 易地攜帶或操作攝錄放影機。... -
Page 7: 使用 Lcd 顯示屏
使用之前 將手穿過手挂帶。 調整 LCD 顯示屏的角度,達到您滿意的程度。 1 180o 2 90o ≥使用帶麥克風的自由式遙控器,可以更方便地操 ≥它能朝鏡頭方向轉動 180o 1 或者朝取景器方 作。 向轉動 90o 2。 ≥握持攝錄放影機時不要用手擋住麥克風或感測 器。 ≥可以從菜單調整 LCD 顯示屏的亮度和色彩級別。 把手挂帶恢復為手柄帶 ª ≥如果強力打開或轉動 LCD 顯示屏,攝錄放影機可 ≥把手挂帶恢復到手柄帶固定部分時,按壓鎖止蓋 能會被損壞或造成故障。 1,並檢查手柄帶是否被牢牢鎖住。 ≥檢查記憶卡插槽蓋是否已經關上。 ≥當LCD顯示屏朝鏡頭方向轉動180o(進行自拍時) , LCD 顯示屏和取景器會同時。 使用取景器 拉伸出取景器 ª ª 作為手柄帶使用... -
Page 8: 充電時間和可拍攝時間
使用之前 電源 ª 裝入電池 把電池頂靠在電池座上,並滑動電池,直到發出 電池的充電 哢噠一聲。 ª 當您買到本產品時,電池是未充電的。 在使用本 產品前,請先給電池充電。 ≥電池的充電時間 ( ≥我們建議使用松下的電池。 ≥如果使用了其他品牌的電池,我們不能保證本產 品的質量。 ≥如果 DC 輸入線被連接到 AC 適配器 , 則電池將不 能被充電。 從 AC 適配器上取下 DC 輸入線。 把 AC 電源線連接到 AC 適配器和 AC 電源插座 。 取下電池 ª 對准標記把電池放到電池安裝座上,然後再把 在推動... -
Page 9: 插入 / 取出錄影帶
使用之前 ≥使用後,一定要把錄影帶完全倒回去,取出錄影 ( 間斷可拍攝時間指的是當拍攝和停止操作反復進 行時可以拍攝的時間。) 帶,並放到錄影帶盒內。 應當豎直存放錄影帶 “1h. 10 min.”表示 1 小時 10 分鐘。 盒。 ( -48- ≥提供的電池為 CGA-DU12 型。 ≥如果在攝錄放影機的鏡頭或主要的元件上形成了 ≥表內所示時間只是粗略的估算。 該時間是指使用 水汽凝結,即使沒有顯示出水汽凝結報警,也可 取景器時的可拍攝時間。 括弧內的時間是指使用 能在磁頭或錄影帶上已經形成了水汽凝結。 此時 LCD 顯示屏時的可拍攝時間。 不要打開錄影帶倉蓋。 ( -47- ≥對於長時間的拍攝 ( 連續拍攝 2 小時或更長的時 當錄影帶倉不能露出時 ª 間,間斷拍攝... -
Page 10: 打開攝錄放影機
使用之前 打開攝錄放影機 向記憶卡插槽內插入 / 取出記憶卡。 如果在鏡頭蓋未取下的情況下打開攝錄放影機, 自動白平衡調整可能無法正常工作。 請取下鏡頭 蓋後,再打開攝錄放影機。 接通電源的方法 ª 在按動鍵 1 的同時,將 [OFF/ON] 開關設置為 [ON]。 ≥電源指示燈點亮。 ≥在插入記憶卡時,要使有標簽的一側 1 朝向自 己,然後把記憶卡筆直地推進去,直到不能繼 續前進為止。 ≥取出記憶卡時,打開記憶卡插槽蓋,並按壓記 憶卡的中心部位,然後筆直地向外抽出。 牢牢關上記憶卡插槽蓋。 有關記憶卡 ª ≥不要觸摸記憶卡背面的觸頭。 關閉電源的方法 ª ≥不要使用另一台攝錄放影機或者任何一台電腦對 在按動鍵 1 的同時,將 [OFF/ON] 開關設置為 記憶卡進行格式化。 這會使記憶卡無法使用。 [OFF]。 ≥電子雜訊、靜電、攝錄放影機的故障或者記憶卡... -
Page 11: 控制桿的使用方法
使用之前 控制桿的使用方法 2) 錄影帶拍攝模式 ([AUTO/MANUAL/FOCUS] 開關設置為 [MANUAL]) 控制桿的基本操作 ª 在菜單熒幕上的操作以及在多影像顯示上對要重 播檔案的選擇 上下左右移動控制桿,選擇一項或者一個檔案, 然後推動中心部位進行設定。 白平衡 -26- 快門速度 光圈或增益值 選擇 / 調整 -26- 選擇 / 調整 -26- 3) 錄影帶重播模式 1 向上移動選擇。 2 向下移動選擇。 3 向左移動選擇。 4 向右移動選擇。 5 推動中心部位,進行確定。 控制桿和熒屏顯示 ª 推動控制桿的中心部位,熒屏上將顯示出圖標。 重播... -
Page 12: 轉換語言
使用之前 使用菜單熒屏 5) 記憶卡拍攝模式 ([AUTO/MANUAL/FOCUS] 開關設置為 關於每個單獨的菜單,請參見 。 -37- [MANUAL]) 按 [MENU] 鍵。 MENU ≥顯示出與模式轉盤所選模式相對應的菜單。 白平衡 -26- ≥當菜單正在顯示時,不要切換模式轉盤。 快門速度 上下移動控制桿選擇頂級菜單。 光圈或增益值 選擇 / 調整 -26- 選擇 / 調整 -26- 6) 圖片重播模式 向右移動或按下控制桿,設定選擇。 重播 / 停止 -30- 消抹 -30- 重播前一個圖片 -30- 上下移動控制桿,選擇子菜單。... -
Page 13: 設置日期和時間
使用之前 ª 退出菜單熒屏 左右移動控制桿,選擇要設定的項目。 然後上 下移動控制桿,設定想要的值。 按 [MENU] 鍵。 ≥年份將按下列方式變化: 回到前一個熒屏 ª 2000, 2001, ..., 2089, 2000, ... 向左移動控制桿。 ≥使用 24 小時制。 按壓控制桿確定設定。 ≥時鐘功能從 [00] 秒開始計數。 關於日期 / 時間 ª ≥日期和時間功能是由內置鋰電池驅動的。 ≥在正式錄製之前一定要檢查時間,因為內置時鐘 關於菜單設置 ª 不是十分準確。 ≥錄製的過程中不會出現菜單熒屏。 並且,當菜單 熒屏出現時,不能進行拍攝。 給內置鋰電池充電 ª ≥如果在攝錄放影機啟動時顯示出... -
Page 14: 使用遙控器
使用之前 使用遙控器 ª 為了增加 LCD 顯示屏整體的亮度 按 [POWER LCD] 鍵。 遙控器 ª 使用隨機提供的遙控器可以控制本攝錄放影機幾 乎所有的功能。 POWER LCD START/ DATE/ PHOTO STOP ≥[POWER LCD] 指示燈點亮。 TIME SHOT ZOOM ≥如果按下 [POWER LCD] 鍵 , 整個 LCD 顯示屏 ¥ A.DUB 的亮度就會比正常情況下大約亮一倍左右。 /REW PLAY STILL ADV PAUSE STILL ADV ≥再次按下這個鍵,指示燈就會熄滅,亮度將恢復... - Page 15 使用之前 重播鍵 [1] ª 選擇遙控模式 (15) 快進 / 快進搜索鍵 [5] (16) 如果同時使用 2 台攝錄放影機,把其中一套攝錄 進入鍵 [ENTER] (17) 放影機和遙控器設置為 [VCR1],另一套設置為 -13- ¢ 意味著這些鍵的功能和攝錄放影機上的相應鍵 [VCR2]。 這將防止 2 套攝錄放影機之間互相干 的功能是一樣的。 擾。 ( 缺省設置是 [VCR1]。 當更換鈕扣型電池時, 設置將恢復為缺省值 [VCR1]。) 安裝鈕扣型電池 ª 在攝錄放影機上設置: 使用前要把提供的鈕扣型電池安裝到遙控器內。 設置 [ 設定 ] >> [ 遙控 ] >> [VCR1] 或 [VCR2]。 在按下止動鍵...
-
Page 16: 帶麥克風的自由式遙控器
使用之前 帶麥克風的自由式遙控器 ª 關於夾子 ( 位於背面一側 ) 可以從不同的高低角度來使用本遙控器。 在使用 三腳架時,也是很方便的。 當不使用遙控器時, 應當把夾子別到手柄帶上。 左撇子用戶使用攝錄 放影機會更加方便。 當把夾子別到衣服口袋上或者其他地方時,一定 要小心不要碰翻三腳架,使攝錄放影機從架子上 掉下來。 ≥帶麥克風的自由式遙控器上的[PHOTO SHOT]鍵 不能按下一半。 麥克風 [MIC] ≥如果遙控器的針式插頭沒有牢牢插入 [REMOTE] 拍攝啟動 / 停止鍵 [REC] 端口,其插入的深度應儘可能的深,可能無法確 變焦桿 [W/T] 保正常的操作。 拍照鍵 [PHOTO SHOT] ≥在使用前,要確保該插頭已經牢牢地插入到端口 麥克風開關鍵 [TALK] 其插入的深度應儘可能的深。 把帶麥克風的自由式遙控器連接到攝錄放 ª... -
Page 17: 拍攝前的檢查
拍攝模式 拍攝模式 ª 關於自動模式 ≥將 [AUTO/MANUAL/FOCUS] 開關設置為 拍攝前的檢查 [AUTO],色彩平衡 ( 白平衡 ) 和對焦將會自動調 整。 在給重大的事件進行拍攝時,如在婚禮等場合, ≥自動白平衡: -50- 為了確保能夠正常拍攝影像和聲音,並知道如何 ≥自動對焦: -50- 使用攝錄放影機,請先進行試拍。 ≥根據光源和場景,色彩平衡和對焦可能不能調 攝錄放影機的基本握持 ª 整。 在這種情況下,手動調整白平衡和對焦。 AUTO MANUAL FOCUS ≥場景模式設置 ( -25- ≥白平衡設置 ( -26- ≥快門速度設置 ( -27- ≥光圈 / 增益值設置 ( -27- ≥對焦設置... -
Page 18: 在錄影帶上錄製
拍攝模式 在錄影帶上錄製 在錄影帶上錄製影像的同時,在記憶卡 上錄製靜態圖片 取下鏡頭蓋。 ( ( 如果在鏡頭蓋未取下的情況下打開攝錄放影機, 可以在將影像錄製到錄影帶上的同時錄製靜態圖 自動白平衡調整可能無法正常工作。 請取下鏡頭 片。 蓋後,再打開攝錄放影機。) ≥設置為錄影帶拍攝模式。 ≥設置為錄影帶拍攝模式。 在把影像錄製到錄影帶上的同時,完全按下 [PHOTO SHOT] 鍵。 PHOTO SHOT 按拍攝啟動 / 停止鍵開始錄製。 ≥關於錄製到記憶卡上的靜態圖片數量,請參見 。 -52- ≥在往記憶卡上錄製圖片時,拍攝啟動 / 停止鍵會 失效。 ≥可以為要錄製的靜態圖片選擇圖片質量。 ( -19- 再次按拍攝啟動 / 停止鍵暫停錄製。 ≥要錄製的圖片尺寸是 [640]。 ≥為了以較高的質量錄製靜態圖片,我們建議使用 記憶卡拍攝模式。... -
Page 19: 把靜態圖片錄製到記憶卡上 ( 拍照 )
拍攝模式 把靜態圖片錄製到記憶卡上 ( 拍照 ) ≥當存取燈點亮時,不要插入或取出記憶卡。 ≥可能降低其他產品的質量或者不能回放在本攝錄 ≥設置為記憶卡拍攝模式。 放影機上錄製的資料。 ≥如果設置 [ 圖片質量 ] >> [ ],根據圖片內容在 重播的影像上會出現馬賽克圖案的雜訊。 ≥當 [ 圖片尺寸 ] 設定成除 [640] 以外時 , 被設置為百 萬像素的拍攝模式。 ≥當圖片尺寸設定成除 [640] 以外時,物體周圍的 場景拍攝得比在 [640] 中的場景更寬一些。 半按 [PHOTO SHOT] 鍵,調整焦距。 ( 僅適用於 ª 在記憶卡拍攝模式下熒屏上的顯示內容... -
Page 20: 放大 / 縮小功能
拍攝模式 ª 關於連續攝影標記 ª 數位變焦功能 ≥在手動對焦模式下不出現連續攝影標記。 如果變焦放大率超過 10 倍,則數位變焦功能將啟 ≥當被拍攝的物體難以對焦時,可以手動聚焦。 動。 數位變焦功能允許選擇的放大率為從 20k 到 ≥即使連續攝影標記不出現,也可以在記憶卡上拍 500k。 攝靜態圖片,但圖片可能沒有準確對焦就被拍 設置 [ 進階功能 ] >> [ 數位變焦 ] >> [20k] 或 攝。 [500k]。 ≥在下列情況下,連續攝影標記不會出現,或是難 20tW 以顯示。 ≥當變焦放大率很高時。 ≥當攝錄放影機抖動時。 ≥當被拍攝物體正在運動時。 [ 關 ]: 僅光學放大 ( 最高 10k) ≥當被拍攝的物體背著光源時。... -
Page 21: 快速啟動
拍攝模式 快速啟動 逆光補償功能 在接通電源後,本攝錄放影機會在大約 1.7 秒內進 這個功能將防止逆光物體變得黑暗。 ≥設置為錄影帶 / 記憶卡拍攝模式。 入待機狀態。 ≥只有在下列的情況下,才能被這樣啟動。 按控制桿直到出現 1 圖標。 ≥已經插入了錄影帶或記憶卡,同時設定了錄 向右移動控制桿,選擇逆光補償指示 [ ]。 影帶拍攝模式。 ≥已經插入了記憶卡,同時設定了記憶卡拍攝 模式。 按 [QUICK START] 鍵。 ª ≥熒屏上的影像將變得更亮。 QUICK START 恢復正常拍攝 ª 再次選擇 [ ] 指示。 ≥快速啟動拍攝指示燈點亮。 ( 如果再一次按鍵, ≥如果您操作了 [OFF/ON] 開關或模式轉盤,則逆 就會取消。) 光補償就會被取消。... -
Page 22: 肌膚柔和模式
拍攝模式 淡入 / 淡出功能 ª 取消彩色夜視功能 選擇夜視圖標直到夜視指示消失。 淡入 影像和聲音漸漸出現。 ≥如果在明亮的地方設置,則熒屏就可能變白一 淡出 會。 影像和聲音漸漸消失。 ≥夜視功能可使 CCD 的信號充入時間比平時長 ≥設置為錄影帶拍攝模式。 25k,所以肉眼不可見的黑暗場景可以拍攝得很 按控制桿直到出現 1 圖標。 明亮。 因此,可能會看到平常看不見的亮點,但 向左移動控制桿,選擇漸變指示 [ ]。 這不是故障。 ≥當操作電源開關或模式轉盤時,夜視功能將取 消。 肌膚柔和模式 這種模式可以使皮膚的色彩拍攝得更柔和一些。 按拍攝啟動 / 停止鍵。 在拍攝人物的半身像時,這一模式更加有效。 開始拍攝。 ( 淡入 ) ≥設置為錄影帶 / 記憶卡拍攝模式。 開始拍攝時,影像... -
Page 23: 消除風聲噪音功能
拍攝模式 消除風聲噪音功能 ≥轉換鏡頭 ( 可選件 ) 可能會擋住閃光燈 , 並且導致 出現暈影的效果。 這個功能可以消減在拍攝時吹入麥克風的風聲噪 ≥不要使閃光燈與安裝的 ND 濾鏡 ( 可選件 ) 一起使 音。 用。 ≥設置為錄影帶拍攝模式。 ≥在禁止使用閃光燈的地方,請將閃光燈設置為 設置 [ 基本功能 ] >> [ 消除風聲 ] >> [ 開 ]。 ]。 ≥不要用手或者其他任何方法把閃光燈擋住。 當不使用視頻閃光燈時 ª 設置 [ 進階功能 ] >> [ 閃光燈 ] >> [ ]。... -
Page 24: 自拍計時器拍攝
拍攝模式 自拍計時器拍攝 ≥當把寬屏電影的圖片輸入到個人電腦中時,根據 使用的軟體,輸入的圖片有可能顯示得不正確。 可以使用自拍計時器將靜態圖片錄製到記憶卡內。 ≥如果您使用的電視的寬高比是 4:3 時,我們不建 ≥設置為記憶卡拍攝模式。 議您使用寬銀幕模式。 ( 影像被垂直拉長。) 設置 [ 基本功能 ] >> [ 自拍計時器 ] >> [ 是 ]。 畫面穩定器功能 按 [PHOTO SHOT] 鍵。 可以減輕在拍攝過程中由於手的抖動而使影像發 生晃動的情況。 PHOTO ≥設置為錄影帶拍攝模式。 SHOT 設置 [ 進階功能 ] >> [ 光學防震功能 ] >> [ 開 ]。 ≥在拍攝燈和... -
Page 25: 在不同情況下拍攝 ( 場景模式 )
拍攝模式 ≥鬆開 [PHOTO SHOT] 鍵後 , 可能會再拍攝一個靜 ª 取消場景模式功能 態圖片。 設置 [ 基本功能 ] >> [ 場景模式 ] >> [ 關 ] 或將 ≥不使用閃光燈。 [AUTO/MANUAL/FOCUS] 開關設置為 [AUTO]。 ≥如果設置為 [ 自拍計時器 ] >> [ 是 ] , 攝錄放影機能 運動模式 拍攝最多數量的可拍攝圖片。 ≥對拍攝的圖片進行慢動作重播或重播暫停時, ≥根據不同的記憶卡,每次拍攝的時間間隔可能會... -
Page 26: 用自然色彩拍攝 ( 白平衡 )
拍攝模式 用自然色彩拍攝 ( 白平衡 ) 在手動調整模式下設置時 ≥設置完成後,將保持點亮。 根據場景或照明條件的不同,自動白平衡功能可 關於白平衡感測器 ª 能不能再現自然的色彩。 在這種情況下,可以手 白平衡感測器能在拍攝時檢測光源的類型。 動調整白平衡。 ≥拍攝時不要遮蓋白平衡感測器,否則將無法正常 ≥設置為錄影帶 / 記憶卡拍攝模式。 工作。 將 [AUTO/MANUAL/FOCUS] 開關設置為 ª 關於黑平衡調整 [MANUAL]。 這是 3CCD 系統功能之一,當白平衡在手動調整 模式下設置時自動調整黑色。 當調整黑平衡時, AUTO 熒屏將暫時變黑。 MANUAL FOCUS 向下移動控制桿,直到出現白平衡指示。 ] 等 ) 1 黑平衡調整 ( 閃爍。) 2 白平衡調整... -
Page 27: 手動快門速度 / 光圈調整
拍攝模式 ª 恢復自動調整 ª 快門速度的範圍 將 [AUTO/MANUAL/FOCUS] 開關設置為 [AUTO] 1/50-1/8000 秒 : 錄影帶拍攝模式 或 [FOCUS]。 1/2-1/2000 秒 : 記憶卡拍攝模式 快門速度越接近 1/8000 就越快。 手動快門速度 / 光圈調整 光圈 / 增益值的範圍 ª 快門速度 CLOSE( 關閉 ), F16, ..., F1.7, 當拍攝快速移動的物體時,需要調整快門速度。 OPEN( 打開 ) 0dB, ..., 18dB 夜晚在戶外拍攝人物時,快門速度要低,還要使... -
Page 28: 重播錄影帶
重播模式 重播模式 ª 音頻設置 ≥當重播錄影帶時如果聽不到想要的聲音,請在 重播錄影帶 [ 設定 ] >> [12bit 音頻 ] 中檢查設置情況。 ≥當用 [12bit] 錄製或配音,並設置了 [ 設定 ] >> ≥設置為錄影帶重播模式。 [12bit 音頻 ] >> [ 混合 ] 時,不管 [ 音頻輸出 ] 中 設置是什麼,聲音將會以立體聲重播。 慢動作重播 / 逐格重播 ≥設置為錄影帶重播模式。 ( 只能用遙控器進行慢 動作重播。) 用控制桿操作。... -
Page 29: 變速搜索功能
重播模式 在電視機上重播 慢動作重播 ≥反向慢動作重播,時間碼指示會不穩定。 用本攝錄放影機拍攝的影像可以在電視機上重播。 逐格重播 ≥在本攝錄放影機上插入一盤錄製好的錄影帶。 ≥重播暫停時持續按下 [E] 鍵或 [D] 鍵 , 影像將連續 連接攝錄放影機和電視機。 逐格重播。 變速搜索功能 快進搜索 / 回捲搜索重播的速度是可以改變的。 ( 只能使用遙控器來進行這一操作。) ≥設置為錄影帶重播模式,重播錄影帶。 [VIDEO IN] 按遙控器上的 [VAR. SEARCH] 鍵。 [S-VIDEO IN] [AUDIO IN] S-VIDEO 按 [π] 鍵或 [∫] 鍵改變速度。 ≥用 AV 電纜 1 連接攝錄放影機和電視機。 ≥如果電視機上有... -
Page 30: 重播記憶卡
重播模式 重播記憶卡 ª 關於靜態圖片的相容性 ≥本攝錄放影機符合JEITA (Japan Electronics and ≥設置為圖片重播模式。 Information Technology Industries Association) 制定的統一標準 DCF (Design rule for Camera File system)。 ≥本攝錄放影機所支持的檔案格式為 JPEG 。 ( 並不 是所有 JPEG 格式的檔案都可以重播。) ≥如果重播不符合規格的檔案,文件夾 / 檔案名稱 可能不會顯示。 用控制桿操作。 ≥攝錄放影機會降低在其他產品上錄製或建立的資 料的品質,或根本無法重播;其他產品也會降低 在本攝錄放影機上錄製的資料的品質,或根本無 法重播。 刪除記憶卡上錄製的檔案 刪除的檔案不能恢復。 ≥設置為圖片重播模式。... -
Page 31: 格式化記憶卡
重播模式 在記憶卡上寫入列印資料 (DPOF 設定 ) ª 刪除用其他設備錄製在記憶卡上的靜態圖 片檔案 可以將需要列印的圖片資料、列印份數及其他信 ≥可以刪除無法在攝錄放影機上重播的靜態圖片檔 息 (DPOF 資料 ) 寫在記憶卡上。 案 ( 非 JPEG 格式 )。 ≥設置為圖片重播模式。 格式化記憶卡 設置 [ 進階功能 ] >> [DPOF 設定 ] >> [ 設定 ]。 移動控制桿選擇需要設置的檔案,然後按下控 必須清楚:如果記憶卡被格式化,則記憶卡上錄 制桿。 製的全部資料都將被擦除。 請將重要資料存儲在 個人電腦等設備上。... -
Page 32: 從錄影帶錄製到記憶卡上
編輯模式 編輯模式 用 AV 電纜連接起來 從錄影帶錄製到記憶卡上 可以從已經拍攝在錄影帶上的場景中將靜態圖片 錄製在記憶卡上。 ≥設置為錄影帶重播模式。 ≥插入已錄有內容的錄影帶和記憶卡。 開始重播。 [VIDEO IN] [S-VIDEO IN] [AUDIO IN] 在需要錄製的場景處暫停,按 [PHOTO SHOT] S-VIDEO 鍵。 ≥用 AV 電纜 1 連接攝錄放影機和錄影機。 ≥如果錄影機上有 S 視頻端子,還要連接一根 S PHOTO 視頻電纜 2( 可選件 )。 這樣就可以複製到更 SHOT 清晰的影像。 ≥不能錄製聲音。 用可選的... -
Page 33: 錄製其他設備中的內容
編輯模式 錄製其他設備中的內容 ≥不要在錄製時插拔電纜,否則錄製將無法正常完 可以將其他設備中的內容複製到 DV 錄影帶或記憶 成。 卡中,還可以錄製電視節目。 ≥仔細閱讀電視機和視頻設備的使用說明書。 ≥設置為錄影帶重播模式。 ≥通過操作 [ 設定 ] 或 [ 進階功能 ] >> [ 音效選擇 ] , 設 連接攝錄放影機和其他設備。 置錄音模式 ([12bit] 或 [16bit])。 ≥如果圖片 ( 雙語視頻等 ) 中含有主音和次音 , 重播 時要用 [ 設定 ] >> [ 音頻輸出 ] 選擇需要的聲音。 ≥如果錄製的圖片中含有版權保護信號(複製保護) ,... -
Page 34: 用 Dv 電纜錄製 ( 數位配音 )
編輯模式 用 DV 電纜錄製 ( 數位配音 ) ≥如果攝錄放影機錄製的圖片中含有版權保護信號 ( 複製保護 ),則在重播時會有馬賽克圖案造成圖 用 DV 電纜 VW-CD1E( 可選件 )1 來連接帶 DV 片失真。 插孔的其他數位視頻設備和本攝錄放影機時,會 ≥斷開 USB 電纜 , 因為連接 USB 電纜會無法錄製外 以數位格式獲得影像優質的複製。 部輸入端的輸入信號。當輸入寬銀幕影像時,諸 ≥設置為錄影帶重播模式。 ( 放像機 / 錄影機 ) 如菜單熒幕或操作圖標那樣的顯示被水平拉長。 用 DV 電纜連接攝錄放影機和數位視頻設備。 ≥當輸入寬銀幕影像時,諸如菜單熒幕或操作圖標... -
Page 35: 直接連接到印表機上列印圖片 (Pictbridge)
編輯模式 直接連接到印表機上列印圖片 按下遙控器上的 [A.DUB] 鍵,準備好進行配音。 (PictBridge) A.DUB ; ZOOM 直接連接攝錄放影機與印表機來列印圖片時,要 ¥ A.DUB 使用與 PictBridge 相容的印表機。 ( 仔細閱讀印表 /REW PLAY 機的使用說明書。) ≥插入記憶卡,並設置為圖片重播模式。 STILL ADV PAUSE STILL ADV 用隨機提供的 USB 電纜來連接攝錄放影機和印 按遙控器上的 [;] 鍵,開始配音。 表機。 A.DUB ¥ /REW PLAY STILL ADV PAUSE STILL ADV STOP ≥使用自由式遙控器時,按下... - Page 36 編輯模式 選擇紙張尺寸。 [ 標準 ]: 印表機的尺寸規格 [4a5 英吋 ] [5a7 英吋 ] [4a6 英吋 ] [A4] ≥不能設置為印表機不支持的紙張尺寸。 設置 [ 列印 ] >> [ 是 ] ,開始列印。 中途停止列印時 ª 向下移動控制桿。 ≥列印時應避免以下的操作。 這些操作會影響正常 列印。 ≥斷開 USB 電纜 ≥取出記憶卡 ≥轉動模式轉盤 ≥關閉電源 ≥檢查印表機的紙張尺寸、列印質量等設置。 ≥不能列印無法在攝錄放影機上重播的圖片。 ≥如果在錄影帶拍攝...
-
Page 37: 菜單列表
菜單 菜單 ª [ 錄影帶重播菜單 ] 菜單列表 菜單的圖形和說明採用便於理解的解釋方式,所 以不同於實際菜單指示。 [ 錄影帶拍攝菜單 ] ª 1) [ 基本功能 ] [ 日期 / 時間 ] -39- [AV 插孔 ] -34- [USB 功能 ] ( 請參見關於個人電腦連接的使用說明 書。) 1) [ 基本功能 ] 2) [ 進階功能 ] [ 場景模式... - Page 38 菜單 ª [ 記憶卡拍攝菜單 ] ª [ 圖片重播菜單 ] 2048 1) [ 基本功能 ] 1) [ 基本功能 ] [ 日期 / 時間 ] -39- [ 場景模式 ] -25- [ 保護 ] -31- [ 圖片質量 ] -19- [ 圖片尺寸 ] -19- 2) [ 進階功能...
-
Page 39: 與照相有關的菜單
菜單 與照相有關的菜單 ª [ 節電 ] [ 關 ]: 當 5 分鐘內沒有進行任何操作,則自 [ 熱靴麥克風 ] 動設置為待機模式。 在待機模式下, ª 設置為 [ 降噪 ] 後,可以減小低音噪音和打在立體 [; ] 閃爍,並且在按下拍攝啟動 / 停 聲變焦麥克風 (VW-VMH3E;可選件 ) 上的風聲噪 止鍵後開始錄製所用的時間比平時要 長。 音,立體聲變焦麥克風安裝在智能式附件座上。 [5 分鐘 ]: 當 5 分鐘內沒有進行任何操作,攝錄 [ 日期... -
Page 40: 與重播有關的菜單
菜單 與重播有關的菜單 其他菜單 [AV 插孔 ] [ 初始設定 ] ª ª 在 AV/ 耳機插孔的輸出設置之間進行轉換。 根據功能的結合,當菜單不能選擇時,設置為 [ 是 ], [ 輸入 / 輸出 ]: 當通過 AV 電纜或 S 視頻電纜從其 可將菜單恢復到出廠時的設置情況。 他設備輸入信號時使用這個設定。 ( 語言設定不能恢復到出廠時的設定狀態。) [ 輸出 /Ë]: 在 AV 和耳機輸出之間進行自動轉 [ 示範模式 ] ª... -
Page 41: 指示內容
其他方面 其他方面 運動模式 ( 場景模式 ) -25- 肖像模式 ( 場景模式 ) -25- 指示內容 低照度模式 ( 場景模式 ) -25- 聚光燈模式 ( 場景模式 ) -25- 各種功能和攝錄放影機的狀態可以在熒屏上顯示 海灘和雪地模式 ( 場景模式 ) -25- 出來。 自動白平衡 -26- 基本指示 室內模式 ( 白熾燈下拍攝 ) -26- 剩餘的電池電量 室外模式 -26- 0h00m00s00f: 時間碼... -
Page 42: 警告 / 報警指示
其他方面 警告 / 報警指示 記憶卡 æ: 漸進拍照模式 -19- 如果以下指示亮起或閃爍,請檢查攝錄放影機。 ±( 白色 ): 連續攝影標記 -19- 確認性指示 ¥ ( 綠色 ): 連續攝影標記 -19- Y: 插入的錄影帶的防意外擦除滑塊位於 [SAVE] 連續拍照拍攝 -24- 位置。 自拍計時器拍攝 -24- 沒有插入錄影帶。 MEGA OIS -24- MEGA [--]/0: ( 白色 ): 拍照模式 內置電池的電量不足。 -13- ( 綠色... -
Page 43: 無法同時使用的功能
其他方面 無法同時使用的功能 記憶卡已滿 : 記憶卡上沒有足夠的剩餘存儲空間。 因攝錄放影機的規格問題有些功能被禁止或無法 選擇圖片重播模式,刪除不需要的檔案。 選擇。 下表所示為被條件限制功能的例子。 無資料 : 記憶卡上沒有錄製的檔案。 功能 禁止功能的條件 轉為 4:3 模式 : ≥漸近 ≥同時在錄影帶和記憶卡上 試圖按下 [PHOTO SHOT] 鍵,以 16:9 的寬 拍攝時 高比錄製圖片。 ≥當使用數位變焦時 檔案被鎖定 : (10k 或更高 ) 試圖擦除受保護的檔案。 ≥在錄影帶拍攝模式下快門 記憶卡被鎖定 : 速度為 1/750 或者更快時 SD 記憶卡上的寫保護開關設在... -
Page 44: 請求修理前 ( 問題和解決方法 )
其他方面 請求修理前 ( 問題和解決方法 ) ≥調整快門速度、 ≥當使用彩色夜視功能時 ≥當使用場景模式時 光圈 / 增益 電源 / 機身 1: 攝錄放影機的電源不能打開。 ≥變速搜索 ≥處於反復重播過程中 0 電池是否充足電? 請使用充足電的電池。 ≥刪除檔案 ≥當記憶卡上的寫保護開關 0 電池的保護電路已經可能啟動。 請將電池裝在 設在 [LOCK] 的位置時 AC 適配器上停留 5 至 10 秒。 如果攝錄放影機 ≥當檔案受到保護時 仍不能使用,說明電池已經失效了。 ≥格式化 ≥當記憶卡上的寫保護開關 2: 攝錄放影機電源自動關閉。... - Page 45 其他方面 拍攝 重播 ( 聲音 ) 1: 儘管攝錄放影機有電,而且錄影帶也正確插入, 1: 不能從攝錄放影機的內置揚聲器或耳機中重播 但也不能開始拍攝。 聲音。 0 錄影帶上的防止意外擦除滑塊是否打開? 如果 0 音量是否太低? 重播時,推動 [s /VOLr] 桿 打開 ( 設置為 [SAVE]),則無法進行拍攝。 ( 顯示音量指示並進行調整。 ( -28- 0 錄影帶是否到達了終點? 請插入新的錄影帶。 2: 同時再現不同的聲音。 0 是否設置了拍攝模式? 如果設在重播模式,則 0 是否設置為[設定] >> [12bit音頻] >> [混合]? 如 無法進行拍攝。...
- Page 46 其他方面 重播 ( 圖片 ) 其他方面 1: 快進搜索或回捲搜索重播時,影像上出現馬賽 1: 指示消失、熒屏凍結或無法進行操作。 克干擾。 0 關閉攝錄放影機的電源。 如果電源無法關閉, 0 這種現象是數位視頻系統的特點。 不是故障。 請按 [RESET] 鍵,或者拆下電池或 AC 適配器 2: 快進搜索和回捲搜索重播時,影像上出現水平 後,再重新安裝。 然後重新打開電源。 如果仍 條紋。 不能恢復正常的操作,則拔下電源線,向出售 0 根據場景的不同會出現水平條紋,但這不是故 攝錄放影機的經銷商諮詢。 障。 2: 顯示 “請按重置鍵” 。 3: 儘管攝錄放影機與電視機連接正確,也看不到 0 自動檢測到攝錄放影機有缺陷。 請取出錄影帶 重播的影像。...
-
Page 47: 使用注意事項
其他方面 使用注意事項 即使清潔磁頭後也不能正常重播 一個可能的原因是拍攝時磁頭是髒的,所以無法 正常拍攝。 請清潔磁頭,重新拍攝和重播。 如果 有關水汽凝結 ª 可以正常重播,說明磁頭是乾淨的。 重要拍攝前 如果磁頭或錄影帶發生水汽凝結時打開攝錄放影 一定要進行試拍,以保證拍攝的正常進行。 機,在取景器或 LCD 顯示屏上顯示水汽凝結顯示 ≥如果清潔後磁頭很快又變髒,問題可能出在錄影 [3]( 黃色或紅色 ) 並出現 [3 檢測到露水 ] 或 帶上。 在這種情況下,請用其他的錄影帶。 [3 取出錄影帶 ]( 僅在錄影帶插入時 ) 資訊。 在 ≥重播時圖片或聲音可能會暫時中斷,但這不是攝 這種情況下,按以下的步驟進行操作。 3 黃色: 錄放影機的故障。 ( 一個可能的原因是有汙物或 灰塵黏在磁頭上,造成重播中斷。) 有少量的露水黏在磁頭或錄影帶上。... - Page 48 其他方面 不要用此攝錄放影機作監視用或用於其他商業用 ª 關於 AC 適配器 途。 ≥如果電池發熱,充電時間會比平時長。 ≥如果長時間使用攝錄放影機,內部溫度會升高, ≥如果電池溫度極高或極低,[CHARGE] 指示燈會 從而會造成故障。 持續閃爍,電池可能沒有被充電。 電池溫度降低 ≥本攝錄放影機不能用於商業用途。 或升高到一定程度後,充電將自動進行。 因此, 關於閃光燈 請等待一會兒。 如果即使充電後指示燈仍持續閃 ≥閃光燈內有高壓部件,不要隨意拆卸,以免觸 爍,電池或 AC 適配器可能失效。 此時應向經銷 電。 商咨詢。 ≥如果在收音機附近使用 AC 適配器,收音機的接 關於電池 ª 收會受到干擾。 AC 適配器應與收音機保持 1 米 攝錄放影機所用的電池為可充電的鋰離子電池。 以上的距離。 這種電池對溫度和濕度很敏感,溫度的影響會隨 ≥使用...
- Page 49 其他方面 ª 記憶卡的文件夾結構 用本攝錄放影機格式化的記憶卡的文件夾結構在 個人電腦上將如下圖所示。 ≥在 100CDPFP 文件夾等最多可以錄製 999 個圖 片。 ≥帶 DPOF 設置的檔案可以在 MISC 文件夾中錄製 。 LCD 顯示屏 / 取景器 ª LCD 顯示屏 ≥LCD 顯示屏變髒時,要用軟的幹布擦拭。 ≥在溫度急劇變化的地方,LCD 顯示屏上會出現水 汽凝結。 要用軟的幹布擦拭。 ≥如果攝錄放影機處於非常寒冷的地方,剛打開電 源時,LCD 顯示屏會比平時暗。 但隨著內部溫 度的升高,其將恢復正常的亮度。 LCD 顯示屏熒屏的製造採用了極高的精密技 術,總像素約達到 113,000。 有效像素超過 99.99%,無效像素只有...
-
Page 50: 術語解釋
其他方面 術語解釋 ª 自動對焦 自動對焦功能可使對焦鏡頭在攝錄放影機內自動 自動白平衡 前後移動,將物體調到焦點處。 ª 白平衡調整可以識別光色並進行調整,所以白色 自動對焦具有如下特點 ≥進行調整,使物體的豎線看得更清晰。 會變成純白色。 攝錄放影機可以測定通過鏡頭和 ≥使具有較高對比度的物體處於焦點處。 白平衡感測器的色調,從而判斷拍攝條件,選擇 ≥焦點只處於熒屏中心。 最接近的色調設置。 這被稱為自動白平衡調整。 由於有幾種光源時攝錄放影機只保存白色資訊, 由於這些特點,自動對焦在以下情況下不能正常 所以自動白平衡調整在其他的光源下不能正常工 工作。 要用手動對焦模式進行拍攝。 作。 拍攝的物體一端距離攝錄放影機較近,另一端較 遠 10 000K ≥由於自動對焦在影像的中心進行調整,所以無 9 000K 8 000K 法對同時處於前景和背景的物體進行對焦。 7 000K 拍攝的物體位於肮髒或有灰塵的玻璃後 6 000K ≥由於焦點在髒玻璃上,所以無法對玻璃後的物 5 000K 體進行對焦。... - Page 51 規格 S 視頻輸入電平: 規格 Y 輸入: 1.0 Vp-p,75 ohm C 輸入: 0.3 Vp-p,75 ohm 規格 音頻輸入電平 ( 線路 ): 316 mV,10 kohm 或更高 麥克風輸入: 數位攝錄放影機 麥克風靈敏度 s50 dB (0 dB=1 V/Pa,1 kHz) ( 立體 安全注意事項 聲微型插孔 ) USB: 記憶卡讀 / 寫器功能,USB 2.0 相容 (Hi-Speed) 電源:...
- Page 52 規格 AC 適配器 VSK0651B 安全注意事項 電源: AC 110–240 V,50/60 Hz 耗電量: 19 W DC 輸出: DC 7.9 V,1.4 A ( 攝錄放影機工作時 ) DC 8.4 V,0.65 A ( 電池充電時 ) 外廓尺寸: 61 mm ( 寬 ) 32 mm ( 高 ) 91 mm ( 深...
-
Page 53: Information For Your Safety
ENGLISH Information for your safety technologies and intellectual properties of Japan and the U.S. To use these copyright- protected technologies, authorization of the Macrovision Company is required. It is As this equipment gets hot during use, prohibited to disassemble or modify the Movie operate it in a well-ventilated place;... - Page 54 Contents Information for your safety ......... 53 Playback mode Playing back tape..........83 Before using Slow-motion playback/ frame-by-frame playback......... 83 Accessories............55 Variable-speed search function......84 Optional.............. 55 Playback on TV ..........84 Parts identification and handling ......55 Playing back card..........85 Fitting the lens cap ..........
-
Page 55: Before Using
Before using Before using 16) Video flash (VW-FLH3E) 17) Tripod (VW-CT45E) Accessories 18) DV cable (VW-CD1E) 19) Jacket pouch (VW-SJ05E) The followings are the accessories supplied with ≥Some optional accessories may not be this product. available in some countries. Parts identification and handling ª... - Page 56 Before using (28) Reset button [RESET] -100- (17) (29) Power LCD button [POWER LCD] -66- (18) Power LCD lamp -66- (14) (19) (30) Mode select switch [AUTO/MANUAL/ (20) (15) (21) FOCUS] -70- -80- -82- (22) (16) (31) Card access lamp -62- (23) (32)
-
Page 57: Fitting The Lens Cap
Before using In order to remove the lens hood, rotate it counterclockwise 1. In order to fit it, put into slot 2, and then rotate it clockwise. ≥Fit the MC protector or the ND filter of the Filter Kit (VW-LF43WE; optional) in front of the lens hood. -
Page 58: The One-Touch Free-Style Grip Belt
Before using The one-touch free-style grip belt ª To use as a grip belt Adjust the belt length so it fits your hand. ª To use as a hand strap Adjust the belt length and the pad position. If you use the grip belt as a hand strap, then you can carry or handle this camera more easily. -
Page 59: Using The Viewfinder
Charge the battery before using this product. ≥Battery charging time ( -60- ≥We recommend using Panasonic batteries. ≥If you use other batteries, we cannot guarantee the quality of this product. ≥If the DC input lead is connected to the AC adaptor, then the battery will not get charged. -
Page 60: Charging Time And Recordable Time
Before using Charging time and recordable time Connect the DC input lead to this product. ≥Lift up the viewfinder beforehand. The times shown in the table below show the ≥The output plug of the AC mains lead is not times at a temperature of 25oC and a humidity of completely connected to the AC adaptor 60%. -
Page 61: Inserting/Removing A Cassette
Before using ≥When you use both the viewfinder and the ≥After using, make sure to rewind the cassette LCD monitor simultaneously while rotating completely, remove it, and put it in a case. Store the LCD monitor frontward to record yourself, the case in an upright position. -
Page 62: Inserting/Removing A Card
Before using ≥If the following operations are performed when Inserting/removing a card the access lamp is lit, then the card or the Before inserting/removing a card, be sure to turn recorded data may be damaged or the camera the power [OFF]. may malfunction. -
Page 63: Selecting A Mode
Before using Selecting a mode ª Joystick and screen display Push the centre of the joystick, and icons will be Rotate the mode dial to select the desired mode. displayed on the screen. Each push switches the Rotate the mode dial. display as follows depending on the mode. -
Page 64: Switching The Language
Before using Switching the language 4) Card recording mode ([AUTO/MANUAL/FOCUS] switch is set to You can switch the language on the screen [AUTO]) display or the menu screen. Set [LANGUAGE] >> select the desired language. Tele-macro -76- Soft skin mode -76- Backlight compensation -75-... -
Page 65: Setting Date And Time
Before using Move the joystick right or press it to set the selection. VAR. MENU SEARCH ENTER Move the joystick up or down in order to Press the [MENU] button to exit the menu select the item to be set. screen. -
Page 66: Adjusting Lcd Monitor/Viewfinder
Before using Adjusting LCD monitor/viewfinder ª Changing the picture quality on the LCD monitor ª Adjusting the brightness and colour Set [SETUP] >> [LCD AI] >> [DYNAMIC] or level [NORMAL]. Set [SETUP] >> [LCD SET] or [EVF SET] >> [DYNAMIC]: The image on the LCD monitor becomes clear and vivid. -
Page 67: Using The Remote Control
Before using Using the remote control (13) Stop button [∫] (14) Recording start/stop button [START/STOP] ¢ ª Remote control (15) Playback button [1] Using the remote control supplied will enable (16) Fast forward/cue button [5] controlling almost all the functions of this camera (17) Enter button [ENTER] to be controlled. -
Page 68: Free Style Remote Control With Mic
Before using ª Free style remote control with mic Selecting the remote control mode If 2 cameras are used simultaneously, set the This controller can be used from different high mode for one pair of movie camera and remote and low angles. It is also handy when a tripod is control to [VCR1] and that of the other pair to used. - Page 69 Before using ª About the clip (on the backside) When you move with the clip fitted to your pocket or elsewhere, beware of knocking over the tripod and causing the camera to fall off the table. ≥The [PHOTO SHOT] button on the free style remote control with mic cannot be pressed halfway.
-
Page 70: Record Mode
≥We recommend using the SP mode for important recording. ≥In order to fully exhibit the performances of the LP mode, we recommend using Panasonic 1) Hold the camera with both hands. cassettes marked LP mode. 2) Run your hand through the grip belt. -
Page 71: Recording On A Tape
Record mode Recording on a tape ª Concerning the remaining tape time indication on the screen Remove the lens cap. ( -57- ≥The remaining tape time is indicated in minutes. (When the camera is turned on with the lens cap (When it reaches less than 3 minutes, the fitted, the automatic white balance adjustment indication starts flashing.) -
Page 72: Check The Recording
Record mode Check the recording Recording still pictures onto a card (Photoshot) The last image recorded is played back for 2 to 3 seconds. After checking, the camera will be set ≥Set to Card Recording Mode. to a recording pause. ≥Set to Tape Recording Mode. - Page 73 Record mode ≥For the number of still pictures to be recorded ª Select the picture quality for on a card, refer to -111- photoshot images ≥The sound cannot be recorded. Set [BASIC] >> [PICT. QUALITY] >> select ≥While data are recorded on a card, do not the desired picture quality.
-
Page 74: Zoom In/Out Function
Record mode Zoom in/out function ª To use the zoom microphone function Interlocked with the zooming operation, the You can zoom in up to 10koptically. microphone will collect sounds clearly far away ≥Set to Tape/Card Recording Mode. with the tele-shot or those in the vicinity with the Wide-angle recording (zoom out): wide-angle shot. -
Page 75: Quick Start
Record mode Quick start Backlight compensation function This camera will be put into standby in approx. This protects a backlit subject from being 1.7 seconds after the power is turned on. darkened. ≥This is only activated in the following cases. ≥Set to Tape/Card Recording Mode. -
Page 76: Soft Skin Mode
Record mode Tele-macro function By focusing only on the subject and blurring the background, the image can be impressive. This camera can focus on the subject at a distance of approx. 40 cm. ≥Set to Tape/Card Recording Mode. Press the joystick until the icon 1 appears. Move the joystick up to select the ≥When the LCD monitor is reversed, the tele-macro icon [... -
Page 77: Wind Noise Reduction Function
Record mode Using the built-in video flash Pause recording. (fade out) The image/audio gradually disappears. After the Use the built-in video flash in order to record still image/audio completely disappears, recording pictures in dark places. stops. ≥Set to Tape/Card Recording Mode. Set [ADVANCE] >>... -
Page 78: Self-Timer Recording
Record mode ª Self-timer recording To adjust the brightness of the video flash You can record still pictures on a card using the Set [ADVANCE] >> [FLASH LEVEL] >> timer. select the desired brightness level. ≥Set to Card Recording Mode. [ßj]: If the brightness is too high ([ßj] or Set [BASIC] >>... -
Page 79: Image Stabilizer Function
≥Intervals between recording pictures may ≥In the following cases, the image stabilizer become longer depending on the card. We function may not work effectively. recommend using a Panasonic SD Memory ≥When the digital zoom is used Card. ≥When a conversion lens is used ≥When using the card formatted by other... -
Page 80: Recording In Various Situations (Scene Mode)
Record mode ≥If you record a subject illuminated with strong Recording in various situations light or a highly reflective subject, vertical (Scene mode) lines of light may appear. When you record images in different situations, ≥If the brightness is insufficient, the sports this mode automatically sets optimum shutter mode does not function. -
Page 81: Manual Focus Adjustment
Record mode Manual focus adjustment 1) Auto white balance adjustment [ 2) Indoor mode (for recording under If auto focusing is difficult due to the conditions, incandescent lamps) [ then manual focusing is available. 3) Outdoor mode [ ≥Set to Tape/Card Recording Mode. 4) Manual adjustment mode [ Set the [AUTO/MANUAL/FOCUS] switch to ª... -
Page 82: Manual Shutter Speed/Aperture Adjustment
Record mode ≥When recording in the extremely bright place, Manual shutter speed/aperture the colour of the screen may change or flickers. adjustment If so adjust the shutter speed manually to 1/50 Shutter Speed or 1/100. Adjust it when recording fast-moving subjects. Manual iris/gain adjustment When recording persons outdoors at night, select ≥If the value does not become “OPEN”, you... -
Page 83: Playback Mode
Playback mode Playback mode ª Repeat playback When the tape end is reached, the tape will be Playing back tape rewound and played back again. Set [ADVANCE] >> [REPEAT PLAY] >> [ON]. ≥Set to Tape Playback Mode. ≥The [ ] indication appears. (In order to cancel the repeat playback mode, set [REPEAT PLAY] >>... -
Page 84: Variable-Speed Search Function
Playback mode ≥The speeds for cue/review playback are 1/5k Frame-by-frame playback During playback, press the [;] button on (SP mode slow-motion playback only), 1/3k (LP the remote control. mode slow-motion playback only), 2k, 5k, Press the [E] button or the [D] button on 10k, 20k. -
Page 85: Playing Back Card
Playback mode ≥If you attempt to play back file recorded in a ª If the image or audio from this camera different format or file data is defective, the is not output on the TV ≥Check that the plugs are inserted as far as they whole display becomes bluish and the “UNPLAYABLE CARD’’... -
Page 86: Deleting Files Recorded On A Card
Playback mode Deleting files recorded on a card Formatting a card The deleted files cannot be restored. Please be aware that if a card is formatted, then ≥Set to Picture Playback Mode. all the data recorded on the card will be erased. Move the joystick left or right to select a file Store important data on a personal computer, etc. -
Page 87: Writing The Printing Data On A Card (Dpof Setting)
Playback mode Writing the printing data on a card (DPOF setting) You can write the data of pictures to be printed, number of copies, and other information (DPOF data) onto the card. ≥Set to Picture Playback Mode. Set [ADVANCE] >> [DPOF SET] >> [SET]. Move the joystick to select a file to be set, and then press it. -
Page 88: Edit Mode
Edit mode Edit mode Recording from a tape onto a card Still pictures can be recorded on a memory card from scenes that have already been recorded on a cassette. ≥Set to Tape Playback Mode. ≥Insert a tape which already has recorded [VIDEO IN] contents and a card. -
Page 89: Recording The Contents Of Other Equipment
Edit mode ª ¥ When neither image nor sound from Or, while pressing the [ REC] button on the remote controller, press the [ ] button. the movie camera is output to the TV ¥ ≥Check that the plugs are inserted as far as they A.DUB /REW PLAY... -
Page 90: Using The Dv Cable For Recording (Digital Dubbing)
Edit mode ª Using the DV Cable for Recording Analog/digital conversion When setting [ADVANCE] >> [DV OUT] >> [ON], (Digital Dubbing) you can output video input from other equipment By connecting other digital video equipment with in analog form to other digital video equipment DV terminal and the movie camera by using the connected through the DV terminal in digital form. -
Page 91: Audio Dubbing
Edit mode ª Audio dubbing To cancel the standby for recording When the camera is standby for recording, move You can add music or narration to the recorded the joystick down and select the [∫] icon. cassette. ≥Set to Tape Playback Mode. (If you perform ≥Do not plug or unplug the DV cable during external input, set [BASIC] >>... -
Page 92: Printing Pictures By Directly Connecting To The Printer (Pictbridge)
Edit mode Printing pictures by directly Press the [;] button on the remote control to start audio dubbing. connecting to the printer (PictBridge) To print pictures by directly connecting the movie A.DUB ¥ /REW PLAY camera to the printer, use a printer compatible STILL ADV PAUSE STILL ADV... - Page 93 Edit mode Move the joystick left and right to select a desired picture, and then press it. Select the desired number of prints. ≥You can set up to 9 prints. Select the setting for date printing. ≥If the printer is not capable of date printing, this setting is unavailable.
-
Page 94: Menu
Menu Menu ª [TAPE PLAYBACK MENU] Menu list Menu figures and illustrations are provided for easy-to-understand explanations, and so they are different from the actual menu indications. ª [TAPE RECORDING MENU] 1) [BASIC] [DATE/TIME] -96- [AV JACK] -91- [USB FUNCTION] (Refer to the operating instructions for PC connection.) 2) [ADVANCE] 1) [BASIC]... - Page 95 Menu ª ª [CARD RECORDING MENU] [PICTURE PLAYBACK MENU] 2048 1) [BASIC] 1) [BASIC] [DATE/TIME] -96- [SCENE MODE] -80- [PROTECT] -86- [PICT. QUALITY] -73- [PICTURE SIZE] -73- 2) [ADVANCE] [SELF TIMER] -78- [DPOF SET] -87- [CLOCK SET] -65- [CARD FORMAT] -86- 2) [ADVANCE] 3) [SETUP]...
-
Page 96: Menus Related To Taking Pictures
Menu Menus related to taking pictures recording after you press the recording start/stop button. ª [H.SHOE MIC] [5 MINUTES]:When about 5 minutes passed without any operation, the movie Set to [LOWCUT] and this reduces low sound camera automatically turns off to noise and wind noise hitting the stereo zoom protect the tape or to prevent the microphone (VW-VMH3E;... -
Page 97: Other Menus
Menu Other menus ª [INITIAL SET] When there is a menu that cannot be selected depending on a combination of functions, set to [YES] for changing the menu settings back to the initial shipping condition. (Language setting cannot be back to the initial shipping condition.) ª... -
Page 98: Others
Others Others External microphone supporting LOWCUT the smart accessory shoe (LOW Indications CUT) -56- Sports mode (Scene mode) -80- Various functions and the movie camera status Portrait mode (Scene mode) -80- are shown on the screen. Low light mode (Scene mode) Basic indications -80- Remaining battery power... -
Page 99: Warning/Alarm Indications
Others Photoshot picture quality time until the cassette holder opens, but this -73- Remaining number of photoshot is not a malfunction. -104- pictures (When the remaining LOW BATTERY: number of photoshot pictures The battery is low. Recharge it. -59- reaches 0, the red indication NO TAPE : flashes.) No tape is inserted. -
Page 100: Functions Cannot Be Used Simultaneously
Others Functions cannot be used CHANGE ASPECT TO 4:3: You are attempting to record pictures with simultaneously an aspect ratio of 16:9 by pressing the Some functions in the movie camera are disabled [PHOTO SHOT] button. or cannot be selected due to its specifications. FILE LOCKED: The table below shows examples of functions You are attempting to erase protected files. -
Page 101: Before Requesting Repair (Problems And Solutions)
Others Before requesting repair (Problems ≥Flash ≥While recording to a tape and solutions) ≥During demo mode ≥When continuous Power/Body photoshot is used 1: The movie camera power cannot be turned ≥When the colour night view function is used • Is the battery fully charged? Use a fully ≥Zoom ≥When the microphone of charged battery. - Page 102 Others access lamp is on may destroy the data on the 4: Auto focus function does not work. card.) • Is manual focus mode selected? If auto focus 6: The cassette cannot be removed. mode is selected, focus is automatically •...
- Page 103 Others 2: Different sounds are reproduced at the TV and select the channel that matches the same time. input terminals used for the connection. • Have you set [SETUP] >> [12bit AUDIO] >> 4: Playback picture is not clear. [MIX]? If you set [AUDIO REC] >> [12bit] and •...
-
Page 104: Cautions For Use
Others Others 6: The warning/alarm indication [°] appears 1: The indication disappears, the screen is when the camera is operated in the WEB frozen, or no operation can be performed. camera mode. • Turn off the power to the movie camera. If the •... - Page 105 Others ª Especially in cold areas, moisture may be frozen. About the movie camera ≥When the movie camera is used for a long time, If so, it may take more time before the condensation indication disappears. the camera body becomes warm, but this is not Watch for condensation even before the a malfunction.
- Page 106 Others ≥The camera body may be discoloured and the After use, be sure to take the cassette out and surface finish may peel off. detach the battery from the movie camera or ≥Wipe the movie camera with a soft dry cloth to pull out the AC mains lead from AC mains remove dust and fingerprints.
- Page 107 Others ª When storing the cassette after use, be sure Folder structure of the card to rewind the tape to the beginning and take it The folder structure of the card formatted by out. the movie camera will be displayed on the PC ≥If the cassette is left for more than 6 months as the illustration below.
-
Page 108: Explanation Of Terms
Others 1) The effective range of automatic white balance adjustment on this movie camera Extremely high precision technology is 2) Blue sky employed to produce the viewfinder screen 3) TV screen featuring a total of approximately 113,000 4) Cloudy sky (rain) pixels. - Page 109 Others Recording a subject that is surrounded by objects with glossy surfaces or by highly reflective objects ≥The recording subject may become blurry because the movie camera focuses on the objects with glossy surfaces or on highly reflective objects. Recording a subject in dark surroundings ≥The movie camera cannot focus correctly because the light information that comes through the lens decreases considerably.
-
Page 110: Specifications
Specifications Specifications S-Video input level: Y Input: 1.0 Vp-p, 75 ohm C Input: 0.3 Vp-p, 75 ohm Specifications Audio input level (Line): 316 mV, 10 kohm or more Mic input: Digital Video Camera Mic sensitivity –50 dB (0 dB=1 V/Pa, 1 kHz) (Stereo Information for your safety mini jack) USB:... - Page 111 Specifications AC adaptor VSK0651B Information for your safety Power source: AC 110–240 V, 50/60 Hz Power consumption: 19 W DC output: DC 7.9 V, 1.4 A (Movie camera operation) DC 8.4 V, 0.65 A (Battery charging) Dimensions: 61 mm (W) 32 mm (H) 91 mm (D) Weight:...
- Page 112 VQT0N70 F1204Ke0 ( 3500 A ) Matsushita Electric Industrial Co., Ltd. Web site: http://www.panasonic.co.jp/global/...
Need help?
Do you have a question about the NV-GS250GC and is the answer not in the manual?
Questions and answers