Table of Contents
Advertisement
Quick Links
Advertisement
Table of Contents

Related Manuals for ORION TELESCOPES & BINOCULARS SpaceProbe 3 EQ 9847


Summary of Contents for ORION TELESCOPES & BINOCULARS SpaceProbe 3 EQ 9847
- Page 1 INSTRUCTION MANUAL Orion ® SpaceProbe 3 EQ #9847 and #9842 Customer Support (800) 676-1343 E-mail: support@telescope.com Corporate Offices (831) 763-7000 P.O. Box 1815, Santa Cruz, CA 95061 Providing Exceptional Consumer Optical Products Since 1975 IN 173 Rev. A 0801...
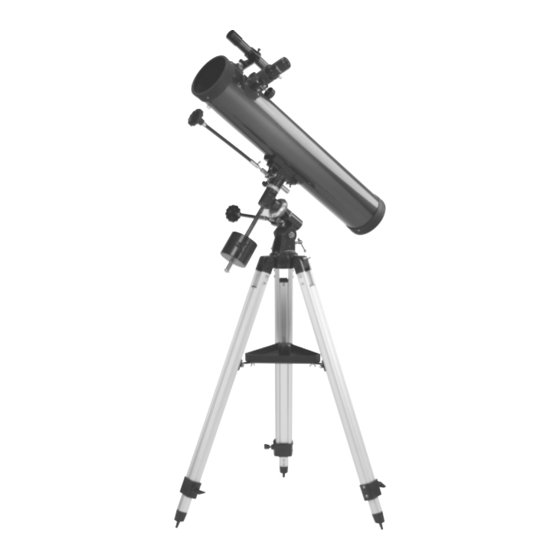
- Page 2 Finder scope Finder scope bracket Eyepiece Focuser Optical tube assembly Declination slow-motion control cable Right Ascension setting circle Declination setting circle Declination lock knob Latitude adjustment Right Ascension slow motion cable T-Bolt Counterweight shaft Accessory tray Counterweight Counterweight lock knob Right Ascension lock knob Tripod leg Accessory tray bracket...
-
Page 3: Table Of Contents
elcome to the exciting world of amateur astronomy! Your SpaceProbe 3 EQ is a high-quality optical instrument designed for nighttime stargazing. With its precision optics and equatorial mount, you’ll be able to locate and enjoy fascinating denizens of the night sky, including the planets, Moon, and a variety of deep-sky objects. -
Page 4: Assembly
3. Assembly ment point on each leg. Use the screw and lock nut that come installed in each attachment point to do this. First, remove the Assembling the telescope for the first time should take about screw using the supplied screwdriver and triangular assem- 30 minutes. -
Page 5: Getting Started
7. Thread the counterweight shaft into the equatorial mount R.A. axis. Rotate it until the counterweight shaft is parallel at the base of the declination axis until tight. to the ground (i.e., horizontal). 8. Remove the screw and washer on the bottom of the coun- 2. - Page 6 Focusing the Telescope Insert the 25mm Explorer II eyepiece into the focuser and secure with the thumbscrew. Move the telescope so the front (open) end is pointing in the general direction of an object at least 1/4-mile away. Now with your fingers, slowly rotate one of the focusing knobs until the object comes into sharp focus.
-
Page 7: Setting Up And Using The Equatorial Mount
Focusing the Finder Scope 4. Loosen the azimuth lock knob at the base of the equatori- al mount and rotate the mount so the telescope tube (and If, when looking through the finder scope, the images appear R.A. axis) points roughly at Polaris. If you cannot see somewhat out of focus, you will need to refocus the finder Polaris directly from your observing site, consult a com- scope for your eyes. - Page 8 Optional Electronic Drives for Automatic Tracking range from +90° to -90°. The 0° mark indicates the celestial equator. When the telescope is pointed north of the celestial An optional DC electronic drive can be mounted on the R.A. equator, values of the Dec. setting circle are positive, while axis of the equatorial mount to provide hands-free tracking.
-
Page 9: Using Your Telescope-Astronomical Observing
3. Point the telescope at the bright star whose coordinates it with the counterweight down as pictured in Figure 1. Again, you know. Lock the R.A. and Dec. lock knobs. Center the you have to rotate the scope in R.A. so the counterweight star in the telescope's field of view with the slow-motion shaft is positioned horizontally. - Page 10 or more eyepieces to access a wide range of magnifications. This allows the observer to choose the best eyepiece to use depending on the object being viewed. To calculate the magnification, or power, of a telescope and eyepiece combination, simply divide the focal length of the tel- escope by the focal length of the eyepiece: Magnification = (focal length of telescope) ÷...
-
Page 11: Care And Maintenance
objects will become easier to find. Take it from us, there is big JUPITER: The largest planet, Jupiter, is a great subject for difference between looking at a well-made full-color NASA observation. You can see the disk of the giant planet and image of a deep-sky object in a lit room during the daytime, watch the ever-changing positions of its four largest moons - and seeing that same object in your telescope at night. -
Page 12: Specifications
Small components like eyepieces and other accessories should be kept in a protective box or storage case. Keep the caps on the front of the telescope and on the focuser draw- tube when not in use. Your SpaceProbe 3 EQ telescope requires very little mechan- ical maintenance. - Page 13 In addition to providing the collimation cap, you'll notice a tiny move the secondary mirror toward the primary mirror. ring (sticker) in the exact center of the primary mirror. This When the secondary mirror is centered in the focuser draw- “center mark”...
-
Page 14: Appendix B: Cleaning The Optics
not accurately centered in the eyepiece, the optics will always appear out of collimation, even though they may be perfectly aligned. It is critical to keep the star centered, so over time you will need to turn the R.A. slow motion control cable clockwise in order to account for the sky’s apparent motion. - Page 15 Now, remove the mirror from the mirror cell by removing the three mirror clips that secure the mirror in its cell. Use a Phillips head screwdriver to unthread the mirror clip anchor screws. Next, hold the mirror by its edge, and remove it from the mirror cell.
- Page 16 One-Year Limited Warranty This Orion SpaceProbe 3 EQ telescope is warranted against defects in materials or workman- ship for a period of one year from the date of purchase. This warranty is for the benefit of the original retail purchaser only. During this warranty period Orion Telescopes & Binoculars will repair or replace, at Orion’s option, any warranted instrument that proves to be defective, pro- vided it is returned postage paid to: Orion Warranty Repair, 89 Hangar Way, Watsonville, CA 95076.
Need help?
Do you have a question about the SpaceProbe 3 EQ 9847 and is the answer not in the manual?
Questions and answers