Table of Contents
Advertisement
Quick Links
Advertisement
Table of Contents

Subscribe to Our Youtube Channel
Related Manuals for ORION TELESCOPES & BINOCULARS SkyView Pro 120 EQ 9867


Summary of Contents for ORION TELESCOPES & BINOCULARS SkyView Pro 120 EQ 9867
- Page 1 INSTRUCTION MANUAL Orion ® SkyView Pro 120 EQ ™ #9867 Equatorial Refractor Telescope Customer Support (800) 676-1343 E-mail: support@telescope.com Corporate Offices (831) 763-7000 P.O. Box 1815, Santa Cruz, CA 95061 Providing Exceptional Consumer Optical Products Since 1975 IN 189 Rev. A 09/02...
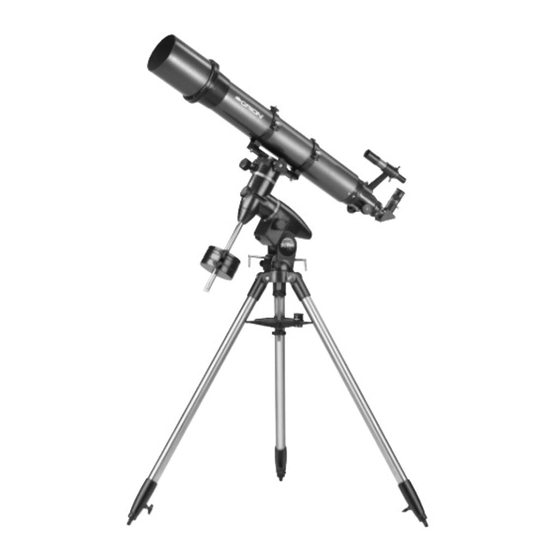
- Page 2 Objective lens Optical tube Tube rings Declination lock lever (opposite side) Finder scope Right Ascension lock lever (opposite side) Finder scope bracket Declination slow-motion control knob Eyepiece Safety thumbscrew Star diagonal Mounting plate securing knob Focus wheel Counterweight shaft Right Ascension Counterweights slow-motion control knob Counterweight lock knobs...
-
Page 3: Table Of Contents
® ongratulations on your purchase of an Orion telescope. Your new SkyView Pro 120 EQ is designed for high-resolution viewing and astrophotography of astronomical objects. With its precision optics and stur- dy equatorial mount, you’ll be able to enjoy hundreds of fascinating celestial denizens. These instructions will help you set up, properly use, and care for your telescope. - Page 4 Finder scope bracket Nylon alignment thumbscrews Finder scope Azimuth adjustment Post knobs Tensioner Focus lock ring Figure 2. Orient the equatorial mount so that the post on the tripod head lines up between the azimuth adjustment knobs on the equatorial mount. Figure 3a.
-
Page 5: Balancing The Telescope
® Figure 4. Proper operation of the equatorial mount requires that the telescope tube be balanced on the R.A. axis. (a) With the R.A. lock lever released, slide the counterweights along the counterweight shaft until it just counterbalances the tube. (b) When you let go with both hands, the tube should not drift up or down. -
Page 6: Using Your Telescope
Aligning the Finder Scope The SkyView Pro 120 EQ comes with a 6x30 achromatic find- er scope (Figure 3a). The number 6 means six-times magnifi- cation and the 30 indicates a 30mm diameter front lens. The finder scope makes it easier to locate the subject you want to observe in the telescope, because the finder scope has a much wider field-of-view. -
Page 7: Setting Up And Using The Equatorial Mount
® Magnification & Eyepieces may be attached, comes off, exposing the 2" diameter focuser drawtube Now, insert your 2" star diagonal into the drawtube Magnification, or power, is determined by the focal length of and secure with the two thumbscrews loosened previously. the telescope and the focal length of the eyepiece. - Page 8 Dec. slow-motion control knob Dec. setting circle R.A. setting circle Dec. lock lever Polar axis finder Front opening scope (optional) R.A. lock lever Latitude scale (opposite side) R.A. slow-motion control knob Latitude adjustment L-bolts Figure 6. The SkyView Pro 120 equatorial mount. Azimuth adjustment Little Dipper...
- Page 9 Eyepiece Alignment Objective focus ring set screws (3) lens Focus lock ring Figure 9a. Figure 9b. The optional polar axis finder scope. Installing the optional polar axis finder scope. The equatorial mount is now polar aligned for casual observ- ing. More precise polar alignment is recommended for astrophotography.
- Page 10 Use of the Right Ascension and Declination Slow- 3. Remove the cap on the front of the equatorial mount (Figure 6). Focus the polar finder by rotating the eyepiece. Motion Control Knobs Now, sight Polaris in the polar axis finder scope. If you The right ascension (R.A.) and declination (Dec.) slow-motion have followed the approximate polar alignment procedure control knobs allow fine adjustment of the telescope’s position...
- Page 11 Rotate the setting circle until the R.A. pointer arrow indi- Dec. setting circle cates the R.A. coordinate listed in the star atlas for the object. Re-tighten the setting circle thumbscrew. R.A. Dec. setting circle setting circle Finding Objects With the Setting Circles thumbscrew Now that both setting circles are calibrated, look up in a star atlas the coordinates of an object you wish to view.
-
Page 12: Astronomical Observing
Figure 13. Megrez connects the Big Dipper’s handle to it's “pan”. It is a good guide to how conditions are. If you can not see Megrez (a 3.4 mag star) then conditions are poor. Atmospheric conditions play a huge part in quality of viewing. In conditions of good “seeing”, star twinkling is minimal and objects appear steady in the eyepiece. - Page 13 Allow at least 30 minutes for your SkyView Pro 120 EQ to greater magnification inherently yields dimmer images. This is equilibrate. If the scope has more than a 40° temperature not the case for all deep-sky objects, however. Many galaxies adjustment, allow an hour or more.
- Page 14 cover the finder scope, or better yet, remove it altogether. smudges. But as you become more experienced and your observing skills get sharper, you will be able to ferret out more C. The Planets and more subtle details and structure. The planets don’t stay put like the stars, so to find them you should refer to Sky Calendar at our website telescope.com, or How to Find Deep-sky Objects: Starhopping...
-
Page 15: Astrophotography
which would cause the image to blur if no motor drive was used for tracking. The equatorial mount must be accurately polar aligned, too. As before, connect the T-ring to your camera. Before connect- ing the universal camera adapter to the T-ring, an eyepiece must be inserted and locked into the body of the universal camera adapter. -
Page 16: Collimating (Aligning The Optics)
insert the illuminated reticle eyepiece into the diagonal. Turn the eyepiece’s illuminator on (dimly!). Recenter the bright star (guide star) on the crosshairs of the reticle eyepiece. Check again to make sure that the object to be photographed is still centered within the camera’s field of view. -
Page 17: Specifications
cleaning with fluid and tissue, however, blow any loose parti- cles off the lens with a blower bulb or compressed air. Then apply some cleaning fluid to a tissue, never directly on the optics. Wipe the lens gently in a circular motion, then remove Pair of any excess fluid with a fresh lens tissue. - Page 20 One-Year Limited Warranty This Orion SkyView Pro 120 EQ is warranted against defects in materials or workmanship for a period of one year from the date of purchase. This warranty is for the benefit of the original retail purchaser only. During this warranty period Orion Telescopes & Binoculars will repair or replace, at Orion’s option, any warranted instrument that proves to be defective, provided it is returned postage paid to: Orion Warranty Repair, 89 Hangar Way, Watsonville, CA 95076.
Need help?
Do you have a question about the SkyView Pro 120 EQ 9867 and is the answer not in the manual?
Questions and answers