Table of Contents
Advertisement
Quick Links
Advertisement
Table of Contents

Subscribe to Our Youtube Channel
Related Manuals for ORION TELESCOPES & BINOCULARS AstroView 6 EQ 9827


Summary of Contents for ORION TELESCOPES & BINOCULARS AstroView 6 EQ 9827
- Page 1 INSTRUCTION MANUAL Orion ® AstroView 6 EQ ™ #9827 Equatorial Reflecting Telescope Customer Support (800) 676-1343 E-mail: support@telescope.com Corporate Offices (831) 763-7000 P.O. Box 1815, Santa Cruz, CA 95061 Providing Exceptional Consumer Optical Products Since 1975 IN 160 Rev. A 03/02...
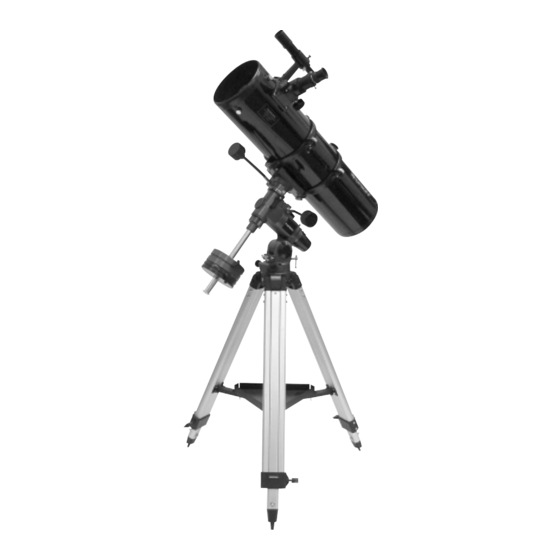
- Page 2 Finder scope Finder scope bracket Eyepiece Focus knob Tube rings Optical tube Declination slow motion control Declination lock lever Counterweight shaft Large counterweight Small counterweight Right ascension slow-motion control “Toe Saver” Right ascension lock lever Counterweight lock knobs Polar axis finder (covered) Latitude scale Tripod leg Latitude adjustment...
-
Page 3: Table Of Contents
Welcome to the exciting world of amateur astronomy! Your new AstroView 6 EQ Reflector is designed for high-resolution viewing of astronomical objects. With its precision optics and equatorial mount, you’ll be able to locate and enjoy hundreds of fascinating celestial denizens, including the planets, Moon, and a variety of deep-sky galaxies, nebulas, and star clusters. - Page 4 screws up through the holes in the bracket, then thread them the internal O-ring from becoming unseated. If it does become into the holes in the tray. unseated, you can remove the entire housing from the mount to locate the O-ring and reseat it. This is done by rotating the 5.
-
Page 5: Using Your Telescope
Figure 3a Figure 3b Figure 3c Figure 3d Figure 3a, b, c, d: the tube should not drift up or down. (c) With the Dec. lock lever Proper operation of the equatorial mount released, loosen the tube ting clamps a few turns and slide the requires that the telescope tube be balanced on both the R.A. - Page 6 viewing through the telescope. Choose any bright star or planet, center the object in telescope eyepiece, and then adjust the finder scope bracket’s alignment thumbscrews until the star or planet is centered on the finder’s crosshairs. Focusing the finder scope Naked-eye view If, when you look through the finder scope, the images appear somewhat out of focus, you will need to refocus the finder...
-
Page 7: Setting Up And Using The Equatorial Mount
Right Ascension lock lever Declination setting circle Declination lock lever Front opening in R.A. axis Latitude scale Right Ascension Latitude adjustment setting circle lock T-bolts thumb screw Azimuth fine Right Ascension setting circle adjustment knobs Polar axis finder scope Figure 5: The equatorial mount of the AstroView 6 piece. - Page 8 Pointer R.A. setting circle Date circle Meridian offset scale Ring with engraved time meridian indicator mark Polar scope housing Polar scope Azimuth alignment thumbscrew (3) fine Polar axis adjustment Tripod finder scope knobs attachment knob Figure 8. The polar axis finder scope installed in the right Figure 7.
- Page 9 is January, “2” is February, etc.). Each small line represents a east of the standard time meridian by the calculated amount. two-day increment. If your local longitude has a value greater than the closest standard time meridian, you are west of the standard time 4.
- Page 10 Calibrating the Right Ascension Setting Circle Remember, accurate polar alignment is not needed for casu- al visual observing. Most of the time, approximate polar align- 1. Identify a bright star in the sky near the celestial equator ment, as outlined previously, will suffice. (Dec.
-
Page 11: Collimation (Aligning The Mirrors)
Figure 9a Figure 9b Figure 9c Figure 9d Figure 9a,b,c,d: Note that the tripod and mount have not been moved; only the This illustration shows the telescope pointed in telescope tube has move on the R.A. and Dec. axis. the four cardinal directions: (a) North, (b) South, (c) East, (d) West. scope on the R.A. - Page 12 Figure 10. Collimating the optics. (a) When the mirrors are properly aligned, the view down the focuser drawtube should look like this (b) With the collimation cap in place, if the optics are out of alignment, the view might look something like this. (c) Here, the secondary mirror is centered under the focuser, but it needs to be adjusted (tilted) so that the entire primary mirror is visible.
-
Page 13: Astronomical Observing
Figure 13: Figure 14: The three small thumbscrews that lock the primary The tilt of the primary mirror is adjusted by turning one mirror in place must first be loosened before any adjustments can be or more of the three larger thumbscrews. made. - Page 14 Seeing and Transparency Atmospheric conditions play a huge part in quality of viewing. In conditions of good “seeing”, star twinkling is minimal and objects appear steady in the eyepiece. Seeing is best over- head, worst at the horizon. Also, seeing generally gets better after midnight, when much of the heat absorbed by the Earth during the day has radiated off into space.
- Page 15 dreds of deep sky objects. Do not expect to see as much color Ironically, Venus appears as a thin crescent, not a full disk, as you in NASA photos, since those are taken with long-expo- when at its peak brightness. Because it is so close to the Sun, sure cameras and have “false color”...
-
Page 16: Astrophotography
E. The Sun You can change your nighttime scope into a daytime Sun viewer by installing an optional full-aperture solar-filter over the front opening of a AstroView 6 EQ. The primary attraction is sunspots, which change in shape, appearance, and loca- tion daily. -
Page 17: Care And Maintenance
Turn the motor drive on. Adjust the telescope’s focuser so that locking shutter release cable and lock it. You are now expos- the image appears sharp in the camera’s viewfinder. The ing your first deep-sky object. camera’s shutter is now ready to be opened. A remote shutter While exposing through the camera lens, you will need to release must be used or the image will be blurred beyond monitor the accuracy of the mount’s tracking by looking... -
Page 18: Specifications
rors, the better. Small specks of dust or flecks of paint have utes (or hours if it’s a very dirty mirror). Wipe the mirror under virtually no effect on the visual performance of the telescope. water with clean cotton balls, using extremely light pressure and stroking in straight line across the mirror. - Page 20 One-Year Limited Warranty This Orion AstroView 6 EQ is warranted against defects in materials or workmanship for a peri- od of one year from the date of purchase. This warranty is for the benefit of the original retail purchaser only. During this warranty period Orion Telescopes & Binoculars will repair or replace, at Orion’s option, any warranted instrument that proves to be defective, provided it is returned postage paid to: Orion Warranty Repair, 89 Hangar Way, Watsonville, CA 95076.
Need help?
Do you have a question about the AstroView 6 EQ 9827 and is the answer not in the manual?
Questions and answers