Table of Contents
Advertisement
Quick Links
Advertisement
Table of Contents

Related Manuals for ORION TELESCOPES & BINOCULARS Atlas 10 EQ 9874


Summary of Contents for ORION TELESCOPES & BINOCULARS Atlas 10 EQ 9874
- Page 1 INSTRUCTION MANUAL Orion ® Atlas 10 EQ ™ #9874 Equatorial Reflector Telescope Customer Support (800) 676-1343 E-mail: support@telescope.com Corporate Offices (831) 763-7000 P.O. Box 1815, Santa Cruz, CA 95061 Providing Exceptional Consumer Optical Products Since 1975 IN 214 Rev. A 12/02...
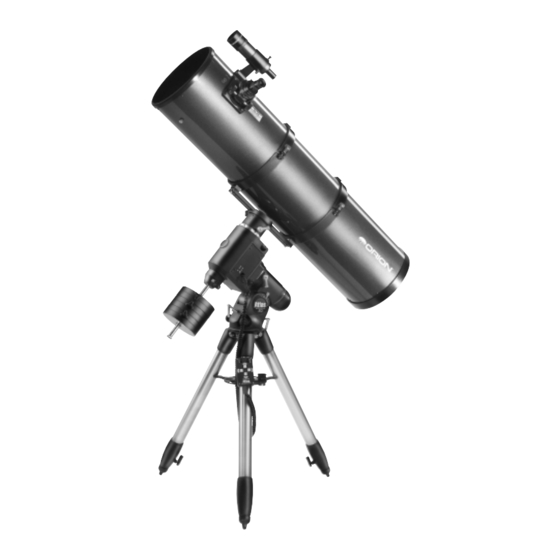
- Page 2 Finder scope Finder scope bracket Eyepiece Focus knob Tube rings Right ascension setting circle Tube ring mounting plate Tube ring mounting plate lock knobs (2) Right ascension lock lever Declination setting circle Declination lock lever Counterweight shaft lock lever Counterweight shaft Counterweights Mirror cell Counterweight lock knobs...
-
Page 3: Table Of Contents
ongratulations on your purchase of a quality Orion telescope. Your new Atlas 10 EQ is designed for high-resolution viewing of astronomical objects. With its precision optics, and its superb Atlas mount, you’ll be able to locate and enjoy thousands of fascinating celestial denizens, including planets, Moon, and a variety of galaxies, nebulas and star clusters. - Page 4 Nylon Finder Finder scope alignment scope bracket thumbscrew (2) Azimuth adjustment knobs Post Focusing lock ring Eyepiece Tensioner Figure 2. Orient the equatorial head so that the post on the tripod lines up with the azimuth adjustment knobs on the equatorial mount. Figure 3a.
-
Page 5: Balancing The Telescope
1.25" eyepiece 2" eyepiece adapter adapter Focus lock thumbscrew Focus Collimation knobs screw pair Figure 4. The 2" focuser of the Atlas 10 EQ. Figure 5a-d. Proper operation of the equatorial mount requires that the telescope tube be balanced on the R.A. and Dec. axes. (a) With the R.A. -
Page 6: Using Your Telescope
Aligning the Finder Scope The Atlas 10 EQ Deluxe comes with a 9x50 achromatic finder scope (Figure 3a). The number 9 means six-times magnifica- tion and the 50 indicates a 50mm diameter front lens. The finder scope makes it easier to locate the object you want to observe in the telescope, because the finder scope has a Naked-eye view much wider field-of-view. -
Page 7: Setting Up And Using The Equatorial Mount
Dec. lock lever R.A. Dec. setting circle setting circle Front opening R.A. lock lever Polar axis finder scope Latitude scale Latitude Azimuth adjustment knobs (2) adjustment L-bolts Figure 7. The Atlas EQ Mount. Telescope Focal Length (mm) Replace the eyepiece with the new one by sliding it gently into = Magnification the holder. - Page 8 Eyepiece Alignment Focus Objective Little Dipper (in Ursa Minor) focus ring setscrew (3) lock ring lens N.C.P. Big Dipper (in Ursa Major) Polaris Cassiopeia Figure 8. To find Polaris in the night sky, look north and find the Big Dipper. Extend an imaginary line from the two “Pointer Stars” in the bowl of the Big Dipper.
- Page 9 Power switch Rate switch Indicator light Reverse switches Dec. R.A. pushbuttons pushbuttons Figure 10. The optical tube must be at a 90° angle to the R.A. axis in order to view through the polar axis finder. Figure 11. The Atlas EQ Mount hand controller. quick and easy.
- Page 10 power switch, the power indicator light on the mount will glow red and the power indicator light on the hand controller will glow green. Your mount will now be moving at the sidereal Dec. setting circle rate, which is the same rate as the sky’s apparent motion. If the mount is properly polar aligned, it is now “tracking”...
- Page 11 Figure 13a-d. These illustrations show the telescope pointed in the four cardinal directions. (a) north, (b) south, (c) east, (d) west. Note that the tripod and mount have not been moved; only the telescope has been moved on the its R.A. and Dec. axes. Calibrating the Right Ascension Setting Circle Confused About Pointing the Telescope? 1.
-
Page 12: Collimating
7. Collimating (Aligning The Mirrors) Collimating is the process of adjusting the mirrors so they are aligned with one another.Your telescope’s optics were aligned at the factory, and should not need much adjustment unless the telescope is handled roughly. Accurate mirror alignment is important to ensure the peak performance of your telescope, so it should be checked regularly. - Page 13 Figure 15. To center the secondary mirror under the focuser, hold the secondary mirror holder in place with your fingers while adjusting the center screw with a Phillips screwdriver. Do not touch Figure 17. the mirror’s surface! The three thumb screws that lock the primary mirror in place must first be loosened before any adjustments can be made.
-
Page 14: Astronomical Observing
Figure 19. A star test will determine if a telescope’s optics are properly collimated. An unfocused view of a bright star through the eyepiece should appear as illustrated on right if optics are perfectly Figure 20. Megrez connects the Big Dipper’s handle to it’s collimated. - Page 15 allow an hour or more. In the winter, storing the telescope out- objects will often disappear at higher magnifications, since doors in a shed or garage greatly reduces the amount of time greater magnification inherently yields dimmer images. This needed for the optics to stabilize. It also is a good idea to keep is not the case for all deep-sky objects, however.
- Page 16 permanent eye damage could result. Also, be sure to cover the finder scope, or better yet, remove it altogether. C. The Planets The planets don’t stay put like the stars, so to find them you should refer to Sky Calendar at our website telescope.com, or to charts published monthly in Astronomy, Sky &...
-
Page 17: Astrophotography
Figure 22a. Figure 22b. Figure 22c. First remove both the 1.25" Thread the camera adapter The SkyView Pro 8 EQ with and 2" adapters as shown. into the focuser drawtube. 35mm SLR camera attached. al magnitude of 9 or lower. Many beginners start with the the focuser drawtube (Figure 22b). -
Page 18: Care And Maintenance
the image appears sharp in the camera’s viewfinder. The While exposing through the camera lens, you will need to camera’s shutter is now ready to be opened. A remote shutter monitor the accuracy of the mount’s tracking by looking release must be used or the image will be blurred beyond through the illuminated reticle eyepiece in the main tele- recognition. -
Page 19: Specifications
The large primary mirror and the elliptical secondary mirror of 11. Specifications your telescope are front-surface aluminized and over-coated with hard silicon dioxide, which prevents the aluminum from Primary mirror diameter: 254mm oxidizing. These coatings normally last through many years of Primary mirror coating: Aluminized, SiO 2 overcoat use before requiring re-coating (which is easily done). - Page 20 One-Year Limited Warranty This Orion Atlas 10 EQ is warranted against defects in materials or workmanship for a period of one year from the date of purchase. This warranty is for the benefit of the original retail purchaser only. During this warranty period Orion Telescopes &...
Need help?
Do you have a question about the Atlas 10 EQ 9874 and is the answer not in the manual?
Questions and answers