Table of Contents
Advertisement
Quick Links
INSTRUCTION MANUAL
Orion
®
SpaceProbe
130mm EQ
#9851 Equatorial Newtonian Reflector Telescope
Customer Support (800) 676-1343
E-mail: support@telescope.com
Corporate Offices (831) 763-7000
P.O. Box 1815, Santa Cruz, CA 95061
Providing Exceptional Consumer Optical Products Since 1975
IN 186 Rev. A 05/02
Advertisement
Table of Contents

Related Manuals for ORION TELESCOPES & BINOCULARS SpaceProbe 130mm EQ 9851


Summary of Contents for ORION TELESCOPES & BINOCULARS SpaceProbe 130mm EQ 9851
- Page 1 INSTRUCTION MANUAL Orion ® SpaceProbe 130mm EQ #9851 Equatorial Newtonian Reflector Telescope Customer Support (800) 676-1343 E-mail: support@telescope.com Corporate Offices (831) 763-7000 P.O. Box 1815, Santa Cruz, CA 95061 Providing Exceptional Consumer Optical Products Since 1975 IN 186 Rev. A 05/02...
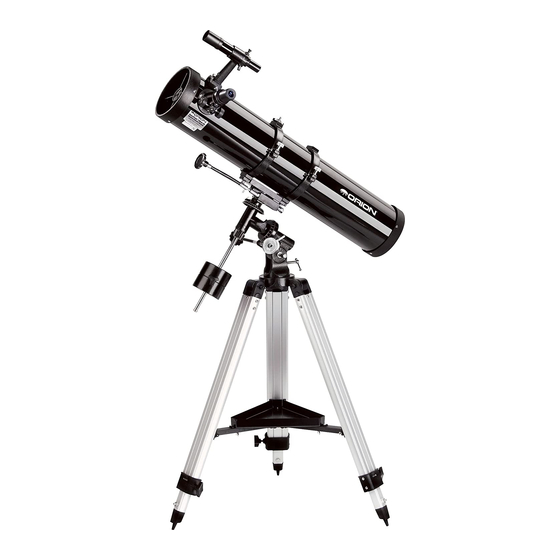
- Page 2 Alignment thumb screws(2) Finder scope Spring-loaded Dovetail slot tensioner Finder scope bracket Eyepiece Piggyback adapter Tube mounting rings Focuser Tube ring clamps Dec. slow-motion control cable Primary mirror cell Dec. setting circle R.A. lock knob Counterweight Collimation shaft screws(6) Counterweight lock knob R.A.
-
Page 3: Table Of Contents
ongratulations on your purchase of a quality Orion telescope. Your new SpaceProbe 130mm EQ is designed for high-resolution viewing of astronomical objects. With its precision optics and equatorial mount, you’ll be able to locate and enjoy hundreds of fascinating celestial denizens, including the plan- ets, Moon, and a variety of deep-sky galaxies, nebulas, and star clusters. - Page 4 Dec. slow motion control cable Dec. lock knob Dec. setting circle R.A. setting circle R.A. setting circle lock thumbscrew Latitude scale R.A. slow motion control cable Latitude lock T-bolt Latitude adjustment T-bolt Figure 2. The SpaceProbe 130’s equatorial mount. finder scopes or eyepieces with your fingers. The optical sur- 4.
-
Page 5: Getting Started
Finder scope Nylon bracket thumbscrews Finder scope Tensioner Focusing lock ring Figure 3a. Figure 3b. The 6x26 Correct-Image finder scope Pull back on the tensioner and slide the finder scope into its bracket until the O-ring is seated in the bracket ring terweight from falling off (and onto your foot!) if the coun- 10.To place the finder scope in the finder scope bracket, first terweight lock knob becomes loose. - Page 6 Figure 4a, 4b, 4c, 4d. Proper operation of the equatorial mount requires that the telescope tube be balanced on both the R.A. and Dec. axes. (a) With the R.A. lock knob released, slide the counterweight along the counterweight shaft until it just counterbalances the tube. (b) When you let go with both hands, the tube should not drift up or down.
-
Page 7: Setting Up And Using The Equatorial Mount
By loosening or tightening the alignment thumb screws, you change the line of sight of the finder scope. Continue making adjustments to the alignment thumb screws until the image in both the finder scope and the telescope’s eyepiece is exactly centered. Check the alignment by moving the tele- scope to another object and fixing the finder scope’s crosshairs on the exact point you want to look at. - Page 8 Earth’s rotational (polar) axis—a process called polar alignment. Little Dipper (in Ursa Minor) Polar Alignment Big Dipper For Northern Hemisphere observers, approximate polar (in Ursa Major) N.C.P. alignment is achieved by pointing the mount’s R.A. axis at Polaris the North Star, or Polaris. It lies within 1° of the north celes- tial pole (NCP), which is an extension of the Earth’s rotation- al axis out into space.
- Page 9 Optional Motor Drives for Automatic Tracking Finding Objects With the Setting Circles An optional DC motor drive can be mounted on the R.A. axis Now that both setting circles are calibrated, look up in a star of the equatorial mount to provide hands-free tracking. atlas the coordinates of an object you wish to view.
-
Page 10: Collimating The Optics
Figure 7. This illustration shows the telescope pointed in the four cardinal directions: (a) north, (b)south, (c) east, (d) west. Note that the tripod and mount have not been moved; only the telescope tube has been moved on the R.A. and Dec. axes. the counterweight shaft will be oriented somewhere between ter of the mirror is. - Page 11 Figure 8. Collimating the optics. (a) When the mirrors are properly aligned, the view down the focuser drawtube should look like this. (b) With the collimation cap in place, if the optics are out of alignment, the view might look something like this. (c) Here, the secondary mirror is centered under the focuser, but it needs to be adjusted (tilted) so that the entire primary mirror is visible.
-
Page 12: Using Your Telescope-Astronomical Observing
Figure 11. The back end of the optical tube (bottom of the primary mirror cell). The three pairs of collimation screws adjust the tilt of the primary mirror. Out of collimation Collimated Figure 12. A star test will determine if a telescope’s optics are properly collimated. - Page 13 some telescope manufacturers are a misleading advertising gimmick and should be dismissed. Keep in mind that at high- er powers, an image will always be dimmer and less sharp (this is a fundamental law of optics). The steadiness of the air (the “seeing”) can also limit how much magnification an image can tolerate.
- Page 14 face, which reveal more detail, especially right along the bor- when at its peak brightness. Because it is so close to the der between the dark and light portions of the disk (called Sun, it never wanders too far from the morning or evening the “terminator”).
-
Page 15: Care And Maintenance
gives an inverted image, so you must keep this in mind when star hopping from star to star. 8. Care and Maintenance If you give your telescope reasonable care, it will last a life- time. Store it in a clean, dry, dust-free place, safe from rapid changes in temperature and humidity. -
Page 16: Specifications
Figure 15. Wipe the mirror under water with clean cotton balls, using Remove the three extremely light pressure and stroking in straight lines across collimation screws the surface. Use one ball for each wipe across the mirror. indicated to remove Then rinse the mirror under a stream of lukewarm water.
Need help?
Do you have a question about the SpaceProbe 130mm EQ 9851 and is the answer not in the manual?
Questions and answers