Table of Contents
Advertisement
Quick Links
Advertisement
Table of Contents

Related Manuals for ORION TELESCOPES & BINOCULARS AstroView 120ST EQ 9005


Summary of Contents for ORION TELESCOPES & BINOCULARS AstroView 120ST EQ 9005
- Page 1 INSTRUCTION MANUAL Orion ® AstroView 120ST EQ ™ #9005 Equatorial Refracting Telescope Customer Support (800) 676-1343 E-mail: support@telescope.com Corporate Offices (831) 763-7000 P.O. Box 1815, Santa Cruz, CA 95061 Providing Exceptional Consumer Optical Products Since 1975 IN 155 Rev. A 0101...
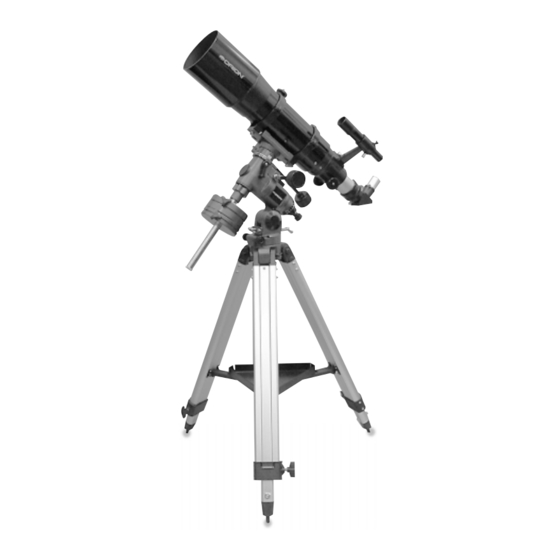
- Page 2 Tube rings Objective lens cell Dew cap/lens shade Declination lock lever Finder scope Finder bracket Large counterweight Small counterweight Focus knob Eyepiece Star diagonal Counterweight lock knobs Counterweight shaft Right Ascension slow-motion control Declination slow-motion control “Toe saver” Right Ascension lock lever Polar axis finder scope Latitude adjustment T-bolts Tripod leg...
-
Page 3: Table Of Contents
ongratulations on your purchase of a quality Orion telescope! Your new AstroView 120ST EQ Refractor is designed for high-resolution viewing of astronomical objects. With its precision optics and equatorial mount, you’ll be able to locate and enjoy hundreds of fascinating celestial denizens, including the planets, Moon, and a variety of deep-sky galaxies, nebulas, and star clusters. -
Page 4: Assembly
2. Assembly Carefully open all of the boxes in the shipping container. Make sure all the parts listed in Section 1 are present. Save the boxes and packaging material. In the unlikely event that you need to return the telescope, you must use the original packaging. Assembling the telescope for the first time should take about 30 minutes. - Page 5 12.To place the finder scope in the finder scope bracket (Figure 3), first unthread the two black nylon thumbscrews Objective Black nylon until the screw ends are flush with the inside diameter of lens cell alignment the bracket. Place the O-ring that comes on the base of thumbscrews the bracket over the body of the finder scope until it seats Lock ring...
-
Page 6: Balancing The Telescope
Figure 5. Proper operation of the equatorial mount requires that the telescope tube be balanced on both the R.A. and Dec. axes. (a) With the R.A. lock knob released, slide the counterweight along the counterweight shaft until it just counterbalances the tube. (b) When you let go with both hands, the tube should not drift up or down. -
Page 7: Aligning The Finder Scope
The telescope is now balanced on both axes. Now when you for now. Refocus the finder scope on a distant object by loosen the lock lever on one or both axes and manually point threading the objective lens cell in or out of the finder scope the telescope, it should move without resistance and should body. - Page 8 Note: From this point on in your observing session, you should not make any further adjustments to the latitude of the mount, nor should you move the tripod. Doing so will Little Dipper undo the polar alignment. The telescope should be moved (in Ursa Minor) only about its R.A.
- Page 9 thumbscrew; see Figure 3). Retighten the thumbscrew. have a friend hold the flashlight while you look through the polar finder. 2. Rotate the date circle until the “0” line on the meridian off- set scale lines up with the time meridian indicator mark. For most accurate polar alignment, you will need to know the The meridian offset scale is printed on the inner circum- approximate longitude of your observing site.This information can...
- Page 10 tography or precise use of the manual setting circles. As men- 2. Loosen the R.A. and Dec. lock levers on the equatorial tioned before, only move the telescope along the R.A. and mount, so the telescope optical tube can move freely. Dec.
-
Page 11: Using Your Telescope-Astronomical Observing
Figure 9. This illustration shows the telescope pointed in the four cardinal directions: north, south, east, west. Note that the tripod and mount have not been moved; only the telescope tube has been moved on the R.A. and Dec. axes. To point the telescope directly south, the counterweight shaft grass or dirt surface, not asphalt, because asphalt radiates should again be horizontal. - Page 12 use the setting circles to “dial in” the object’s coordinates).Then look small but well-resolved image will show more detail and provide a through the (aligned) finder scope and move the telescope tube more enjoyable view than a dim and fuzzy, over-magnified image. until the object is generally centered on the finder’s crosshairs.
- Page 13 Especially important for observing faint objects is good “trans- Start with a basic star atlas, one that shows stars no fainter parency”—air free of moisture, smoke, and dust. All tend to than 5th or 6th magnitude. In addition to stars, the atlas will scatter light, which reduces an object’s brightness.
-
Page 14: Astrophotography
each side of Saturn’s disk. A steady atmosphere (good see- Now you’re ready to shoot. Point the telescope toward the Moon, ing) is necessary for a good view. You might see a tiny, bright and center it within the camera’s viewfinder. Focus the image “star”... -
Page 15: Terrestrial Viewing
rings from the equatorial mount and swap their positions, if ity. That’s because when the scope is pointed near the hori- necessary. Now, connect the camera to the piggyback adapter. zon, it is peering through the thickest and most turbulent part There should be a 1/4"-20 mounting hole in the bottom of the of the Earth’s atmosphere. -
Page 16: Specifications
10. Specifications Optical tube: Seamless aluminum Objective lens diameter: 120mm (4.7") Objective lens: crown and flint, achromatic, air-spaced, diffraction limited Objective lens coating: fully coated with multi-coatings Focal length: 600mm Focal ratio: f/5 Eyepieces: 25mm and 10mm Plössls, fully coated, 1.25" Magnification: 24x (with 25mm), 60x (with 10mm) Focuser: Rack and pinion, accepts 1.25"...
Need help?
Do you have a question about the AstroView 120ST EQ 9005 and is the answer not in the manual?
Questions and answers