Table of Contents
Advertisement
Available languages
Available languages
Advertisement
Table of Contents

Related Manuals for Electrohome EAAC475


Summary of Contents for Electrohome EAAC475
- Page 1 USB Charging Alarm Clock Radio with Time Projection Thank you for your purchase of this Electrohome product. Please read this instruction manual carefully before using product to ensure proper use. Keep this manual in a safe place for future reference.
-
Page 2: Need Help
NEED HELP? DO NOT RETURN THIS PRODUCT TO THE STORE Please contact an ELECTROHOME® customer support representative first regarding any additional information on product features, specifications or assistance with setup. Please contact us via one of the methods below: Support: www.electrohome.com/support... -
Page 3: Warnings
WARNINGS WARNING To reduce the risk of fire or electric shock, do not expose this appliance to rain or moisture. CAUTION Use of controls or adjustments or performance of procedures other than those specified may result in hazardous radiation exposure. RISK OF ELECTRIC SHOCK DO NOT OPEN CAUTION - TO REDUCE THE RISK OF ELECTRIC SHOCK, DO NOT REMOVE... -
Page 4: Important Safety Information
IMPORTANT SAFETY INFORMATION Clean only with a dry cloth. Do not block any ventilation openings. Install in accordance with the manufacturer’s instructions. Do not install near any heat sources such as radiators, heat registers, stoves, or other apparatus (including amplifiers) that produce heat. 10. -
Page 5: Replacement Parts
IMPORTANT SAFETY INFORMATION 26. Unwind and straighten the power cord before use. 27. Damage Requiring Service Unplug the power cord and refer servicing to qualified service professional under the following conditions: A. If liquid has been spilled on or into the product. If the product has been exposed to rain, water, or other liquids. - Page 6 IMPORTANT SAFETY INFORMATION NOTE: This equipment has been tested and found to comply with the limits for a Class B digital device, pursuant to part 15 of the FCC Rules. These limits are designed to provide reasonable protection against harmful interference in a residential installation. This equipment generates, uses and can radiate radio frequency energy and, if not installed and used in accordance with the instructions, may cause harmful interference to radio communications.
-
Page 7: Table Of Contents
Adjusting LED Brightness ................18 Listening to the Radio .................18 To Set / Recall the Radio Presets ..............18 USB Charging Function ................19 Projection Unit ....................19 Troubleshooting ......................20 Care and Maintenance ....................20 Specifications ........................21 Electrohome Warranty ....................22 Notes ..........................23 - 7 -... -
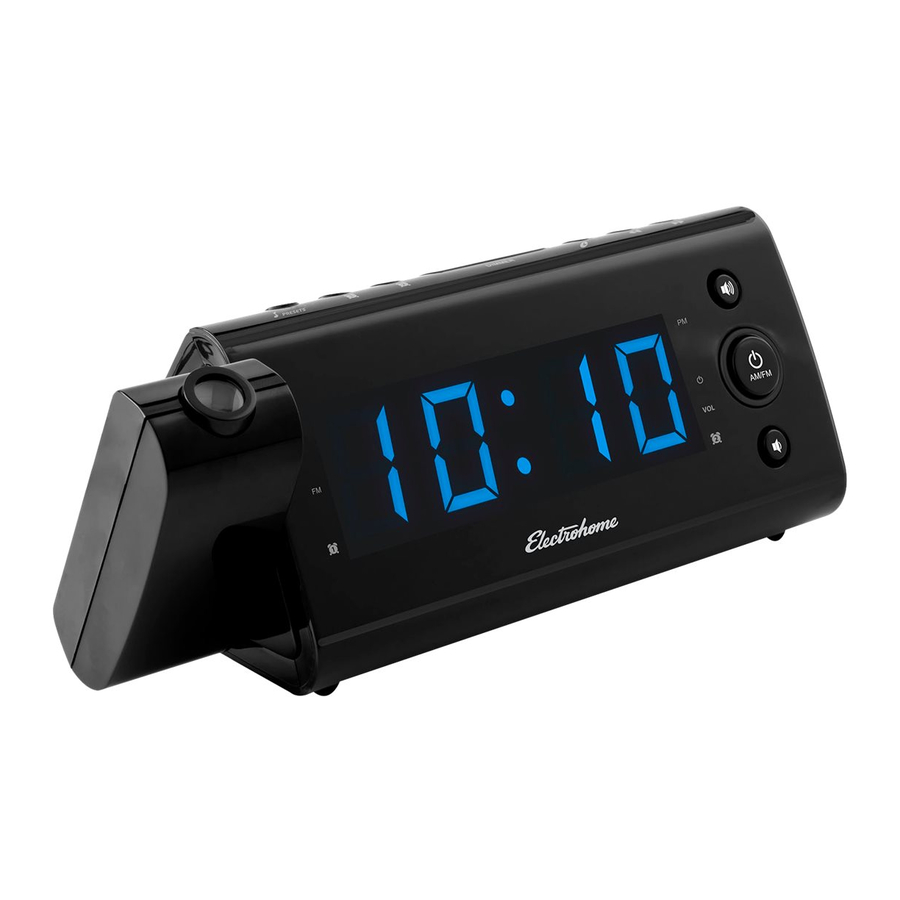
Page 8: What's Included
WHAT’S INCLUDED • USB Charging Alarm Clock Radio • Instructional Manual • Quick Start Guide • 1 x 3V, CR2032 Flat Lithium battery PRODUCT INFORMATION FRONT - LED SCREEN Blue LED dot appears to the right of PM indicating time is set to PM Blue LED dot appears to the right of to indicate LED Time Display is set to OFF Alarm 1 - Blue LED dot appears to the right of... - Page 9 PRODUCT INFORMATION FRONT BUTTONS When set to ON, LED screen shows TIME, YEAR, MONTH/DAY & current temperature Increases volume Turns POWER ON/OFF Decreases volume REAR PANEL A. B. USB Circuit Switch Charges USB devices Allows you to adjust the focus of the projection unit Press once to flip the projected time /temp.
- Page 10 PRODUCT INFORMATION TOP BUTTONS AM / FM DIMMER/GRADATEUR Set Radio Presets / Nap function Toggle between AM & FM Radio band / Set ALARM 1 AM / FM Set ALARM 2 TIME ZONE/ Set TIME ZONE / SNOOZE / SLEEP / LED Brightness SNOOZE/SLEEP DIMMER Set TIME / Y-M-D / 24h-12h Clock ;...
- Page 11 PRODUCT INFORMATION BOTTOM Battery compartment for 1 x 3V, CR2032 Flat Lithium battery AC Adaptor FM Antenna Indoor Temperature Sensor - 11 -...
-
Page 12: Operating Instructions
OPERATING INSTRUCTIONS CONNECTING POWER The USB Charging Alarm Clock Radio is equipped with an "AUTO TIME SET" feature. When power is connected, the clock display will flash '2' which is TIME ZONE 2 (Eastern time) and the default TIME ZONE setting. The correct time will be displayed, unless you are in another time zone. -
Page 13: Installing The Battery
OPERATING INSTRUCTIONS INSTALLING THE BATTERY Using a small Phillips Head screwdriver, remove the screw from the battery panel on the bottom of the unit. Remove the battery compartment panel. Remove/properly dispose of depleted battery and replace with new, 3V, CR2032 Flat Lithium battery. -
Page 14: Setting The Date & Time
OPERATING INSTRUCTIONS DST/°C °F button for 3 To REACTIVATE DST/Summer Time, press and hold the seconds while the radio is OFF. 'ON' will appear in the display to show that the Automatic DST/Summer Time adjustment is reactivated. The display will return to the clock. •... -
Page 15: Setting Alarm 1 & Alarm 2
OPERATING INSTRUCTIONS SETTING ALARM 1 & ALARM 2 To set ALARM 1, press the button once to view current alarm setting then press and hold the button and alarm time will flash. The settings below will appear in the following order: AL 1 Hour >... - Page 16 OPERATING INSTRUCTIONS To set ALARM 2, press the button once to view current alarm setting then press and hold the button and alarm time will flash. The settings below will appear in the following order: AL 2 Hour > AL 2 Min > AL 2 Alarm Modes > AL 2 Radio Station > AL 2 Radio Volume DST/°C °F buttons to decrease/increase the HOUR;...
-
Page 17: Alarm Duration
OPERATING INSTRUCTIONS ALARM DURATION The BUZZER alarm or RADIO alarm will sound for 30 minutes if no key is pressed, then it will stop automatically and resume to the same alarm time on next scheduled day. To stop ALARM 1 and/or ALARM 2 when sounding, press the POWER ON/OFF button on the front of the unit. -
Page 18: Adjusting Led Brightness
OPERATING INSTRUCTIONS ADJUSTING LED BRIGHTNESS You can adjust the brightness of the LED display making it brighter, dimmer or even turning it OFF when the radio is OFF. There are four dimming options available: HIGH/ MEDIUM/LOW/OFF (Standby). Press the DIMMER/GRADATEUR button to toggle between the four brightness settings. -
Page 19: Usb Charging Function
OPERATING INSTRUCTIONS Repeat steps 2 through 4 to set more presets. To recall a preset station, press the SET/NAP button once to view current preset; press the SET/NAP again until desired preset station appears on the LED panel. The unit supports up to 10 AM & 10 FM preset stations. USB CHARGING FUNCTION This alarm clock is equipped with a convenient USB charging port on the back panel that allows you to recharge many brands of smartphones, tablets and portable music players... -
Page 20: Troubleshooting
TROUBLESHOOTING Please consult the Troubleshooting chart below before communicating with ELECTROHOME Customer Support. SYMPTOM POSSIBLE CAUSE POSSIBLE SOLUTION GENERAL Power does not come on AC cord not plugged in Insert plug firmly into AC outlet RADIO No Sound Power is not on... -
Page 21: Specifications
SPECIFICATIONS Display Size 1.2" Display Colour Blue LED Automatic Time Set Battery Back-up for Time PLL Digital Radio Tuner Radio Station Pre-sets Yes 10 AM / 10 FM Dual Alarm Calendar Display Indoor Temperature Reading Adjustable Brightness Off, Low, Medium, High Sleep Timer Battery Required Lithium, Included (3V CR2032) -
Page 22: Electrohome Warranty
ELECTROHOME product or the loss of information. -
Page 23: Notes
NOTES - 23 -... - Page 24 NOTES - 25 -...
- Page 25 ELECTROHOME garantit que cet appareil est exempt de tout défaut de matériau et de fabrication dans des conditions d’utilisation et d’ e ntretien normales. Si un défaut est décelé dans ce produit pendant la période de cette garantie, ELECTROHOME s’ e ngage à le réparer ou, le cas échéant et à...
- Page 26 SPÉCIFICATIONS Largeur de l’affichage 1,2po Couleur de l’affichage DEL bleu Synchronisation automatique de l’heure Circuit secours à pile Syntonisateur numérique PLL Stations radio préréglées Oui 10 AM/ 10 FM Alarme double Affichage calendrier Affichage de la température intérieure Luminosité réglable Arrêt (veille) / Bas / Moyen / Haut Minuterie somnolence Pile requise...
- Page 27 DÉPANNAGE PROBLÈME CAUSE POSSIBLE SOLUTION POSSIBLE HORLOGE Heure incorrecte L’horloge n’est pas réglée Réglez l’horloge Piles sont insérées Vérifiez les piles incorrectement, pas insérées ou épuisées L’alarme ne se déclenche L’alarme n’est pas réglée Appuyez le bouton pour régler ALARME 1 ; Appuyez le bouton pour régler ALARME 2 L’horloge n’est pas réglée Réglez l’horloge...
- Page 28 PROJECTION ON/OFF. Tournez la molette de réglage jusqu’à ce que l’heure / la température est clairement indiqué sur le plafond ou le mur. DÉPANNAGE Veuillez consulter le tableau de dépannage ci-dessous avant de communiquer avec le soutien ELECTROHOME. PROBLÈME CAUSE POSSIBLE SOLUTION POSSIBLE GÉNÉRAL...
- Page 29 UTILISATION HA/°C °F pour sélectionner la station de 3. Appuyez le bouton radio désirée. 4. Appuyez le bouton RÉGL / SIESTE ; « P02 » clignotera à l’ é cran. HA/°C °F pour naviguer à la station prédéfini entre 5. Utilisez le bouton poste «...
- Page 30 UTILISATION 2. Pour revenir à l’affichage de l’heure seulement, appuyez et maintenez le bouton CYCLE D’AFFICHAGE sur l’avant de l’appareil jusqu’à ce que « OFF » s’affiche à l’ é cran DEL. RÉGLER LA LUMINOSITÉ DEL Vous pouvez ajuster la luminosité de l’ é cran DEL lorsque la radio est désactivée. Il y a quatre options de luminosité: HAUT / MOYEN / BAS / ARRÊT (veille).
- Page 31 UTILISATION DURÉE DE L’ ALARME La SONNERIE ou la RADIO sonnera pour 30 minutes, si aucune touche n’ e st actionnée, l’appareil arrêtera automatiquement et reprendra à la même heure de réveil d’après l’horaire préréglé. Pour arrêter ALARME 1 et /ou ALARME 2 lorsqu’il sonne, appuyez sur le bouton ALIMENTATION sur le devant de l’appareil.
- Page 32 UTILISATION Pour régler ALARME 2, appuyez le bouton une fois pour voir l’alarme en cours ensuite appuyer et maintenir le bouton et l’heure d’alarme clignotera ; les paramètres ci-dessous seront affichés dans l’ o rdre suivant: AL 2 Heure >AL 2 Minute > AL 2 Modes alarme > AL 2 Radio Station > AL 2 Radio Volume HA/°C °F pour diminuer/augmenter l’HEURE;...
- Page 33 UTILISATION RÉGLER ALARME 1 ET ALARME 2 Pour régler ALARME 1, appuyez le bouton une fois pour voir l’alarme en cours ensuite appuyer et maintenir le bouton et l’heure d’alarme clignotera. Les paramètres ci-dessous seront affichés dans l’ o rdre suivant: AL 1 Heure >AL 1 Minute >...
- Page 34 UTILISATION 3. Pour RÉACTIVER l’HA / l’heure d’ é té, appuyez et maintenir appuyé le bouton HA/°C °F pour trois secondes lorsque la radio est éteinte. 4. « ON » apparaîtra à l’affichage pour indiquer que le réglage automatique de l’HA / l’heure d’...
- Page 35 UTILISATION INSTALLATION DE LA PILE 1. À l’aide d’un petit tournevis à tête cruciforme, retirez la vis dans le panneau du compartiment à pile sous l’appareil. 2. Enlevez le panneau du compartiment à pile. 3. Retirez/jetez la pile en respectant les consignes de sécurité et remplacez par une nouvelle pile à...
- Page 36 UTILISATION CONNEXION D’ALIMENTATION Le radio-réveil recharge USB est équippé avec la fonction « SYNCHRONISATION AUTOMATIQUE DE L’HEURE ». Lorsque l’appareil est alimenté, l’affichage de l’horloge clignote « 2 » qui représente le FUSEAU HORAIRE 2 (heure de l’ e st). C’ e st le paramètre de fuseau horaire par défaut, donc l’heure exacte s’affiche, sauf si vous demeurez dans un autre fuseau horaire.
- Page 37 INFORMATIONS DU PRODUIT DESSOUS Compartiment à piles pour 1 x pile à plat au lithium 3V, CR2032 Adaptateur CA Antenne FM Capteur de température intérieur - 12 - - 37 -...
- Page 38 INFORMATIONS DU PRODUIT BOUTONS-DESSUS AM / FM DIMMER/GRADATEUR Sauvegarde les stations de radio préréglées / Fonction sieste Basculer entre bandes radio AM et FM / Régler ALARME 1 AM / FM Régler ALARME 2 FUS HOR/ Régler FUSEAU HORAIRE / MINUTERIE SOMMEIL / SOMNOLENCE / MIN SOM/SOMNO/ Luminosité...
- Page 39 INFORMATIONS DU PRODUIT BOUTONS AVANT Lorsque l’ o ption est réglé à ON (appuyer et maintenir appuyé), l’ é cran affiche l’heure, l’année, le mois/jour et la température en séquence Augmente le volume Met l’appareil SOUS TENSION et HORS TENSION Baisse le volume PANNEAU ARRIÈRE Interrupteur de circuit USB A.
- Page 40 CE QUI EST INCLUS • Radio-réveil recharge USB • Manuel d’instruction • Guide de démarrage rapide • 1 x Pile à plat au lithium 3V, CR2032 INFORMATIONS DU PRODUIT AVANT - ÉCRAN DEL Point DEL bleu apparaît à la droite de PM une fois réglée à PM Point DEL bleu apparaît à...
- Page 41 Régler la luminosité DEL ................19 Écouter la radio ...................19 Régler / Rappel de stations radio ..............19 Fonction de recharge USB ................20 Unité de projection ..................21 Dépannage ........................21 Soins et entretien ......................22 Spécifications ........................23 Garantie Electrohome ....................24 Notes ..........................25 - 8 - - 41 -...
- Page 42 CONSIGNES DE SÉCURITÉ IMPORTANTES DÉCLARATION IC CAN ICES-3 (B)/NMB-3(B) Son fonctionnement est soumis aux deux conditions suivantes: Cet équipement ne doit pas causer d’interférences, et Cet équipement doit accepter toute interférence, y compris les interférences capables de causer un mauvais fonctionnement de l’appareil. Ne pas jeter les piles dans les ordures ménagères.
- Page 43 CONSIGNES DE SÉCURITÉ IMPORTANTES Déclaration de la FCC sur la réglementation Cet appareil est conforme à la partie 15 des règlements de la FCC. Son fonctionnement est soumis aux deux conditions suivantes: cet équipement ne doit pas causer d’interférences nuisibles et cet équipement doit accepter toute interférence reçue, y compris les interférences capables de causer un mauvais fonctionnement.
- Page 44 CONSIGNES DE SÉCURITÉ IMPORTANTES 20. AVERTISSEMENT: Pour réduire le risque d’incendie ou d’ é lectrocution, ne pas exposer cet appareil à la pluie ou à l’humidité. 21. Distances minimales de 5 cm autour de l’appareil pour une ventilation suffisante. 22. L’aération ne doit pas être bloquée en obturant les ouvertures d’aération ou en plaçant sur ou à...
- Page 45 CONSIGNES DE SÉCURITÉ IMPORTANTES N’utilisez qu’un linge doux et sec pour le nettoyage. Ne bloquez aucun des orifices de ventilation. Installez l’appareil conformément aux directives du fabricant. N’installez pas l’appareil à proximité d’une source de chaleur telle que radiateur, bouche à air chaud, cuisinière ou autre appareil (y compris les amplificateurs) qui produisent de la chaleur.
- Page 46 AVERTISSEMENT AVERTISSEMENT Pour réduire le risque d’incendie ou de choc électrique, n’exposez pas cet apareil à la pluie ni à l’humidité. MISE EN GARDE: Le réglage ou l’utilisation de commandes ou d’ajustements qui ne sont pas spécifiés dans ceguide peuvent vous exposer à des radiations dangereuses. ATTENTION - RISQUE D’ELECTROCUTION - NE PAS OUVRIR POUR RÉDUIRE LE RISQUE DE CHOC ÉLECTRIQUE, NE PAS RETIRER LE COUVERCLE...
- Page 47 NE RETOURNEZ PAS CE PRODUIT AU MAGASIN! Veuillez contacter d’abord un représentant du soutien à la clientèle ELECTROHOME® pour toute information supplémentaire sur les caractéristiques du produit, les spécifications ou pour de l’aide avec l’installation. Veuillez nous contacter par l’une des méthodes ci-dessous: Soutien: www.electrohome.com/support...
- Page 48 Radio-réveil recharge USB avec projection de l’heure Merci d’avoir fait l’achat de cet appareil Electrohome®. Veuillez lire ce manuel attentivement avant de faire fonctionner l’appareil pour vous assurer de l’utiliser correctement. Conservez ce manuel dans un endroit sûr afin de pouvoir vous y référer au besoin.
Need help?
Do you have a question about the EAAC475 and is the answer not in the manual?
Questions and answers
How to stop flashing year time date
To stop the year, time, and date from flashing on the Electrohome EAAC475, disable the Cycle Display function. Press and hold the display button on the front of the alarm clock until "OFF" appears on the LED panel.
This answer is automatically generated