Table of Contents
Advertisement
Available languages
Available languages
EAAC500
WakeUp™ AM/FM SelfSet™ Projection Clock Radio
with Dual Alarm
Radio-réveil WakeUp™ AM/FM à projection
avec SelfSet™ et double alarme
USER MANUAL
GUIDE DE L'UTILISATEUR
Thank you for your purchase of this Electrohome product. Please read this instruction manual carefully before using
product to ensure proper use. Keep this manual in a safe place for future reference.
Merci d'avoir fait l'achat de cet appareil Electrohome®. Veuillez lire ce manuel attentivement avant de faire fonctionner l'appareil pour
vous assurer de l'utiliser correctement. Conservez ce manuel dans un endroit sûr afin de pouvoir vous y référer au besoin.
www.electrohome.com
Advertisement
Chapters
Table of Contents

Related Manuals for Electrohome WakeUp AM/FM SelfSet EAAC500


Summary of Contents for Electrohome WakeUp AM/FM SelfSet EAAC500
- Page 1 Keep this manual in a safe place for future reference. Merci d’avoir fait l’achat de cet appareil Electrohome®. Veuillez lire ce manuel attentivement avant de faire fonctionner l’appareil pour vous assurer de l’utiliser correctement. Conservez ce manuel dans un endroit sûr afin de pouvoir vous y référer au besoin.
-
Page 2: Warnings
WARNINGS WARNING To reduce the risk of fire or electric shock, do not expose this appliance to rain or moisture. CAUTION Use of controls or adjustments or performance of procedures other than those specified may result in hazardous radiation exposure. RISK OF ELECTRIC SHOCK DO NOT OPEN CAUTION - TO REDUCE THE RISK OF ELECTRIC SHOCK, DO NOT REMOVE... -
Page 3: Important Safety Information
IMPORTANT SAFETY INFORMATION 10. Protect the power cord from being walked on or pinched particularily at plugs, convenience receptacles, and the point where they exit from the apparatus. Only use attachments/accessories specified by the manufacturer. 12. Unplug this apparatus during lightning storms or when unused for long periods of time. 13. - Page 4 IMPORTANT SAFETY INFORMATION 28. Safety Check Upon completion of any service or repairs to this product, ask the service technician to perform safety checks to determine that the product is in proper operating condition. FCC statement on regulation This device complies with part 15 of the FCC Rules. Operation is subject to the following two conditions: (1) This device may not cause harmful interference.
-
Page 5: Table Of Contents
Setting Alarm Output and Alarm On/Off ............8 Alarm Duration and Snooze Function ............8 Change Display Content ................8 Sleep Function ....................9 Nap Timer Function ..................9 Radio Operation ....................9 Reset ......................9 Projection Unit ....................10 Alarm Battery BackUp System ..............10 Specifications ......................10 ELECTROHOME WARRANTY ................11 - 5 -... -
Page 6: Buttons And Connections
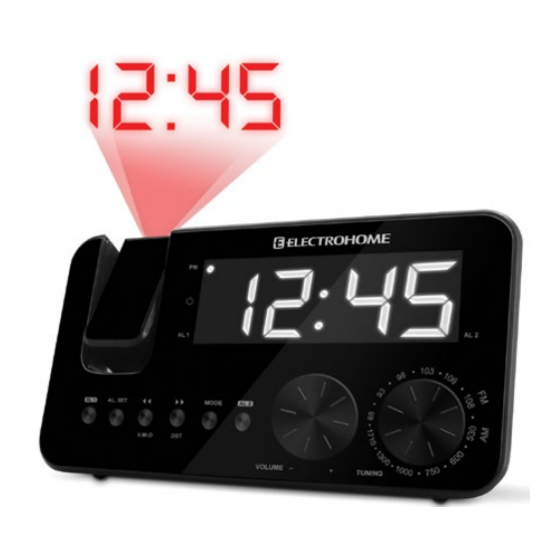
BUTTONS AND CONNECTIONS ALARM 1 ON / OFF BUTTON PROJECTION ON/OFF BUTTON ALARM SET BUTTON ALARM RADIO / BUZZER << / YEAR – MONTH – DAY SWITCH BUTTON PROJECTION UNIT >> / DST BUTTON FOCUS ADJUSTMENT FOR MODE BUTTON PROJECTION UNIT ALARM 2 ON / OFF BUTTON AUX IN JACK VOLUME KNOB... -
Page 7: Operation
OPERATION POWER CONNECTION Plug the AC power cord to a household outlet AC source. Clock display will flash “3“ indefinitely. Unit will go to zone 3, which is the default setting, and correct time will be displayed, if you are in a different time zone. To Set time Zone: This product is factory preset. -
Page 8: Setting Alarm Output And Alarm On/Off
OPERATION Select alarm weekday mode as follows: 1-5 - Monday to Friday 1-7 - Whole week 6-7 - Saturday & Sunday 1-1 - One day of week Action (during data adjustment) : • Press << / Year – Month – Day button (3) to adjust data backward. •... -
Page 9: Sleep Function
OPERATION SLEEP FUNCTION During radio on mode, press Snooze / Sleep / Nap button (13) to turn on sleep mode, the sleep time will keep flashing by 10 seconds, within 10 seconds and press sleep button can change the duration from 90 min – 15 min. Press on/off button (12) to cancel sleep function. -
Page 10: Projection Unit
OPERATION PROJECTION UNIT Focus setting : adjust the projection clock brightness / focus by turning the brightness / focus adjustment wheel (18) until the projected time is clearly shown on the ceiling or wall. -To flip projected image by 180°, press 180° flip button (14). NOTE: THIS PRODUCT PROJECTS THE TIME IMAGE ON THE CEILING OR WALL OF A DARKENED ROOM. -
Page 11: Electrohome Warranty
ELECTROHOME product or the loss of information. The purchaser will be responsible for any removal, reinstallation, transportation and insurance costs incurred. Correction of defects, in the... - Page 12 NOTES - 12 -...
-
Page 13: Avertissement
AVERTISSEMENT AVERTISSEMENT Pour réduire le risque d’incendie ou de choc électrique, n’exposez pas cet apareil à la pluie ni à l’humidité. MISE EN GARDE: Le réglage ou l’utilisation de commandes ou d’ajustements qui ne sont pas spécifiés dans ceguide peuvent vous exposer à des radiations dangereuses. ATTENTION - RISQUE D’ELECTROCUTION - NE PAS OUVRIR POUR RÉDUIRE LE RISQUE DE CHOC ÉLECTRIQUE, NE PAS RETIRER LE... - Page 14 CONSIGNES DE SÉCURITÉ 8. N’installez pas l’appareil à proximité d’une source de chaleur telle que radiateur, bouche à air chaud, cuisinière ou autre appareil (y compris les amplificateurs) qui produisent de la chaleur. 9. Ne tentez pas de modifier les dispositifs de sécurité de la fiche polarisée ou avec mise à la terre. Une fiche polarisée a deux lames, une étant plus large que I’autre.
- Page 15 CONSIGNES DE SÉCURITÉ D. Chute du produit ou tout autre dommage. E. Le fonctionnement de l’appareil a changé de façon marquante. 26. Service ou réparation Ne tentez pas de réparer l’appareil vous-même, car ouvrir ou enlever le couvercle vous expose à des tensions dangereuses.
- Page 16 CONSIGNES DE SÉCURITÉ DÉCLARATION IC CANICES-3 (B)/NMB-3(B) Son fonctionnement est soumis aux deux conditions suivantes: Cet équipement ne doit pas causer d’interférences, et Cet équipement doit accepter toute interférence, y compris les interférences capables de causer un mauvais fonctionnement de l’appareil. Cette marque indique que ce produit ne doit pas être jeté...
- Page 17 Fonction Somnolence ..................21 Minuteur pour Fonction Sieste ............... 21 Opération de la Radio ..................22 Réinitalisation ....................22 Projecteur ...................... 22 Système de batterie de sauvegarde pour l’alarme ........22 Spécifications ...................... 22 GARANTIE ELECTROHOME ................23 - 17 -...
-
Page 18: Touches Et Connexions
TOUCHES ET CONNEXIONS TOUCHE ALARME 1 MARCHE/ 15. TOUCHE MARCHE/ARRÊT POUR ARRÊT PROJECTEUR TOUCHE ALARME 16. TOUCHE ALARME RADIO/ TOUCHE <</ANNÉE-MOIS-JOUR SONNERIE (BUZZER) TOUCHE >>/DST 17. PROJECTEUR TOUCHE MODE 18. MOLETTE DE RÉGLAGE POUR LA TOUCHE ALARME 2 MARCHE/ MISE AU POINT DU PROJECTEUR ARRÊT 19. -
Page 19: Opération
OPÉRATION CONNEXION D’ALIMENTATION Branchez le cordon d’alimentation à une source AC courante. Affichage de l’heure clignote “3” indéfiniment L’unité ira à la zone 3, qui est le paramètre par défaut, et l’heure correcte s’affiche, si vous êtes dans un fuseau horaire différent. Pour régler le fuseau horaire : Ce produit est réglé... -
Page 20: Réglage De La Sortie Alarme Et Alarme Marche/Arrêt
OPÉRATION Normale >> Heure AL 1 >> Minute AL 1 >> Alarme sur semaine AL 1 >> Heure AL 2 >> Minute AL 2 >> Alarme sur semaine AL 2 >> Normale Sélectionnez le mode d’alarme jour de semaine comme suit Action (during data adjustment) : 1-5 : Du lundi au vendredi 1-7 : Semaine entière... -
Page 21: Changer Le Contenu De L'affichage
OPÉRATION • Sélectionnez la touche de LUMINOSITÉ DE L’AFFICHEUR AUTO ARRÊT / HAUT/ BAS (AUTO OFF / HIGH / LOW) (21) à la position auto off, pendant l’alarme l’afficheur démontre qu’il est activé, appuyer sur la touche MINUTERIE-SOMMEIL (SNOOZE)/SOMNOLENCE (SLEEP)/SIESTE(NAP) (13) qui activera la fonction minuterie-sommeil (SNOOZE), la sonnerie (BUZZER) ou la radio. -
Page 22: Opération De La Radio
OPÉRATION OPÉRATION DE LA RADIO Appuyer la touche MARCHE/ ARRÊT (12) pour allumer la radio. Pour choisir la bande AM/FM, appuyer la touche de bande AM/FM (11). Choisir le poste en utilisant le bouton de réglage (8). Ajuste le volume en tournant le bouton de volume (7) au besoin. -
Page 23: Garantie Electrohome
Si un défaut est décelé dans ce produit pendant la période de cette garantie, ELECTROHOME s’ e ngage à le réparer ou, le cas échéant et à son entière discrétion, le remplacer. - Page 24 NOTES - 24 -...
Need help?
Do you have a question about the WakeUp AM/FM SelfSet EAAC500 and is the answer not in the manual?
Questions and answers