Setra Systems Super II User Manual
Hide thumbs
Also See for Super II:
- User manual (41 pages) ,
- Supervisor and technical manual (133 pages)

Related Manuals for Setra Systems Super II


Summary of Contents for Setra Systems Super II
-
Page 1: User Manual
Super II User Manual Setra Systems, Inc Weighing Systems Division 159 Swanson Road Boxborough, MA 01719 SS2067 Rev E 0704... -
Page 2: Table Of Contents
Table of Contents Introduction Introduction ..............................3 Overview of the Super II Scale ........................ 6 Installing Your Scale ............................ 7 Understanding Your Scale ........................10 Keypad: Soft Keys .......................... 10 Keypad: Alphanumeric Keys ...................... 11 Keypad: Hard Keys ......................... 11 LEDs .............................. - Page 3 Soft Key:UNITS .............................33 Soft Key:COUNTER ............................34 Appendix A: Glossary of Terms .......................35 Appendix B: Limited Two Year Scale Warranty .................36 FCC Warning ..............................37 Index ................................38...
-
Page 4: Introduction
Introduction Super II Introduction •... - Page 5 Introduction Super II •...
- Page 6 The Super II scale comes with two separate manuals labeled “User Manual” and the “Supervisor and Technical Manual” . The “User Manual” is all that is necessary to be able to operate the scale in its default state.
-
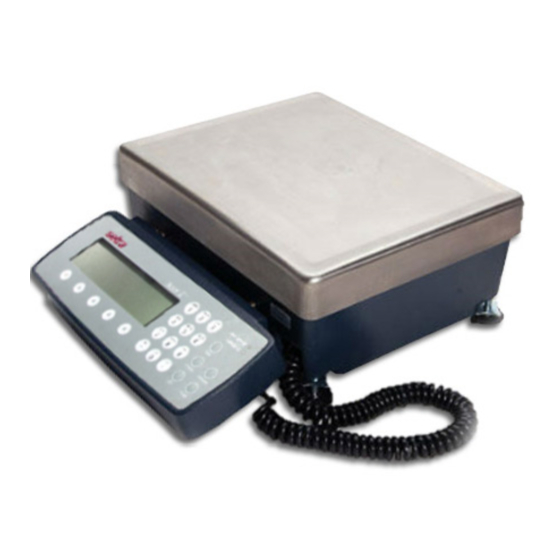
Page 7: Overview Of The Super Ii Scale
Overview of the Scale Super II WEIGHING PLATFORM DISPLAY ADJUSTABLE FOOT KEYPAD ADJUSTABLE FOOT ON/OFF SWITCH REMOTE SCALE (WITH BATTERY BATTERY DOOR CONNECTOR OPTION ONLY) (BATTERY IS (OPTIONAL) OPTIONAL) DC POWER ADDITIONAL CONNECTOR SETRA BASE CONNECTOR BUBBLE LEVEL PAN SUPPORT... -
Page 8: Installing Your Scale
The rugged design of your scale ensures that it will be able to operate well in the typical factory or office Super II environment. Nonetheless, you should always treat your scale as you would any other piece of precision equipment, locating it on a clean dry surface, protected from draft and vibration. - Page 9 Attach the coiled cord coming out of the weighing base to the port marked BASE on the underside of the Super II controller. If you would like to mount the controller to the base, refer to the diagram below. 1. Line up the controller with the three spring loaded screw washers on the base.
- Page 10 When your scale is first powered on, it displays the programmed time and date along with a greeting message that may be either Setra Systems’ address and telephone number or that of the dealer who sold you the scale. There is also a count down procedure that lasts around thirty seconds during which time the controller pulls information from the base before settling on Ø.ØØ...
-
Page 11: Understanding Your Scale
Keypad: Soft Keys The Super II keypad is divided into three groups of keys. The first set of keys underneath the display are referred to as “soft keys” . Their function changes depending on where you are in the counting procedure or which level you enter in the menu. -
Page 12: Keypad: Alphanumeric Keys
Supervisor menus (see fold out for the Main Menu Tree of the “Supervisor and Technical Setups” manual). remote Instructs the scale to switch to a secondary base (either strain gauge or Setra base) attached to the primary base connected to the controller. If multiple bases are attached or daisy chained, a menu will appear to allow base selection by numeric entry. -
Page 13: Leds
RS232 input port for connection to a bar code scanning device. +5V is supplied on pin 6. Default port settings are 2400 baud, 8 data bits, no parity, 1 start, and 1 stop bit for Setra Linear Imager Gun (403678) or Smart Wand (403676), no hardware handshaking. -
Page 14: User Functions
User Functions Super II User Functions •... - Page 15 User Functions Super II •...
-
Page 16: Basic Weighing
Press the tare or ZERO key. (If the container is not empty and tare weight is known, enter the value using the numeric keypad and then press the tare key). Perform your weighing or counting application. Super II User Functions •... -
Page 17: Basic Counting Using The Default Soft Keys
5. Press the PRINT key to generate a tape/label or to transmit the data to the out port. 202 CS Pieces ZERO> SAMPLE> UPDTAPW> PRINT> CLEAR> Tape /Label Remove the pieces from the container and press the CLEAR key to return the scale to the weight display. User Functions Super II •... -
Page 18: Entering Numeric Values For Id, Apw, Count, Or Tare
When you are finished entering the number, press the desired soft key below the display or press the tare hard key to enter that value into the scale register. NOTE: Numeric entry uses the scale’s “medium” size font and is limited to 16 characters. Super II User Functions •... -
Page 19: Entering Alphanumeric Information Into The Id Registers Using The Scale Keypad
The right arrow is necessary when two characters that share the same key follow one another. Letters and numbers can be mixed by simply turning on or off the letter entry mode by pressing the abc key. User Functions Super II •... -
Page 20: Counting With Accuracy Enhancement
APW. CAUTION: This accuracy enhancement feature is disabled if the average piece weight has been scanned in from a bar code or entered via a computer or from a numeric keypad. Super II User Functions •... -
Page 21: Reverse Counting Or Kitting
100 pieces but only 50 pieces are to be kitted together. In this case, follow steps 1 through 5 above, place the 100 piece sample back into the container and press the ZERO key. Continue with steps 6 through 8 above. User Functions Super II •... -
Page 22: Operating Your Scale Using A Qwerty Keyboard
Numeric Enter ID, Tare, APW, or Count. soft key 1 2 3 4 labels: tare PART ID COUNT MORE EXIT menu remote reset PS/2® is a registered trademark of IBM. Super II User Functions •... - Page 23 ALT + 5 = VENDOR ALT + 6 = REV # ALT + 7 = OPRTR ALT + 8 = ORDER # ALT + 9 = VENDOR ALT + 0 = PART ID MORE REV# EXIT User Functions Super II •...
-
Page 24: Adjusting The Backlighting Option
Adjusting the Backlighting Option Super II controllers which are equipped with optional display backlighting are also equipped with con- trols to vary the brightness of the backlighting. An additional feature of the backlighting control is the automatic battery detector which differentiates between power delivered from an AC adapter and that from an internal or external battery. -
Page 25: Soft Key: Save
The PART ID can be overwritten or changed by entering the desired letter (abc key) or number followed by the ACCEPT soft key. If the PART ID is correct, press ACCEPT to move on to the field saving screen in section b if using a database format that keeps track of the count. User Functions Super II •... - Page 26 Transactions for non-scale counted parts can be recorded by manually entering the count in the Transaction Log Saving Screen listed above. If both the Database and the Transaction Log are turned on, the program will prompt you to choose between the two before displaying the appropriate Saving screen. Super II User Functions •...
-
Page 27: Soft Key:accum
See the SAVE soft key in the previous pages and the DATBASE FORMAT soft key in the Supervisor Menu of the “Supervisor and Technical Setups” manual to choose the database selec- tion for storing counts. User Functions Super II •... -
Page 28: Soft Key:display
ID6. REV # ID3. LOT # ID7. GO BACK Press the numerical key associated with the ID register and display that register (ie. Press 0 to display Part ID or 3 to display Lot #). Super II User Functions •... -
Page 29: Soft Key:datbase
DATBASE SETUP selections of the Supervisor Menu. The display and soft keys change to the following: TARE VIEW/ PRIOR NEXT ACCEPT GO BACK RECORD RECORD EDIT User Functions Super II •... - Page 30 As soon as you begin to type in new data, the soft keys change to: TARE: APW: COUNT: DOWN SAVE CLEAR QUIT Press CLEAR to set all fields to 0. Press QUIT to exit without making changes. Super II User Functions •...
-
Page 31: Soft Key:set Pts
BACK soft key to return to the default User Menu. a) The displayed Set Points can be changed at any time by following steps 1-4 listed above. b) To delete the Set Points, press the reset hard key on the controller. User Functions Super II •... -
Page 32: Soft Key:alarms
Setting and Using Alarms The Super II has three alarm outputs which can be used to signal when the measured weight or count is within a pre-programmed range. To access the ALARMS soft key, be certain it has been enabled through the SET PTS soft key of theTechnical setups menu (See “Supervisor and Technical Manual”). - Page 33 % soft key. For better viewing of the displayed weight or count along with its LOW, TARGET, and HIGH set points, press the EXIT soft key to return to the default User Menu. User Functions Super II •...
-
Page 34: Soft Key:units
The last unit of measure, GRAINS, is a user definable unit of measure and may be named differently along with a different conversion factor (see UNITS ON soft key in the Supervisor Menu in the “Supervisor and Technical Setups” manual for naming and programming the user definable unit of measure). Super II User Functions •... -
Page 35: Soft Key:counter
Ø for the X and Y values following steps 1 - 3 above. NOTES: a. You do not need to enter a value for X if 1 is the first value in your sequence. b. Y must be greater than X. You may not enter negative numbers. User Functions Super II •... -
Page 36: Appendix A: Glossary Of Terms
Set points can be used to indicate when a weight or count is within a specified range. Tare The weight of an empty container. Also, the process of storing the weight of an empty container and zeroing the scale’s display. Super II Appendix A •... -
Page 37: Appendix B: Limited Two Year Scale Warranty
Nothing in this warranty shall be construed as a warranty for merchantability or fitness for any specific use or purpose, and this warranty is in lieu of all other warranties, express or implied. Setra shall not be held liable under the terms of this warranty for any special, indirect, incidental or consequential damages claimed in connection with the scale’s performance or availability. -
Page 38: Fcc Warning
Communications. Le présent appareil numerique n’emét pas de bruits radioeléctriques depassant les limités applicables aux appareils numeriques de la classe a préscrites dans le reglément sur le brouillage Radioeléctrique Edicté par le Ministre des Communications du Canada. Super II... -
Page 39: Index
Weighing/Counting 14 Net Weight 35 DC POWER 6 WEIGHINGPLATFORM 6 NEXT/RECORD 29 DELETE 27 Numeric Information 21 DISPLAY 6, 27 Numeric Values 17 Display 9 ZERO 10, 14, 19, 21 display 4, 10 zero 16 OK 12 Index Super II •... - Page 40 Super II Index •...
Need help?
Do you have a question about the Super II and is the answer not in the manual?
Questions and answers