Table of Contents
Advertisement
Advertisement
Table of Contents

Related Manuals for GE NetworX NX-1500E


Summary of Contents for GE NetworX NX-1500E
- Page 1 ™ NetworX Series NX-1500E LED Keypad User Manual...
-
Page 3: Security System Notes
SECURITY SYSTEM NOTES Installing/Service Company _________________________________ For Service Call __________________________________________ Central Station ___________________________________________ Duress Code ____________________ FUNCTION CODES Function Code Controls Function This system is not partitioned. EMERGENCY ACTIVATION KEYS (check if enabled) Fire Auxiliary Emergency Police PROGRAMMED FUNCTIONS Abort Delay Cancel Alarm Forced Arming Auto Bypass... - Page 4 THIS MANUAL IS FURNISHED TO HELP YOU UNDERSTAND YOUR SECURITY SYSTEM AND BECOME PROFICIENT IN ITS OPERATION. ALL USERS OF YOUR SECURITY SYSTEM SHOULD READ AND FOLLOW THE INSTRUCTIONS AND PRECAUTIONS IN THIS BOOKLET AND, IF POSSIBLE, PRACTICE ON THE KEYPAD CONTROL WHILE YOUR PROFESSIONAL INSTALLER IS ON SITE.
-
Page 5: Table Of Contents
TABLE OF CONTENTS TABLE OF CONTENTS ............3 GLOSSARY OF TERMS ............4 UNDERSTANDING THE LIGHTS ........5 ARMED LIGHT ................5 BYPASS LIGHT ................5 CANCEL LIGHT ................5 CHIME LIGHT .................5 EXIT LIGHT..................5 FIRE LIGHT..................5 INSTANT LIGHT................6 POWER LIGHT ................6 READY LIGHT.................6 STAY LIGHT ...................6 ZONE LIGHT ..................6 EMERGENCY ACTIVATION KEYS ........7... -
Page 6: Glossary Of Terms
GLOSSARY OF TERMS Abort Delay An option that allows a delay in reporting to the central station. Authority Level The level of access an individual has when using an alarm panel. Central Station The location where alarm data is sent during an alarm report. -
Page 7: Understanding The Lights
Quick Arm An option that allows you to turn on (ARM) the security system by pressing either the [STAY] or [EXIT] key on the keypad control (for ARMING only) as programmed by the installing company. User Code A four- (4) or six- (6) digit entry code used to arm or disarm the system. -
Page 8: Instant Light
INSTANT LIGHT The instant light is “on” when there is no delay on your entry/exit door(s). Any time the instant light is “on” and the exit delay has expired, the opening of an entry/exit door will produce an immediate alarm. The instant light can be toggled on or off by pressing the [Stay] key while the system is armed. -
Page 9: Emergency Activation Keys
EMERGENCY ACTIVATION KEYS NOTES: You must hold these keys for 2 seconds to activate these functions. Your system may not be programmed for these activation keys (see page 1). You should press these keys only in an emergency situation that requires response by emergency personnel. If your system is programmed for these functions, the following reports can be sent. -
Page 10: Arming Your System In The "Stay" Mode
• Enter your 4 or 6 digit user code to arm the system. Step 2 • The armed and exit lights will illuminate. • You may now leave the building. NOTE: The exit light will flash rapidly for the last 10 seconds of the exit delay as a warning to the user that the exit time is about to expire. -
Page 11: Using The Quick Arm (Optional
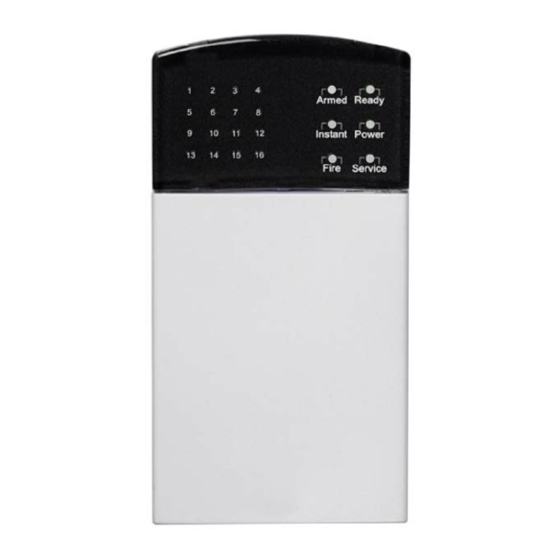
USING THE QUICK ARM (Optional, see page 1) The Quick Arm feature may be used if it is enabled. Quick Arm will allow the user to arm the security system in the AWAY mode by pressing the [EXIT] key, or arm in the STAY mode by pressing the [STAY] key. This feature is used for ARMING ONLY, and will not disarm the security system. - Page 12 NX-1500E LED Keypad includes NX-1508E and NX-1516E ARMED Light is "on" when armed, "off" when disarmed. Flashes to indicate a previous alarm. READY Light is "on" when the system is ready to arm, flashes if ready to "Iorce arm". POWER Light is "on" when AC power is present, flashes to indicate a low battery condition.
-
Page 13: Bypassing Zones
BYPASSING ZONES If you wish to bypass one or more zones, this must be done while the system is in the disarmed state. The following steps are used for bypassing zones: Step 1 Press the [BYPASS] key. Step 2 Enter user code, if required (optional). The bypass light flashes. Step 3 Enter 1 or 2 digits indicating the zone you wish to bypass, i.e. -
Page 14: Adding And Changing User Codes
ADDING AND CHANGING USER CODES Your system must be Disarmed to change user codes. Step 1 Press [r]-[5]-[“Master Arm/Disarm” Code]. NOTE: For partitioned systems, someone changing the code of another person must have access to all or more partitions than the user being changed. Step 2 The ready light will flash. - Page 15 You may toggle (turn on/off) the authority level by pressing the number for that authority level. LIGHT AUTHORITY LEVELS IF LIGHT 8 IS OFF Reserved (Note: Do not change if on.) Arm Only Arm Only After Closing Time Master Arm/Disarm (can program other codes) Arm/Disarm Bypass Zones Open / Close Reporting...
-
Page 16: Other Keypad Functions
OTHER KEYPAD FUNCTIONS SETTING THE KEYPAD TONE Step 1 Press [r]-[0]. Keypad is now in the “Adjust Tone” mode. Step 2 Pressing the [•] key will make the keypad sounder go to higher tones, pressing the [–] key will make the keypad sounder go to lower tones. -
Page 17: Reset Function
RESET FUNCTION This function is used to reset Smoke Detectors, Zone Troubles, and Zone Tampers. Your system must be Disarmed to use the Reset function. Step 1 Press [r]-[7]. Resets have now been performed. Step 2 If the keypad begins beeping, the reset did not execute properly. Enter your code to silence the keypad. -
Page 18: Setting The Keypad Lighting
Time Hour Code Time Hour Code Time Hour Code 12:00 8:00 AM 4:00 PM Midnight 1:00 AM 9:00 AM 5:00 PM 2:00 AM 10:00 AM 6:00 PM 3:00 AM 11:00 AM 7:00 PM 12:00 4:00 AM 8:00 PM Noon 5:00 AM 1:00 PM 9:00 PM 6:00 AM... -
Page 19: Keypad Control Tones (Beeps)
ZONE LOW BATTERY - Press the [3] key. The zone light(s) will illuminate showing which zone(s) has a low battery. This only applies to wireless zones. Press the [#] key to return to the 1 of 8 service lights. ZONE LOSS OF SUPERVISION - Press the [4] key and the zone light(s) will illuminate showing which zone(s) has loss of supervision. -
Page 20: Emergency Evacuation Plans
Beeps for 1 second or emits a “ding-dong” sound for the “Chime” feature. Beeps during an exit delay; beeps rapidly for the last 10 seconds of an exit delay; and beeps 1 second at the end of the exit delay. Pulses when the armed status changes and the AC power is off. - Page 21 warning fire detection is best achieved by the installation of fire detection equipment in all rooms. This equipment should be installed in accordance with the National Fire Protection Association's Standard 72. For additional information write the National Fire Protection Association, Batterymarch Park, Quincy, MA 02269.The following are examples of evacuation plans.
- Page 22 SYSTEM NOTES Page 21...
- Page 23 NX1500E SERIES USER’S MANUAL NX1500EUB03 REV B (MARCH 2003)
Need help?
Do you have a question about the NetworX NX-1500E and is the answer not in the manual?
Questions and answers
What should I do incase if false fire alarm due to battery