Table of Contents

Related Manuals for M-Audio M-Track Quad


Summary of Contents for M-Audio M-Track Quad
- Page 1 User Guide English ( 3 – 8 ) Guía del usuario Español ( 9 – 14 ) Guide d'utilisation Français ( 15 – 20 ) Guida per l'uso Italiano ( 21 – 26 ) Benutzerhandbuch Deutsch ( 27 – 32 ) Appendix English ( 33 –...
-
Page 3: Box Contents
In addition to outstanding audio performance, M-Track Quad also features MIDI in and out jacks. M-Track Quad connects to your computer via USB, and also acts as a powered hub with three additional USB ports. -
Page 4: Driver Installation
Also, start with all of your volume levels low before increasing them to a comfortable listening level. • When recording a guitar or bass with an active pickup, set the M-Track Quad's Mic/Line Inst Switch to Mic/Line. If your instrument uses a passive pickup, set the switch to Inst. - Page 5 Setup Scenario 2: Small band recording Guitar* (Vocal) Microphone* Grand piano* Computer* Headphones* Headphone amplifier* Power Headphones* Headphones* Use this setup to record a small band. Connect your computer to the rear panel USB port, and remember to select M-Track Quad as your computer's default device for recording and playback (see the following Audio Setup section for more information).
-
Page 6: Audio Setup
Windows 7 and Windows 8: Connect M-Track Quad to a power source using the included power adapter (6V, 3A, center pin- positive). Use the included USB cable to connect the M-Track Quad to your computer. -
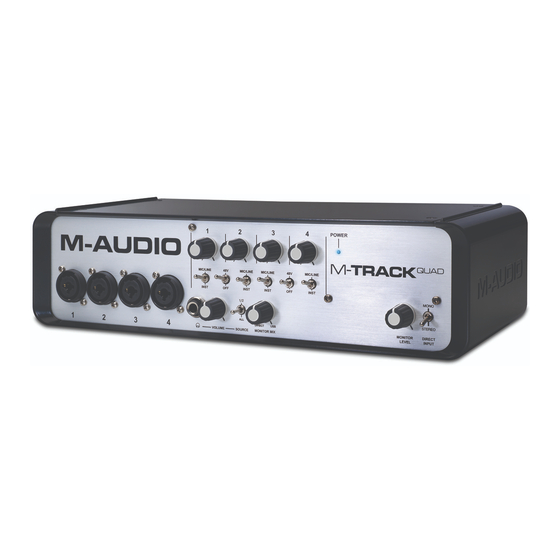
Page 7: Front Panel
Front Panel 6 10 11 Power LED – Illuminates when M-Track Quad is on. Mic/Line / Inst Input – Connect a microphone, line-level device, or guitar to this input with an XLR or 1/4" TRS cable. (For mic-level signals, use an XLR cable. For line-level signals, use a 1/4" TRS cable.) Gain –... -
Page 8: Rear Panel
USB ports. In addition to being an audio interface, these ports allow M-Track Quad to function as a powered USB hub. This can be useful if you run out of available USB ports on your computer. -
Page 9: Contenido De La Caja
Introducción ® Agregue un toque profesional a su estudio de proyecto con el M-Track Quad de M-Audio Cuatro entradas flexibles admiten cualquier fuente, desde micrófonos con alimentación fantasma a su guitarra o bajo favorito. Además, cada entrada viene equipada con su propio conector hembra de inserción para integrar sus efectos favoritos. -
Page 10: Instalación
• Para reducir el zumbido eléctrico a altos valores de ganancia, mantenga la fuente de alimentación del M- Track Quad alejada del cable de su guitarra y las entradas de los canales del M-Track Quad. Escenario de instalación 1: Uso general... - Page 11 Use esta instalación para grabar una banda pequeña. Conecte su computadora al puerto USB del panel trasero y recuerde seleccionar M-Track Quad como dispositivo predeterminado de su computadora para grabación y reproducción (para más información, consulte la sección Configuración de audio a continuación). Conecte sus micrófonos a los canales 1 y 2 y active el interruptor de alimentación fantasma correspondiente a esos canales.
-
Page 12: Configuración Del Audio
Windows 7 y Windows 8: Conecte el M-Track Quad al suministro eléctrico usando el adaptador de alimentación incluido (6 V 3 A, pin central positivo). Use el cable USB incluido para conectar el M-Track Quad a su computadora. -
Page 13: Panel Frontal
Panel frontal 6 10 11 LED de encendido – Se ilumina cuando el M-Track Quad está encendido. Entrada de micrófono/nivel de línea / instrumento – Conecte a esta entrada un micrófono, un dispositivo de nivel de línea o una guitarra con un cable XLR o TRS de 1/4 pulg. (Para señales de nivel de micrófono, use un cable XLR. -
Page 14: Panel Trasero
Interruptor de encendido – Enciende y apaga M-Track Quad. Puerto USB – Esta conexión le permite enviar audio e información MIDI hacia o desde una computadora. Use el cable USB incluido para conectar el M-Track Quad a una computadora. El M-Track Quad requiere una conexión USB 2.0. -
Page 15: Contenu De La Boîte
En plus des performances audio exceptionnelles, le M-Track Quad dispose également d’entrées et de sorties MIDI. Le M-Track Quad se branche à votre ordinateur via une connexion USB et agit également comme concentrateur USB avec trois ports USB supplémentaires. -
Page 16: Installation Des Pilotes
Installation Installation des pilotes IMPORTANT : Avant de brancher le M-Track Quad à votre ordinateur pour la première fois, vous devez installer les pilotes : Veuillez visiter m-audio.com/drivers et télécharger le dernier pilote M-Track Quad pour votre système d'exploitation. Ouvrez le fichier téléchargé, puis double-cliquez sur le fichier d'installation du pilote. - Page 17 Cette configuration permet d'enregistrer un petit groupe. Branchez votre ordinateur au port USB sur le panneau arrière, et pensez à sélectionner M-Track Quad comme périphérique par défaut sur votre ordinateur pour l'enregistrement et la lecture (voir la section Configuration audio pour plus d'information). Branchez vos microphones aux canaux 1 et 2 et activez l'alimentation fantôme pour ces canaux.
-
Page 18: Configuration Audio
Cette configuration est idéale pour le DJing avec logiciel. Branchez votre ordinateur au port USB sur le panneau arrière, et pensez à sélectionner M-Track Quad comme périphérique par défaut sur votre ordinateur pour l'enregistrement et la lecture (voir la section Configuration audio pour plus d'information). Branchez les moniteurs de cabine aux sorties audio 1 et 2 du panneau arrière et les enceintes de salle aux sorties 3 et 4. -
Page 19: Caractéristiques
Panneau avant 6 10 11 DEL d’alimentation – S’allume lorsque le M-Track Quad est sous tension. Entrée Mic/Line / Inst – Cette entrée permet de brancher un appareil à niveau ligne ou une guitare avec un câble XLR ou TRS 6,35 mm (¼ po). (Pour les signaux à niveau micro, utilisez un câble XLR. Pour les signaux à... -
Page 20: Panneau Arrière
Entrée d’alimentation – Branchez le câble d'alimentation (6 V, 3 A, fiche à centre positif) inclus à cette entrée, puis branchez l’extrémité à une prise secteur. Interrupteur d'alimentation – Cette touche permet de mettre le M-Track Quad sous et hors tension. -
Page 21: Contenuti Della Confezione
Quattro uscite offrono una riproduzione versatile e varie opzioni di collegamento. L'uscita cuffie ha un comando di controllo del volume dedicato. Oltre a eccezionali prestazioni audio, l'M-Track Quad presenta jack di ingresso e di uscita MIDI. L'M-Track Quad si collega al computer tramite USB, e agisce come hub alimentato con tre porte USB aggiuntive. -
Page 22: Installazione Dei Driver
Guida rapida / Schema dei collegamenti • AVVERTENZA: indossare le cuffie o accendere le casse solo DOPO aver acceso l'M-Track Quad. Inoltre, iniziare con tutti i livelli del volume bassi prima di aumentarli fino a un livello di ascolto adeguato. - Page 23 Servirsi di questa configurazione per registrare una piccola band. Collegare il computer alla porta USB del pannello posteriore e ricordarsi di selezionare l'M-Track Quad come dispositivo predefinito del computer per la registrazione e la riproduzione (si veda il seguente paragrafo, Configurazione Audio, per maggiori informazioni). Collegare i microfoni ai Canali 1 e 2 e attivare l'interruttore di alimentazione phantom per tali canali.
- Page 24 Servirsi di questa configurazione quando ci si serve del software per fare i DJ. Cllegare il computer alla porta USB a livello del pannello posteriore e ricordarsi di selezionare l'M-Track Quad come dispositivo predefinito del computer per la registrazione e la riproduzione (si veda il seguente paragrafo, Configurazione Audio, per maggiori informazioni).
-
Page 25: Pannello Anteriore
Pannello anteriore 6 10 11 Led di alimentazione – Si illumina quando l'M-Track Quad è acceso.. Ingresso mic/linea / strumento – Collegare un microfono, dispositivi a livello di linea o una chitarra a questo ingresso servendosi di un cavo XLR o TRS da 1/4”. (Per i segnali a livello di microfono, servirsi di un cavo XLR. -
Page 26: Pannello Posteriore
Uscite hub USB – Si possono collegare ulteriori dispositivi USB (controller, hard drive, ecc.) a queste porte USB. Oltre ad essere un'interfaccia audio, queste porte consentono all'M-Track Quad di funzionare come un hub USB. Ciò può essere utile se si rimane senza porte USB disponibili sul computer. -
Page 27: Mitgelieferte Software
Wir empfehlen die Installation der mitgelieferten Digital Audio Workstation (DAW) Software: • Pro Tools Express: Wir liefern Ihr M-Track Quad mit Pro Tools Express aus, damit Sie gleich angefangen können, Musik mit einer professionellen DAW zu machen. Besuchen Sie inmusicbrands.com/ptex und folgen Sie den Anweisungen auf dieser Seite, um Ihr Pro Tools Express zu installieren und zu autorisieren. - Page 28 Verwenden Sie dieses Setup für die Aufnahme in Ihrem Heimstudio. Schließen Sie Ihren Computer an den rückseitigen USB- Anschluss an und achten Sie darauf, Ihr M-Track Quad als Standard-Gerät für Aufnahme und Wiedergabe festzulegen (siehe folgenden Abschnitt Audio-Setup für weitere Informationen). Schließen Sie Ihr Mikrofon an Kanal 1 und aktivieren Sie die Phantomspeisung für die Kanäle 1 und 2.
- Page 29 Verwenden Sie diese Einstellung, um eine kleine Band aufzunehmen. Schließen Sie Ihren Computer an den rückseitigen USB- Anschluss an und achten Sie darauf, Ihr M-Track Quad als Standard-Gerät für Aufnahme und Wiedergabe festzulegen (siehe folgenden Abschnitt Audio-Setup für weitere Informationen). Schließen Sie Ihre Mikrofone an die Kanäle 1 und 2 an und aktivieren Sie die Phantomspeisung für diese Kanäle.
- Page 30 Verwenden Sie diese Einstellung, wenn Sie mit Software mixen. Schließen Sie Ihren Computer an den rückseitigen USB- Anschluss an und achten Sie darauf, Ihr M-Track Quad als Standard-Gerät für Aufnahme und Wiedergabe festzulegen (siehe folgenden Abschnitt Audio-Setup für weitere Informationen). Verbinden Sie Ihre Booth-Monitore mit den rückseitigen Audio- Ausgängen 1 und 2 und schließen Sie die Hifi-Lautsprecher an die Audio-Ausgänge 3 und 4 an.
- Page 31 Vorderseite 6 10 11 Power LED - Leuchtet auf, wenn M-Track Quad eingeschaltet ist. Mic/Line/Inst-Eingang - Schließen Sie ein Mikrofon, Line-Level-Gerät oder eine Gitarre mit einem XLR- oder 1/4" TRS-Kabel an diesen Eingang an. (Für Mic-Signale verwenden Sie ein XLR-Kabel. Für Line-Signale ein 1/4"...
- Page 32 USB-Anschluss – Diese Verbindung ermöglicht es Ihnen, Audio- und MIDI-Daten an bzw. von einem Computer zu senden. Verwenden Sie ein USB-Kabel, um das M-Track Quad an einen Computer anzuschließen. M-Track Quad benötigt einen USB 2.0 Anschluss. USB-Hub-Ausgänge – Sie können zusätzliche USB-Geräte (Controller, Festplatten etc.) an diese mit Strom versorgten USB-Anschlüsse anschließen.
-
Page 33: Technical Specifications
Appendix (English) Technical Specifications USB Audio Interface 44.1 kHz, 48 kHz, 88.2 kHz, 96 kHz Sampling rates 24-bit Resolution Interface USB 2.0, High-Speed Analog Inputs Frequency response 20 Hz to 20 kHz (+0.05dB) Line gain range 51.5 dB Dynamic range 103 dB, A-weighted Line impedance 55 kΩ... -
Page 34: Audio Routing
Audio Routing... - Page 36 Manual Version 1.0...
Need help?
Do you have a question about the M-Track Quad and is the answer not in the manual?
Questions and answers