Table of Contents

Subscribe to Our Youtube Channel
Related Manuals for M-Audio AIR 192|4 Vocal Studio Pro


Summary of Contents for M-Audio AIR 192|4 Vocal Studio Pro
- Page 1 User Guide English ( 3 – 8 ) Guía del usuario Español ( 10 – 16 ) Guide d’utilisation Français ( 17 – 23 ) Guida per l’uso Italiano ( 24 – 30 ) Benutzerhandbuch Deutsch ( 31 – 37 ) Appendix English ( 38 –...
-
Page 3: Box Contents
Software: We've included Pro Tools | First M-Audio Edition and Ableton Live Lite with your AIR 192|4 so you can get started making music with professional software right out of the box. Register your AIR 192|4 on m-audio.com, and follow the Pro Tools | First M-Audio Edition install instructions in your User Account. Also, visit ableton.com... -
Page 4: Connection Diagram
3. Read the End-User License Agreement, then check the box to Agree and click Next to continue. 4. Click Install to begin the installation. You may be asked to connect AIR 192|4 to your computer during the installation process. Click Install on any further system messages during the installation. - Page 5 Alternatively, go to Start Menu > Control Panel (or Settings > Control Panel in Classic View) > Hardware and Sound > Sound. 3. In the Windows Sound control panel select the Playback tab and select AIR 192|4 as the default device.
- Page 6 5. Select your Sample Rate and then click OK to close the Setup window. 6. Go to the Setup > I/O and select M-Audio AIR 192|4 for the Input and Output devices. You can now add tracks to send and receive audio from sources connected to AIR 192|4 inputs and stream recorded audio back through the AIR 192|4 outputs.
-
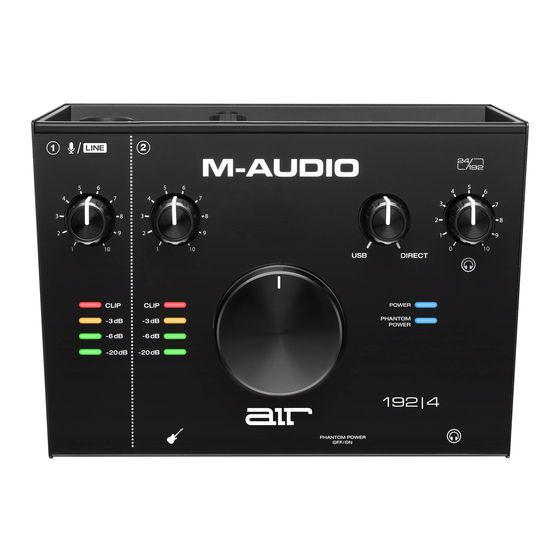
Page 7: Top Panel
6. Power LED: Lights up when a valid USB connection has been established between your computer and AIR 192|4. Use this light to verify that AIR 192|4 is receiving power and is ready to use. -
Page 8: Rear Panel
USB / Direct Blend knob. The level of these outputs is controlled by the Monitor Level knob. 4. Kensington Lock Slot: You can use this Kensington lock slot to secure AIR 192|4 to a table or other surface. - Page 9 NOVA Black Microphone Usage Connections and Phantom Power The NOVA Black microphone outputs a balanced, low-impedance signal. It is designed to be connected to the mic-level inputs of a mixer channel or a dedicated high-quality preamp. As with all condenser microphones, your NOVA Black microphone requires power in order to operate.
-
Page 10: Contenido De La Caja
Siga las instrucciones de la pantalla para instalar los drivers. Software: Hemos incluido Pro Tools | First M-Audio Edition y Ableton Live Lite con su AIR 192|4 de modo que puede comenzar a hacer música con software profesional en cuanto lo saca de la caja. Registre su AIR 192|4 en m-audio.com... -
Page 11: Diagramas De Conexión
Cuando utilice el micrófono NOVA Black incluido, conecte el interruptor +48 V (potencia fantasma). Ajuste del audio Usuarios de Windows: Antes de conectar el AIR 192|4 a su ordenador, instale el controlador: 1. Vaya a m-audio.com/drivers y descargue el controlador AIR 192|4 más reciente correspondiente a su sistema operativo. - Page 12 3. En la ventana Audio Devices (Dispositivos de audio), seleccione AIR 192|4 en la columna izquierda. 4. Haga clic derecho en AIR 192|4 y seleccione Use this device for sound input (Utilizar este dispositivo para la entrada de sonido). 5. Haga clic derecho en AIR 192|4 y seleccione Use this device for sound output (Utilizar este dispositivo para la salida de sonido).
- Page 13 Ahora puede añadir pistas para enviar y recibir audio desde las fuentes conectadas a las entradas del AIR 192|4 y transmitir el audio grabado de regreso por las salidas del AIR 192|4. Para configurar el AIR 192|4 con Ableton Live Lite 1.
-
Page 14: Panel Superior
6. LED de alimentación: Se enciende cuando se establece una conexión USB válida entre su computadora y el AIR 192|4. Use esta luz para verificar que el AIR 192|4 esté recibiendo alimentación y esté listo para usar. 7. LED de phantom power: Se enciende cuando se acopla la alimentación fantasma. -
Page 15: Panel Trasero
(Monitor Level). 4. Ranura de bloqueo Kensington: Puede utilizar esta ranura de bloqueo Kensington a fin de sujetar el AIR 192|4 a una mesa u otra superficie. Panel frontal 1. Salida... - Page 16 Uso del micrófono NOVA Black Conexiones y alimentación phantom Las salidas del micrófono NOVA Black producen una señal balanceada de baja impedancia. Su diseño permite conectarlo a la entrada de micro de un canal de su consola de mezclas o de un preamplificador de alta calidad.
-
Page 17: Contenu De La Boîte
Web. Pour de l’assistance supplémentaire, veuillez visiter le site m-audio.com/support. Démarrage Utilisateurs de Windows : Avant de brancher l'AIR 192|4 à votre ordinateur pour la première fois, vous devez installer les pilotes : Veuillez visiter m-audio.com/drivers et télécharger le dernier pilote AIR 192|4 pour votre système... -
Page 18: Schéma De Connexion
Pour utiliser le microphone NOVA Black fourni, activez la touche d’alimentation fantôme (+48V). Paramètres audio Utilisateurs Windows : Avant de brancher l'AIR 192|4 à votre ordinateur pour la première fois, vous devez installer le pilote : 1. Veuillez visiter m-audio.com/drivers et télécharger la dernière version du pilote AIR 192|4... - Page 19 4. Faite un clic droit sur AIR 192|4 et sélectionnez Utiliser ce périphérique pour l’entrée audio. 5. Faite un clic droit sur AIR 192|4 et sélectionnez Utiliser ce périphérique pour la sortie audio. 6. Quitter le menu de Configuration audio et MIDI.
- Page 20 Vous pouvez maintenant ajouter des pistes et recevoir un signal audio des sources branchées aux entrées de l'AIR 192|4 et transmettre en continu des fichiers par le biais des sorties de l'AIR 192|4. Pour configurer l'AIR 192|4 pour Ableton Live Lite 1.
-
Page 21: Caractéristiques
à des moniteurs amplifiés ou à un système d’amplification. 6. DEL de power : S’allume lorsque qu’une connexion USB est établie entre votre ordinateur et l'AIR 192|4. Vous pouvez utiliser cette DEL pour vérifier que l'AIR 192|4 est alimenté et prêt. -
Page 22: Panneau Arrière
USB/Direct. Le niveau de ces sorties est commandé par le bouton bouton moniteur. 4. Verrou Kensington : Cet emplacement permet d’utiliser un verrou Kinsington pour sécuriser l'AIR 192|4 sur une table ou autre surface. Panneau avant 1. Sortie casque : Cette sortie permet de brancher un casque d’écoute... - Page 23 Utilisation du microphone NOVA Black Connexions et l'alimentation fantôme Le microphone NOVA Black produit un signal symétrique de faible impédance. Il est conçu pour être connecté aux entrées de niveau micro sur une table de mixage ou un préampli de haute qualité dédié.
-
Page 24: Contenuti Della Confezione
Seguire le istruzioni su schermo per installare i driver. Software: Con lAIR’192|4 abbiamo incluso il Pro Tools | First M-Audio Edition e Ableton Live Lite in modo da consentirvi di iniziare immediatamente a fare musica con software professionale. Registrare l’AIR 192|4 su m-audio.com, e seguire le istruzioni di installazione nel proprio Account utente. - Page 25 4. Cliccare su Install per avviare l’installazione. Durante l’installazione potrà essere richiesto di collegare l'AIR 192|4 al computer. Cliccare su Install in occasione di ulteriori messaggi di sistema durante l’installazione. 5. Una volta completata l’installazione, cliccare su Finish (fine).
- Page 26 3. Nella finestra Audio Devices (dispositivi audio), selezionare AIR 192|4 nella colonna sinistra. 4. Fare clic col tasto destro su AIR 192|4 e selezionare Use this device for sound input (utilizza questo dispositivo per ingresso audio). 5. Fare clic col tasto destro su AIR 192|4 e selezionare Use this device for sound output (utilizza questo dispositivo per uscita audio).
- Page 27 5. Selezionare la Frequenza di campionamento e cliccare su OK per chiudere la finestra di configurazione (Setup). 6. Recarsi su Setup > I/O e selezionare M-Audio AIR 192|4 per i dispositivi di Ingresso e di Uscita. È ora possibile aggiungere tracce per inviare e ricevere audio dalle fonti collegate agli ingressi dell’AIR 192|4 e inviare lo streaming dell’audio registrato attraverso le uscite dell’AIR 192|4.
- Page 28 6. LED di alimentazione: Si accende quando viene stabilito un collegamento USB valido tra il computer e l'AIR 192|4. Servirsi di questa spia per verificare che l'AIR 192|4 riceva alimentazione e sia pronto per l'uso.
- Page 29 USB / Direct Blend. Il livello di queste uscite è controllato dalla manopola livello monitor (Monitor Level). 4. Slot per lucchetto Kensington: servirsi di questa apertura per lucchetto Kensington per fissare l'AIR 192|4 a un tavolo o ad altre superfici. Pannello anteriore 1. Uscita cuffie: collegare cuffie TRS da 6,35 mm (1/4”) a questa...
- Page 30 Uso del microfono NOVA Black Connessioni e l'alimentazione phantom Il microfono NOVA Black produce un segnale bilanciato a bassa impedenza. È progettato per essere connesso a ingressi mic-level di un canale mixer o di un preamplificatore ad alta qualità. Allo stesso modo di tutti i microfoni a condensatore, anche il microfono NOVA Black richiede alimentazione elettrica.
- Page 31 Befolgen Sie die Anweisungen am Bildschirm, um die Treiber zu installieren. Software: Wir liefern AIR 192|4 mit Pro Tools | First M-Audio Edition und Ableton Live Lite aus, damit Sie Ihre Musikproduktion gleich mit professioneller Software starten können. Registrieren Sie Ihren AIR 192|4 zuerst auf m-audio.com...
- Page 32 Rückseite Vorderseite Wichtig: • Denken Sie daran, AIR 192|4 als Schnittstelle in den Einstellungen, Optionen oder im Geräte-Setup etc. in Ihrer Digital Audio Workstation (DAW) auszuwählen. • Verwenden Sie den +48V (Phantomspeisung)-Schalter nur dann, wenn ein Mikrofon eine Phantomspeisung benötigt. Die meisten dynamischen Mikrofone und Bändchenmikrofone benötigen keine Phantomspeisung.
- Page 33 2. Wählen Sie Anwendungen > Dienstprogramme > Audio-MIDI-Setup. 3. Wählen Sie im Fenster Audiogeräte die Option AIR 192|4 in der linken Spalte aus. 4. Klicken Sie mit der rechten Maustaste auf AIR 192|4, und wählen Sie Dieses Gerät für Soundeingabe verwenden.
- Page 34 5. Wählen Sie Ihre Abtastrate aus und klicken Sie auf OK, um das Setup-Fenster zu schließen. 6. Gehen Sie zu Setup > I/O und wählen Sie M-Audio AIR 192|4 als Eingabe- und Ausgabegeräte. Sie können jetzt Tracks zum Senden und Empfangen von Audio von Quellen hinzufügen, die an die AIR 192|4-Eingänge angeschlossen sind, und die aufgenommenen Audiosignale über...
- Page 35 Aktivboxen oder dem Verstärker verbunden sein sollten. 6. Power LED: Leuchtet, wenn eine gültige USB-Verbindung zwischen Ihrem Computer und dem AIR 192|4 hergestellt wurde. Überprüfen Sie mithilfe dieses Lichts, ob das AIR 192|4 mit Strom versorgt wird und einsatzbereit ist.
- Page 36 Sie aus diesen Ausgängen hören werden, hängen vom USB/Direct Blend-Regler ab. Die Lautstärke dieser Ausgänge wird über den Monitorpegelregler kontrolliert. 4. Kensington Lock Slot: Sie können diesen Kensington Lock Sicherheits-Slot verwenden, um das AIR 192|4 an einem Tisch oder einer anderen Oberfläche zu befestigen. Vorderseite 1. Kopfhörerausgang: Verbinden 6,35 mm (1/4") TRS-Kopfhörer mit...
- Page 37 Einsatz von NOVA Black-Mikrofon Verbindungen und Phantomspeisung Mit NOVA Black-Mikrofon erhalten Sie ein symmetrisches, niedrigohmiges Ausgangssignal, das an die Mikrofoneingänge eines Mischpults oder eines hochwertigen, fest geschalteten Vorverstärkers angeschlossen werden kann. Wie alle Kondensatormikrofone ist NOVA Black-Mikrofon auf eine externe Spannungsversorgung angewiesen.
-
Page 38: Technical Specifications
Appendix (English) Technical Specifications AIR 192|4 All specifications are measured at 20 kHz bandwidth. Specifications are subject to change without notice. Mic Input 1 (balanced XLR) Frequency Response 20 Hz – 20 kHz (+0.1 dB) Dynamic Range 104 dB (A-weighted) Signal-to-Noise Ratio 104 dB (+1.0 dBu, A-weighted) -
Page 39: Trademarks And Licenses
Cable Length Trademarks and Licenses M-Audio and AIR Music Tech are trademarks of inMusic Brands, Inc., registered in the U.S. and other countries. Windows is a registered trademark of Microsoft Corporation in the United States and other countries. Macintosh and macOS are trademarks of Apple Inc., registered in the U.S. and other countries. - Page 40 Manual Version 1.1...
Need help?
Do you have a question about the AIR 192|4 Vocal Studio Pro and is the answer not in the manual?
Questions and answers