Table of Contents
Advertisement
version: AP-050103
Table of Contents
Introduction . . . . . . . . . . . . . . . . . . . . . . . . . . . . . . . . . . . . . . . . . . . . . . . .2
What's in the Box? . . . . . . . . . . . . . . . . . . . . . . . . . . . . . . . . . . . . . . . . . .2
About the Audiophile USB . . . . . . . . . . . . . . . . . . . . . . . . . . . . . . . . . . . . .2
Features & Specifications . . . . . . . . . . . . . . . . . . . . . . . . . . . . . . . . . .3
Minimum System Requirements . . . . . . . . . . . . . . . . . . . . . . . . . . . . .3
Front Panel Features . . . . . . . . . . . . . . . . . . . . . . . . . . . . . . . . . . . . . .4
Rear Panel Features . . . . . . . . . . . . . . . . . . . . . . . . . . . . . . . . . . . . . .4
Guide to Getting Started Quickly . . . . . . . . . . . . . . . . . . . . . . . . . . . . . . .5
Hardware Installation . . . . . . . . . . . . . . . . . . . . . . . . . . . . . . . . . . . . . . . .6
Audiophile USB Driver & Software Installation . . . . . . . . . . . . . . . . . . . .6
Windows Installation . . . . . . . . . . . . . . . . . . . . . . . . . . . . . . . . . . . . .6
Macintosh OS 9 Installation . . . . . . . . . . . . . . . . . . . . . . . . . . . . . . . .7
OMS Configuration . . . . . . . . . . . . . . . . . . . . . . . . . . . . . . . . . . . .7
Macintosh OS X Installation . . . . . . . . . . . . . . . . . . . . . . . . . . . . . . . .8
Verifying Windows Driver Installation . . . . . . . . . . . . . . . . . . . . . . . .9
Verifying Control Panel Installation, PC/Macintosh . . . . . . . . . . . . . .9
The Audiophile USB Control Panel . . . . . . . . . . . . . . . . . . . . . . . . . . . . .10
Windows Sound System and the Audiophile USB . . . . . . . . . . . . . .13
Macintosh Sound Manager and the Audiophile USB . . . . . . . . . . . .13
Audiophile USB Inputs & Outputs . . . . . . . . . . . . . . . . . . . . . . . . . . . . .13
Audiophile USB with Your Music Software . . . . . . . . . . . . . . . . . . . . . .14
Audiophile USB MIDI Setup . . . . . . . . . . . . . . . . . . . . . . . . . . . . . . . . . .17
Troubleshooting . . . . . . . . . . . . . . . . . . . . . . . . . . . . . . . . . . . . . . . . . . . .18
Contact Information . . . . . . . . . . . . . . . . . . . . . . . . . . . . . . . . . . . . . . . .21
Audiophile USB Warranty . . . . . . . . . . . . . . . . . . . . . . . . . . . . . . . . . . . .22
Appendix A - Technical Specifications . . . . . . . . . . . . . . . . . . . . . . . . . . .23
Appendix B - Driver/Software Install, Step by Step . . . . . . . . . . . . . . . .24
Windows XP: . . . . . . . . . . . . . . . . . . . . . . . . . . . . . . . . . . . . . . . . . .24
Windows 2000: . . . . . . . . . . . . . . . . . . . . . . . . . . . . . . . . . . . . . . . . .29
Windows ME: . . . . . . . . . . . . . . . . . . . . . . . . . . . . . . . . . . . . . . . . . .33
Audiophile USB Owner's Manual
Advertisement
Table of Contents

Related Manuals for M-Audio Audiophile USB


Summary of Contents for M-Audio Audiophile USB
-
Page 1: Table Of Contents
Audiophile USB Owner’s Manual version: AP-050103 Table of Contents Introduction ..........2 What’s in the Box? . -
Page 2: Introduction
Introduction Congratulations on your purchase of the Audiophile USB by M-Audio. The Audiophile USB is your audio and MIDI upgrade for any PC or Macintosh computer*, utilizing the convenience of your computer’s USB port—no tools or computer disassembly is required.The Audiophile brings you true 24-bit 96kHz audio and the highest-quality stereo, and digital multi-channel surround sound available today. -
Page 3: Features & Specifications
jacks. Alternatively, you can connect the record outputs of your stereo receiver into the Audiophile’s RCA jacks located on the back panel. Record a digital audio signal from your DAT, MiniDisc, CD, or external A/D converter via the Audiophile’s coaxial S/PDIF input. Control all hardware settings with the Audiophile USB Control Panel software. -
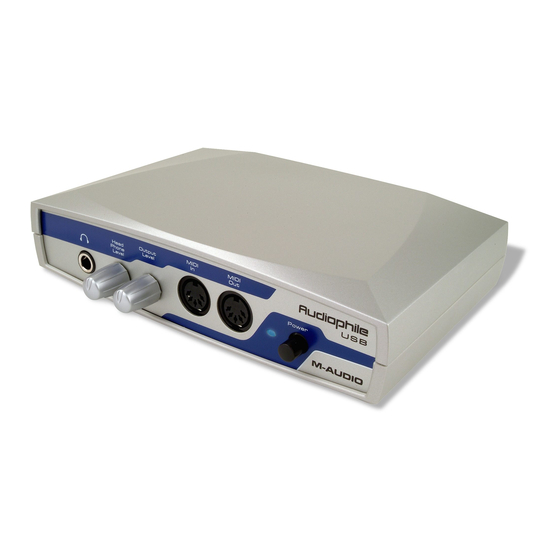
Page 4: Front Panel Features
Front Panel Features 1. Headphone Out:This is a stereo headphone output on a 1/4” TRS jack. Connect only a stereo plug to this jack. 2. Headphone Level: This knob controls the level of the stereo output signal sent to the headphone jack. 3. -
Page 5: Guide To Getting Started Quickly
2. Left Input and Right Input (RCA Analog Inputs): These jacks input analog audio from a variety of external sources. Each jack is female RCA, compatible with common male RCA cables. When plugs are inserted into the 1/4” jacks, these RCA inputs are defeated. 3. -
Page 6: Hardware Installation
Hardware Installation Find a convenient spot near your computer for the Audiophile USB.With the Audiophile’s power switched “Off,” plug the included power supply into your wall socket, and plug its 2.5mm plug into the Audiophile’s 9V AC 1000 mA Power Jack.Then, simply connect the USB cable to your computer and to the Audiophile USB. -
Page 7: Macintosh Os 9 Installation
Installer program. OMS is provided on the Drivers CD that came with the unit, and is located in the “OS 9” folder, or it can be downloaded from the M-Audio Website’s “Drivers” page. Opening the OMS 2.3.8 folder and double-clicking on the “Install OMS 2.3.8” program will install OMS in your system. -
Page 8: Macintosh Os X Installation
1. Insert the Audiophile USB Driver CD into your CD-ROM Drive and open the CD to view its contents. 2. Double click "M-Audio Audiophile USB Installer.dmg" file. An Icon will appear on your desktop marked " Audiophile USB." 3. Double click the " Audiophile USB " icon on your desktop. -
Page 9: Verifying Windows Driver Installation
This example shows the M-Audio Audiophile USB entries in the Windows Device Manager device list. The Audiophile USB is properly installed with no conflicts. If you do not see your M-Audio Audiophile USB in your Device Manager in this fashion, please jump ahead to the “Troubleshooting”... -
Page 10: The Audiophile Usb Control Panel
On Macintosh: During the driver installation, a dialog box will ask you if you wish to place a shortcut to the control panel on your desktop. Clicking this checkbox will, upon completion of the driver software installation, place a shortcut to the Audiophile USB Control Panel on your computer’s desktop.The control panel program itself will install to your system’s hard drive. - Page 11 sampling clock. Continue reading this section for more information on making selections in the Audiophile USB Control Panel. Active Channels & Sample Depth: Activation of the Analog and S/PDIF inputs and outputs is done with a set of four check boxes.Two radio buttons allow selection between sample bit depths of 16-bit or 24-bit.
- Page 12 Panel page displays the ASIO Driver Version, USB Driver Version, and the Firmware Version numbers currently in use. This is useful when checking for driver updates on the M-Audio website, or in the event that you need to call tech support and give them your system information.
-
Page 13: Windows Sound System And The Audiophile Usb
Windows Sound System and the Audiophile USB Windows may be set up to use the Audiophile as its default audio device, allowing system sounds to be played through the Audiophile. This also enables you to use the Audiophile with the sound applets included with Windows.To set this up, go to Control Panel | Sounds and Audio Devices (or, “Multimedia”... -
Page 14: Audiophile Usb With Your Music Software
Instead, pass the microphone signal through a microphone pre-amp (such as the M-Audio TAMPA™, DMP3™, or Audio Buddy™), and then connect the pre-amp output to the input of the Audiophile USB. Some additional cable and/or cable adaptors may also be needed to ensure proper connectivity. - Page 15 Note that the input devices are stereo. Your application software may break these down further to “left” and “right” mono devices. Therefore you may see them as “Left M-Audio USB Audiophile Line” and “Right M-Audio USB Audiophile Line,” or “Left M-Audio USB Audiophile S/PDIF”...
- Page 16 “M-Audio USB Audiophile Line Left”, “M-Audio USB Audiophile Line Right”, “M-Audio USB Audiophile SPDIF Left”, and “M-Audio USB Audiophile SPDIF Right”. ASIO Output devices will appear as these stereo pairs, which you will be able to pan left and right from within your music program: “M-Audio USB Audiophile Line”, and...
-
Page 17: Audiophile Usb Midi Setup
Audiophile USB MIDI Setup The Audiophile’s MIDI input and output ports may be connected to external MIDI devices.The following diagram shows connection to a MIDI keyboard instrument, which is also being used as a sound module.The MIDI output of the Audiophile USB may be used with just a sound module, while the MIDI input may alternately be used to receive MIDI time code for synchronization purposes. -
Page 18: Troubleshooting
Troubleshooting Problem: No sound output. Possible Cause 1:The Audiophile USB hardware or software device drivers are not properly installed.See the installation sections of this manual for further information. Possible Cause 2:There is a resource conflict between your computer’ s USB controller and another device in your computer (PC only). - Page 19 Problem: Repetitious Sound. Possible Cause: An IRQ resource conflict with the USB controller and another device (PC only). Often this will result in a small segment of sound (0.5 to 1 second) repeating itself over and over, sometimes completely locking up the computer. See the general troubleshooting suggestions at the beginning of this section.
- Page 20 Problem: I am playing AC-3 or surround sound data from a software application on my computer, sending the data from Audiophile USB S/PDIF Out to my home theater’s AC-3 decoder. However, the decoder does not recognize the signal and therefore refuses to put out any audio. Possible Cause: There is a bit within the S/PDIF digital audio stream that defines the S/PDIF content as audio or non-audio.
-
Page 21: Contact Information
Contact Information For additional help, contact M-Audio Technical Support by telephone (626-445-8495, 9-5 PST M-F), by fax (626-445-7564) or by e-mail (techsupt@m-audio.com). M-AUDIO U.S. M-AUDIO U.K. 45 E. Saint Joseph St. Unit 5, Saracen Industrial Park Arcadia, CA 91006-2861 Mark Rd. -
Page 22: Audiophile Usb Warranty
In the event that repair is required, a Return Authorization number must be obtained from M-Audio. After this number is obtained, the unit should be shipped back to M-Audio in a protective package with a description of the problem and the Return Authorization clearly written on the package. -
Page 23: Appendix A - Technical Specifications
Appendix A - Technical Specifications Analog Audio: Peak Signal, Analog Input: +2dBV Peak Signal, Analog Output: +2dBV Dynamic Range, Inputs: 109dB (A-weighted) Dynamic Range, Outputs: 107dB (A-weighted) THD (at 0dBFS): -92dB (typical) Frequency Response: 22Hz - 22kHz, -0.4,-0.4dB Maximum Converter Data Width: 24 bits Input Impedance: 10k ohms minimum... -
Page 24: Appendix B - Driver/Software Install, Step By Step
Appendix B - Driver/Software Install, Step by Step Windows XP: 1. During this installation, the Audiophile USB must be powered off. Begin the installation process by inserting the Drivers CD ROM in your computer. 2. A Setup window will appear. Click “Next,” to continue. 3. - Page 25 5. A third Software Installation window will appear. Click “Continue Anyway.” 6. An M-Audio USB Audiophile Setup window will appear next. Make sure both the Enable Digital CD and Enable DMA Transfer Mode boxes are checked, then click “Next.” 7. Another M-Audio USB Audiophile Setup window will appear next.
- Page 26 9. When you are completely restarted and at the desktop, power up the USB Audiophile. 10. The New Hardware Wizard will appear. Please select “Install the software automatically (Recommended),” then click “Next.” 11. A Hardware Installation window will come up. Click “Continue Anyway.” 12.
- Page 27 13 Another Windows Logo testing window will come up. Once again, click “Continue Anyway.” 14. The New Hardware Wizard will appear again. Select “Install the software automatically (Recommended),” by clicking on the radio button and then clicking “Next.” 15. Another Hardware Installation window will appear regarding Logo Testing.
- Page 28 17. Open the Windows Control Panel and click on the Audiophile USB Control Panel. Select "Place Audiophile Icon in the task bar.” The Audiophile USB will have a small black “M” in the system tray for easy access to the control panel.
-
Page 29: Windows 2000
Windows 2000: NOTE: Please make sure the Service Pack 3 is installed. To get this update, please visit the download section of Microsoft at www.microsoft.com Windows 2000 comes installed with DirectX version 7. You must have DirectX version 8.1 in order to install the Audiophile USB.The Audiophile USB installer will automatically check for the correct version of DirectX and install the latest DirectX update (this update will be skipped if you already have DirectX version 8.1 or higher in your system). - Page 30 Rest assured, our USB drivers are of the highest quality and will not cause problems in your system. Click “Yes.” 8. An M-Audio Setup window will appear next. Make sure both Enable Digital CD and Enable DMA Transfer Mode boxes are checked, then...
- Page 31 9. An M-Audio Setup window will come up confirming a successful setup. Click “Next,” to successfully install the USB Audiophile. 10. Windows will prompt you to restart the computer. Make sure that “Yes, restart my computer now,” is checked and then click “Finish,” to restart.
- Page 32 13. A second Digital Signature Not Found Box will appear. Click “Yes,” again. 14.The driver is now installed in your computer. Next, open the Windows Control Panel and click on the Audiophile USB Control Panel. Select "Place Audiophile Icon in the task bar.” A button which contains a small black “M”...
-
Page 33: Windows Me
Windows ME: NOTE: Please make sure the Service Pack 3 is installed. To get this update, please visit the download section of Microsoft at www.microsoft.com Windows ME comes installed with DirectX version 7. You must have DirectX version 8.1 in order to install the Audiophile USB.The Audiophile USB installer will automatically check for the correct version of DirectX and install the latest DirectX update. - Page 34 4. Verify that you have read the license agreement and agree to the terms. Click "Yes," to continue. 5. Windows will need to restart your machine to complete the DirectX 8.1 installation. Click "OK," to restart your system. 6. This is the first setup window for installing the Audiophile USB drivers after the installer has confirmed that you have DirectX version 8.1 (or higher) installed on your system.
- Page 35 7. An M-Audio Setup window will appear next. Make sure both Enable Digital CD and Enable DMA Transfer Mode boxes are checked, then click “Next.” 8. An M-Audio Setup window will come up confirming a successful setup. Click “Next,” to successfully install the USB Audiophile.
- Page 36 10. When you are completely restarted and at the desktop, power up the USB Audiophile. 11. Open the Windows Control Panel and click on the Audiophile USB Control Panel. Select "Place Audiophile Icon in the task bar.” The Audiophile USB will have a small black “M” in the system tray for easy access to the control panel.
Need help?
Do you have a question about the Audiophile USB and is the answer not in the manual?
Questions and answers