Table of Contents

Related Manuals for M-Audio M-Track Solo


Summary of Contents for M-Audio M-Track Solo
- Page 1 User Guide English ( 2 – 8 ) Guía del usuario Español ( 9– 15 ) Guide d'utilisation Français ( 16 – 22 ) Guida per l'uso Italiano ( 23 – 29 ) Benutzerhandbuch Deutsch ( 30– 36 ) Appendix English ( 37 –...
-
Page 2: Box Contents
Introduction Box Contents M-Track Solo User Guide USB-B–to–USB-A Cable Safety & Warranty Manual Software Download Cards Support For the latest information about this product (system requirements, compatibility information, etc.) and product registration, visit m-audio.com. For additional product support, visit m-audio.com/support. -
Page 3: Quick Start
After installation, most DAWs will not load virtual instrument plugins automatically. In order to access the virtual instrument plugins with Pro Tools | First M-Audio Edition, you will need to choose the plugin folder for the software to scan:... - Page 4 To set M-Track Solo as your default playback device, follow the directions below based on your computer’s operating system. Windows: 1. Use the included USB cable to connect the M-Track Solo to your computer. 2. In the Taskbar, locate the Volume Control "speaker" icon. Right-click the speaker and open Sound Settings >...
-
Page 5: Connection Diagram
Connection Diagram Items not listed under Introduction > Box Contents are sold separately. Guitar Monitors Computer Microphone Headphones Rear Panel Front Panel Note: Use the +48V (Phantom Power) Switch only if a microphone requires phantom power. Most dynamic microphones and ribbon microphones do not require phantom power, but most condenser microphones do. - Page 6 Select your Sample Rate and then click OK to close the Setup window. You can now add tracks to send and receive audio from sources connected to M-Track Solo inputs and stream recorded audio back through the M-Track Solo outputs.
-
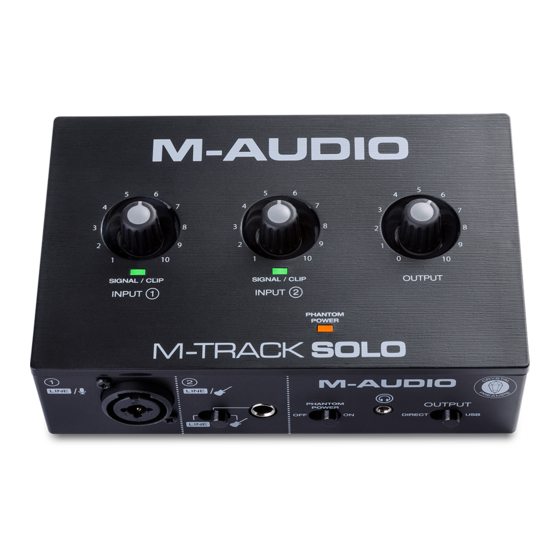
Page 7: Top Panel
Use the included USB-B-to-USB-A cable to connect the M-Track Solo to a computer. The M-Track Solo requires a USB 2.0 connection (or higher). Main Outputs: Use standard RCA cables to connect these outputs to your powered monitors, amplifier system, etc. -
Page 8: Front Panel
Front Panel Combo Input: Connect a microphone, a guitar or bass with an active pickup, or a line-level device to this input. For microphones, use an XLR or 1/4” (6.35 mm) TRS cable. For a guitar or bass with an active pickup, use a standard 1/4”... -
Page 9: Contenido De La Caja
Manual sobre la seguridad y garantía Tarjetas de descarga de software Soporte Para obtener la información más completa acerca de este product (los requisitos del sistema, compatibilidad, etc) y registro del producto, visite m-audio.com. Para soporte adicional del producto, visite m-audio.com/support. -
Page 10: Conexión Rápida
Siga las instrucciones de la pantalla para instalar los drivers. Software: Hemos incluido Pro Tools | First M-Audio Edition y MPC Beats con su M-Track Solo de modo que puede comenzar a hacer música con software profesional en cuanto lo saca de la caja. - Page 11 Windows: Utilice el cable USB incluido para conectar el M-Track Solo a su ordenador. Localice en la barra de tareas el icono del "altavoz" del control de volumen. Haga clic derecho en el altavoz y abierto Ajustes de sonido >...
-
Page 12: Diagrama De Instalación
Diagrama de instalación Los elementos que no se enumeran en Introducción > Contenido de la caja se venden por separado. Guitarra Monitores alimentados Computadora Micrófono Auriculares Panel trasero Panel frontal Nota: Utilice el interruptor +48 V (potencia fantasma) solamente si un micrófono requiere potencia fantasma. - Page 13 Ahora puede añadir pistas para enviar y recibir audio desde las fuentes conectadas a las entradas del M-Track Solo y transmitir el audio grabado de regreso por las salidas del M-Track Solo. Instalación del M-Track Solo con MPC Beats Utilice el cable USB incluido para conectar el M-Track Solo a su ordenador.
-
Page 14: Panel Superior
Utilice los cable USB-B–a–USB-A para conectar el M-Track Solo a un ordenador. El M-Track Solo requiere una conexión USB 2.0 (o superior). Salidas principales: Utilice cables RCA para conectar estas salidas a sus monitores alimentados, sistema de amplificación, etc. -
Page 15: Panel Frontal
Panel frontal Entrada combinada: Conecte un micrófono, guitarra o bajo con captador activo o un dispositivo de nivel de línea a esta entrada. Para micrófonos, utilice un cable XLR o TRS de 6,35 mm (1/4 pulg.). Entrada de 1/4": para señales de nivel de línea, use un cable TRS de 1/4"... -
Page 16: Contenu De La Boîte
Cartes de téléchargement de logiciel Assistance Pour les dernières informations concernant ce produit (la configuration système minimale requise, la compatibilité, etc) et l’enregistrement du produit, veuillez visitez le site m-audio.com. Pour toute assistance supplémentaire, veuillez visiter le site m-audio.com/support. - Page 17 Logiciel : Nous avons inclus l’application Pro Tools | First M-Audio Edition et MPC Beats avec l'M-Track Solo afin que vous puissiez commencer à créer de la musique avec un logiciel de qualité professionnelle aussitôt que vous le sortez de la boîte. Veuillez enregistrer l'M-Track Solo sur le site m-audio.com/softwaredownload...
- Page 18 Pour définir le M-Track Solo comme périphérique de lecture par défaut, veuillez suivre les instructions ci-dessous, selon le système d'exploitation de votre ordinateur. Windows : Utilisez le câble USB inclus pour brancher le M-Track Solo à votre ordinateur. Dans la barre des tâches, recherchez l’icône de la commande de volume (haut-parleur). Faites un clic droit sur l'icône du haut-parleur et ouvrir Paramètres son>...
-
Page 19: Schéma De Connexion
Schéma de connexion Les éléments qui ne figurent pas dans la section Présentation > Contenu de la boîte sont vendus séparément. Guitare Moniteurs amplifiés Casque Microphone Ordinateur d'écoute Panneau arrière Panneau avant Important : Utiliser la touche d'alimentation fantôme (+48V) uniquement lorsqu’un microphone nécessite une alimentation fantôme. - Page 20 Setup. Vous pouvez maintenant ajouter des pistes et recevoir un signal audio des sources branchées aux entrées de l'M-Track Solo et transmettre en continu des fichiers par le biais des sorties de l'M-Track Solo. Installation de M-Track Solo avec MPC Beats Utilisez le câble USB fourni pour brancher l’interface M-Track Solo à...
-
Page 21: Caractéristiques
Utilisez le câble USB-B–vers–USB-A fourni pour brancher l'M- Track Solo à un ordinateur. L'M-Track Solo requiert une connexion USB 2.0 (ou version ultérieure). Sorties principales : Utilisez des câbles RCA pour relier ces sorties à vos moniteurs amplifiés, à... -
Page 22: Panneau Avant
Panneau avant Entrée combo : Cette entrée permet de brancher un microphone, une guitare ou une basse avec un micro actif, ou un appareil à niveau ligne. Pour brancher un microphone, utilisez un câble XLR ou TRS 6,35 mm. Entrée 1/4" : pour les signaux de niveau ligne, utilisez un câble TRS 1/4"... -
Page 23: Contenuti Della Confezione
Schede di download del software Assistenza Per conoscere le ultime informazioni in merito a questo prodotto (i requisiti di sistema complete, compatibilità, ecc) e per la registrazione del prodotto, recarsi alla pagina m-audio.com. Per ulteriore assistenza, recarsi alla pagina m-audio.com/support. -
Page 24: Inizio Rapido
2. Aprire il file scaricato e fare doppio clic sul file di installazione dei driver. 3. Seguire le istruzioni su schermo per installare i driver. Software: Con l'M-Track Solo abbiamo incluso il Pro Tools | First M-Audio Edition e MPC Beats in modo da consentirvi di iniziare immediatamente a fare musica con software professionale. - Page 25 Per configurare l’M-Track Solo come dispositivo di riproduzione predefinito, seguire le indicazioni seguenti, basandosi sul proprio sistema operativo. Windows: Servirsi del cavo USB in dotazione per collegare l’M-Track Solo al computer. Nella Barra delle applicazioni, individuare l'icona "Speaker" di controllo del Volume. Fare clic col tasto destro del mouse e aperto Impostazioni audio>...
-
Page 26: Schema Dei Collegamenti
Schema dei collegamenti Elementi non elencati sotto Introduzione > Contenuti della confezione sono venduti separatamente. Chitarra Monitor Microfono Computer Cuffie Pannello posteriore Pannello anteriore Importante: Servirsi dell'interruttore +48V (l’alimentazione phantom) solo se un microfono richiede l'alimentazione phantom. La maggior parte microfoni dinamici e i microfoni a nastro non richiedono alimentazione phantom, mentre la maggior parte dei microfoni a condensatore sì. - Page 27 Per utenti Windows: Nella finestra Audio, selezionare ASIO nel menu a discesa Audio Device Type. Nel menu a discesa Device selezionare M-Track Solo and Duo ASIO. Per utenti MacOS: Nella finestra Audio, selezionare USB Audio Codec sotto i menu a discesa Output e Input.
-
Page 28: Pannello Superiore
Servirsi dei cavo da USB-B–a–USB-A in dotazione per collegare l'M-Track Solo al computer. L'M-Track Solo richiede un collegamento USB 2.0 (o superiore). Uscite principali: servirsi di cavi RCA per collegare queste uscite a monitor, impianto di amplificazione, ecc. -
Page 29: Pannello Anteriore
Pannello anteriore Ingresso combo: collegare un microfono, una chitarra o un basso con pickup attivo o un dispositivo a livello di linea a questo ingresso. Per i microfoni, servirsi di un cavo TRS XLR o da 1/4” (6,35 mm). Ingresso 1/4": per segnali a livello di linea, utilizzare un cavo TRS da 1/4"... - Page 30 Benutzerhandbuch (Deutsch) Einführung Lieferumfang M-Track Solo Benutzerhandbuch USB-B-zu-USB-A Kabel Sicherheitshinweise undantieinformationen Software Download-Karten Kundendienst Für aktuelle Informationen diesem Produkt (Systemanforderungen, Informationen zur Kompatibilität etc.) und zur Produktregistrierung besuchen Sie m-audio.com. Um weitere Unterstützung zu Ihrem Produkt zu erhalten besuchen Sie...
- Page 31 Befolgen Sie die Anweisungen am Bildschirm, um die Treiber zu installieren. Software: Wir liefern M-Track Solo mit Pro Tools | First M-Audio Edition und MPC Beats aus, damit Sie Ihre Musikproduktion gleich mit professioneller Software starten können. Registrieren Sie Ihren M- Track Solo zuerst auf m-audio.com/softwaredownload...
- Page 32 Anweisungen je nach Betriebssystem Ihres Computers. Windows: Schließen Sie Ihr M-Track Solo mit dem mitgelieferten USB-Kabel an Ihren Computer an. Suchen Sie das Lautsprechersymbol für die Lautstärke in der Taskleiste. Klicken Sie mit der rechten Maustaste auf den Lautsprecher und öffnen Soundeinstellungen > Sounds.
- Page 33 Anschlussdiagramm Teile, die nicht unter Einführung > Lieferumfang angegeben sind, sind separat erhältlich. Gitarre Aktivemonitore Computer Mikrofon Kopfhörer Rückseite Vorderseite Wichtig: Verwenden Sie den +48V (Phantomspeisung)-Schalter nur dann, wenn ein Mikrofon eine Phantomspeisung benötigt. Die meisten dynamischen Mikrofone und Bändchenmikrofone benötigen keine Phantomspeisung.
- Page 34 Gehen Sie zu Edit > Preferences…. Für Windows-Anwender: Wählen Sie im Audio-Fenster die Option ASIO im Dropdown-Menü Audio Device Type aus. Im Dropdown-Menü Device wählen Sie die Option M-Track Solo and Duo ASIO. Für MacOS-Anwender: Wählen Sie im Audio-Fenster die Option USB Audio Codec unter den Output - und Input-Dropdown-Menüs aus.
- Page 35 Rückseite USB-Port (Typ B): Über diesen Anschluss können Sie Audio- an und vom Computer senden. Verwenden Sie die im Lieferumfang enthaltenen USB-B-auf-USB-A-Kabel, um Ihr M-Track Solo an einen Computer anzuschließen. M-Track Solo benötigt einen USB 2.0-Anschluss (oder höher). Hauptausgäng: Verwenden handelsübliche...
- Page 36 Vorderseite Combo-Eingang: Schließen Sie ein Mikrofon, eine Gitarre, einen Bass mit einem aktiven Pickup oder ein Line-Level-Gerät an diesen Eingang an. Für Mikrofone verwenden Sie ein XLR- oder 1/4" (6,35 mm) TRS- Kabel. 1/4" Eingang: Verwenden Sie für Signale mit Line- Pegel ein 6,35 mm (1/4") TRS-Kabel.
-
Page 37: Technical Specifications
Appendix (English) Technical Specifications All specifications are measured at 20 kHz bandwidth. Specifications are subject to change without notice. Mic Input (balanced XLR) Frequency Response 20 Hz – 20 kHz (+0.1 dB) Signal-to-Noise Ratio 109 dB (A-weighted) 0.003% (min. gain, 0 dBu out, A-weighted) THD+N -128 dBu (max. - Page 38 Instrument Input (unbalanced 1/4" [6.35 mm] TS) 20 Hz – 20 kHz (+0.1 dB) Frequency Response THD+N 0.005% (min. gain, 0 dBu output, A-weighted) 1 MΩ Input Impedance Gain Range -10 dB to +44 dB RCA Outputs 20 Hz – 20 kHz (+0.1 dB) Frequency Response Signal-to-Noise Ratio 109 dB (A-weighted)
-
Page 39: Trademarks And Licenses
Weight 0.66 lbs. / 0.30 kg Trademarks & Licenses M-Audio and MPC Beats are trademarks of inMusic Brands, Inc., registered in the U.S. and other countries. Windows is a registered trademark of Microsoft Corporation in the United States and other countries. - Page 40 Manual Version 1.4...
Need help?
Do you have a question about the M-Track Solo and is the answer not in the manual?
Questions and answers