Table of Contents
Advertisement
Quick Links
Advertisement
Table of Contents

Related Manuals for Chauvet COLORdash Par


Summary of Contents for Chauvet COLORdash Par
-
Page 1: User Manual
Snapshot ™ COLORdash OK on Dimmer Outdoor OK Sound Activated DMX512 Master/Slave Autoswitching Transformer Replaceable Fuse User Serviceable Duty Cycle USER MANUAL Chauvet, 3000 N 29 Ct, Hollywood, FL 33020 U.S.A. (800) 762-1084 – (954) 929-1115 FAX (954) 929-5560 www.chauvetlighting.com... -
Page 2: Table Of Contents
ABLE OF ONTENTS 1. Before You Begin .................................. 3 What is included ..................................3 Unpacking Instructions ................................3 Safety Instructions ..................................4 LED Expected Lifespan ................................4 2. Introduction ................................... 5 Features ...................................... 5 DMX Channel Summary ................................6 Product Overview ..................................7 3. -
Page 3: Before You Begin
1. B EFORE EGIN What is included 1 x COLORdash™ Par 1 x Power cable with plug 1 x 6.6ft (2m) power linking cable 1 x set of replacement screws for barn doors removal 1 x Warranty Card ... -
Page 4: Safety Instructions
There are no user serviceable parts inside the unit. Do not open the housing or attempt any repairs yourself. In the unlikely event your unit may require service, please contact CHAUVET at: 954-929-1115. Note! Power linking may not be available for 230V versions... -
Page 5: Introduction
2. I NTRODUCTION Features 3, 4 or 9-channel DMX-512 LED wash light (with ID addressing) Operating modes 3-channel: RGB control 4-channel: RGB, dimmer 9-channel: RGB, ID, dim, macro, strobe, automatic, custom Blackout/static/dimmer/strobe/pulse RGB color mixing with or without DMX controller Built-in automated programs via master/slave, DMX or COLOR-CON Recall custom programs via master/slave or DMX ADDITIONAL FEATURES... -
Page 6: Dmx Channel Summary
DMX Channel Summary The COLORdash™ Par has a total of 3 DMX channel configurations, referred to as “Personalities” in this manual and in the fixture onboard control board. The 3 personalities are [STAGE 1, ARC1, ARC1+D]. Each of the different personalities can be accessed from the control panel. -
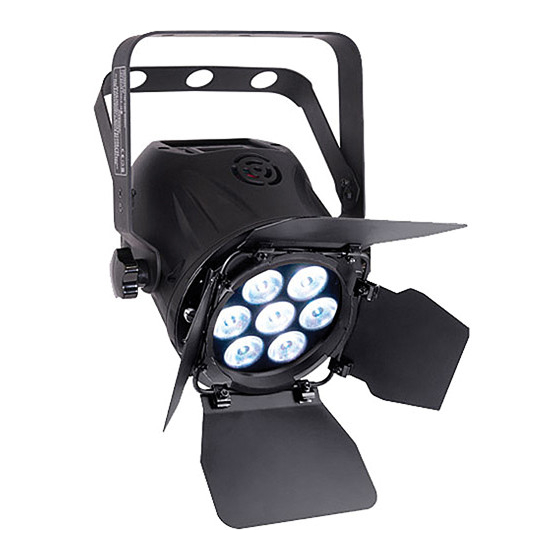
Page 7: Product Overview
Product Overview Control Panel Barn Doors Power Link Out DMX Out DMX In Bracket Adjustment Power Out Power In COLORdash™ Par User Manual 9/4/2008 12:09 PM... -
Page 8: Setup
3. SETUP AC Power This fixture has an auto-switching power supply that can accommodate a wide range of input voltages. The only thing necessary to do before powering on the unit is to make sure the line voltage you are applying is within the range of accepted voltages. This fixture will accommodate between 100V and 240V AC 50-60 Hz. -
Page 9: Mounting
The fixture includes a mounting yoke to which a rigging clamp can be attached. You must supply your own clamp and make sure the clamp is capable of supporting the weight of this fixture. You can order “C” and “O”-clamps from any CHAUVET dealer or distributor (CLP-15, CLP-06 recommended). -
Page 10: Lens Assembly Installation/Replacement
Lens Assembly Installation/Replacement The LED-SPLASH™3 comes with 15 lens assembly pre-installed from the factory. However, there are 2 other optional lens kits (CL20X10, CL20X30) available as accessories, which will alter the beam angle. Please follow the below instructions for proper replacement/installation. LED PCB 2. -
Page 11: Fixture Linking
Maximum recommended number of fixtures on a serial data link: 32 fixtures Data Cabling To link fixtures together you must obtain data cables. You can purchase CHAUVET-certified DMX cables directly from a dealer/distributor or construct your own cable. If you choose to create your own cable please use data-grade cables that can carry a high quality signal and are less prone to electromagnetic interference. -
Page 12: 3-Pin To 5-Pin Conversion Chart
Note! If you use a controller with a 5 pin DMX output connector, you will need to use a 5 pin to 3 pin adapter. CHAUVET Model No: DMX5M, or DMX5F. The chart below details a proper cable conversion: IN TO... -
Page 13: Control Options
4. O PERATING NSTRUCTIONS Control Options The COLORdash™ PAR is addressable in the DMX range of 001 to 512. In its simplest control form, this allows for the control of up to 56 fixtures in the 9-channel Stage1 personality; however, a secondary “ID”... -
Page 14: Colorcon™ Setup
COLORcon™ Setup FIXTURE CONTROL PANEL SETUP Activate ID addressing in each fixture by setting panel function {ID ON/OFF} to ON. {MENU} {Settings) {ID ON/OFF} [ON] Set ID addresses in each fixture by setting panel function {ID address} to incremental values. -
Page 15: Setting The Dmx Address
Setting the DMX address Each fixture requires a "start address" from 1 to 512. A fixture requiring one or more channels for control begins to read the data on the channel indicated by the start address. For example, a fixture that occupies or uses 7 channels of DMX and was addressed to start on DMX channel 100, would read data from channels: 100, 101, 102, 103, 104, 105 and 106. -
Page 16: Upload Customs
Upload Customs The custom programs in the COLORdash™ Par may be transferred (copied) from one fixture to another, thus giving the ability to have to only program them on a single fixture, and then duplicate this only several others. This is referenced in the Control Panel as “Upload”. Follow the below steps for this process. On all fixtures that are going to receive the upload, set them on DMX operation. - Page 17 COLORdash™ Par User Manual 9/4/2008 12:09 PM...
-
Page 18: Dmx512 Channel Values
DMX512 Channel Values The COLORDASH™ PARhas 3 DMX512 channel configurations [STAGE1, ARC1, and ARC1+D]. STAGE 1 HANNEL ALUE UNCTION Dimmer 000 255 0 100% (or STEP TIME when CUS.01-10 is activated) 000 255 0 100% Green (or FADE TIME when CUS.01-10 is activated) 000 ... - Page 19 0 255 Auto Speed 9 (ID HANNEL ADDRESS SELECTION 000 009 All IDs ID 23 ID 46 010 019 ID 1 ID 24 ID 47 020 029 ID 2 ID 25 ID 48 030 039 ID 3 ID 26 ID 49...
-
Page 20: Important Notes About Stage 1 Dmx Operation
Important Notes about STAGE 1 DMX Operation MASTER DIMMER Channels 1 controls the intensity of the currently projected color When the slider is at the highest position (255), then the intensity of the output is at the maximum. RED, GREEN BLUE AND WHITE COLOR SELECTION Channels 2, 3, and 4 control the intensity ratio of each of the Red, Green, &... -
Page 21: Colorado™ Controller
5. COLOR ™ C ONTROLLER LCD Display Panel SOLD MODE SETUP DOWN SEPARATELY MODE Accesses main menu or backs out of sub-menu SETUP Selects the currently displayed menu or confirms the current function value Use to navigate upwards through menu items or increment function values DOWN Use to navigate downwards through menu... -
Page 22: Menu Map
Menu Map ELECTION ELECTION ELECTION ELECTION UNCTION Step time Wash [1] [001] [255] Wash Edit program Fade time Wash [8] [001] [255] Effect [1] Effect Speed Edit [001] [100] program Effect [8] ID address [000*] [100] (*0 = all units) Step time [000] ... -
Page 23: Custom Program
Custom Program Select from the eight existing [Custom] programs and it will instantly play. Enter the [Edit] section to create or edit program. You can create or edit up to 100 scenes. To program less than 100 scenes, set the [Step time] of the scene after your last scene to 0. -
Page 24: Activating Password Mode
[Reset to factory settings] This function will reset all the settings to the factory defaults except for [Custom] programs. Factory Default Settings Setting Default [Schedule] All times in schedule are reset to [00:00] [Wash program] Step times and fade times are reset to [001] [Effect program] Speeds are reset to [001] [DMX address]... -
Page 25: Technical Support
Support (Email): tech@chauvetlighting.com Telephone: (954) 929-1115 - (Press 4) Fax: (954) 929-5560 - (Attention: Service) Website: http://www.chauvetlighting.com Contact Us Wor l d Wi de General Information Chauvet Lighting 3000 North 29 Court Hollywood, FL 33020 voice: 954.929.1115 fax: 954.929.5560 toll free: 800.762.1084) World Wide Web www.chauvetlighting.com... -
Page 26: Appendix
Connect fixtures using shielded two conductor twisted pair cable with three pin XLR male to female connectors. The shield connection is pin 1, while pin 2 is Data Negative (S-) and pin 3 is Data positive (S+). CHAUVET carries 3-pin XLR DMX compliant cables, DMX-10 (33’), DMX-4.5 (15’) and DMX-1.5 (5’) COLORdash™... -
Page 27: General Maintenance
Package must be clearly labeled with a Return Merchandise Authorization Number (RA #). Products returned without an RMA # will be refused. Call CHAUVET and request RA # prior to shipping the fixture. Be prepared to provide the model number, serial number and a brief description of the cause for the return. -
Page 28: Photometrics
Photometrics COLORdash™ Par User Manual 9/4/2008 12:09 PM... -
Page 29: Mini Par Service Maintenance Guide
This fixture has built-in, automatic programs that may be triggered from the Stand alone operation onboard Control Panel If you still have a problem after trying the above solutions, please contact CHAUVET Technical Support at the location on page 28. COLORdash™ Par User Manual... -
Page 30: Blow-Out Diagram
Blow-out Diagram. Description Part Number 1 Front Rim Cover P111-M1RCVR 2 LED lens assembly CL18X10/15/30 3 Electronic Transformer 90-240V 50/60Hz P140-M1ELTR 4 Display/Master PCB P170-MINIPD 5 Bracket/Floor stand P111-PARBRKT 6 Bracket Knob P111-M1KNOB 7 Power/signal input/output P111-M1PWR(POWER) P111-M1SIG(SIGNAL) 8 LED Driver PCB P172-MIN1DVR 9 Cooling fan P130-40MM24V... - Page 31 COLORdash™ Par User Manual 9/4/2008 12:09 PM...
-
Page 32: Technical Specifications
Technical Specifications WEIGHT & DIMENSIONS Length ............................ 14 in (356 mm) Width ............................. 8.5 in (216 mm) Height............................6 in (152 mm) Weight ............................ 5.8 lbs (2.6 kg) POWER AC Power Auto-switching ..................100V~240V 50/60Hz AC Power Consumption ..................30W (0.4A) max at 120V 60Hz Power Consumption ..................
Need help?
Do you have a question about the COLORdash Par and is the answer not in the manual?
Questions and answers