
Related Manuals for Audiovox MMD7HRPKG


Summary of Contents for Audiovox MMD7HRPKG
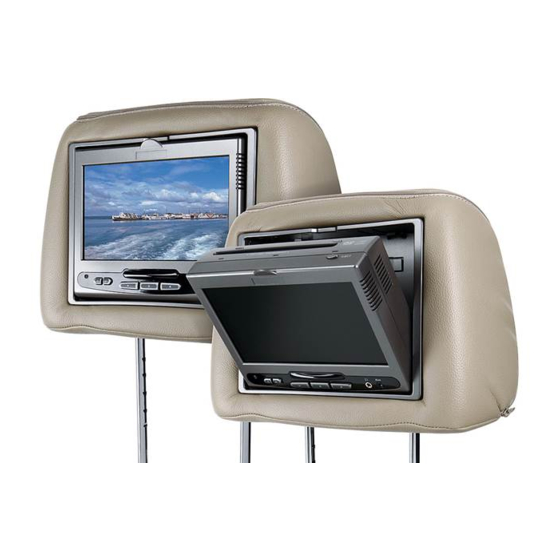
- Page 1 MMD7HRPKG Two Specific Vehicle Headrests With 7" LCD Monitors and Built-In DVD Player for Rear Seat Entertainment c... "0" oo:=J oo:=J .:::=> ::> \... \... Operation Manual 128-8281...
- Page 2 Damage to air bag wiring can result in personal injury to vehicle occupants. If you have any questions regarding wire routing or installation in avehicle, please contact Audiovox Technical Support at 1-800-225-6074. When connecting power and ground in amobile video installation, insure that the ACC wire is fused at the point where it is connected to the vehicle ACC wiring.
- Page 3 MMD7HRPKG The MMD7HRPKG contains two headrests. The master unit M1 (MMD7HRM) has a built-in DVD player and the satellite unit M2 (MMD7HRS) has a monitor that is used to either watch the DVD movie that is playing in the master unit or a video source plugged into the AUX jack on the front of the unit.
-
Page 4: Controls And Indicators Diagram
CONTROLS AND INDICATORS DIAGRAM MMD7HRM Control Function Descriptions for MMD7HRM and MMD7HRS Monitor q>..." MMD7HRM / MMD7HRS Panel Control 1. DVD disc insertion slot EJECT Button - Press this button to eject the disc. 3. Power Indicator LED 4. POWER Button - Press to turn the unit ON/OFF. - Page 5 MMD7HRPKG SYSTEM OVERVIEW 1) The MMD7HRPKG SYSTEM is a versatile audio / video system with built-in DVD player (MMD7HRM only) which includes two monitors, that can accept an Audio / Video input and independent AUX input. A separate audio output is provided for connecting an optional FM Modulator to the vehicle's radio.
- Page 6 Inner Ring Internal Lock Closed Position 10) Insert disc 11) Eject disc - D i s c Label Eject disc Insert disc MMD7HRPKG: MMD7HRM Monitor only. MMD7HRPKG: MMD7HRM Monitor only.
-
Page 7: Remote Control Operation
REMOTECONTROLOPERATION CR2025 Initial Use When purchased the remote control has a battery installed with a Pull Tab to prevent battery discharge. Remove the Pull Tab before attempting to use the remote. Battery Replacement 1. Remove the battery holder. -+--1-+-- 2. Insert the battery into the battery holder and insert the L . - Page 8 REMOTE CONTROL FUNCTION DESCRIPTIONS Function/control is available on the unit and remote control. ** Function/control is not available on this model. NOTE: To control the individual units (MMD7HRM Monitor / MMD7HRS Monitor) press either M1 or M2 before pressing any other button.
- Page 9 10. ZOOM Button - Press this button to enlarge the picture when playing a DVD disc. Press ZOOM button DVD player perform Once Enlarge the picture 1 times of the original size Twice Enlarge the picture 2 times of the original size 3 times Enlarge the picture 3 times of the original size 4 times...
- Page 10 18. AUDIO Button - Press to display and select the AUDIO language in DVD mode. Each time you press the button, the language changes. NOTE: The languages for audio vary from disc to disc. 19. SCAN FORWARD Button - Press to search in a forward direction. Press repeatedly to change the search speed from 2, 4, 8 and 20 times the normal speed.
- Page 11 SETTINGS AND ADJUSTMENTS (M1 ONLY) The Setup Menu contains features and options that let you customize your DVD player. For example, you can set a language for the on- screen display or prevent DVD playback for children. Using the Setup Menu 1.
- Page 12 LANGUAGE SETUP French Spanish Language for On-Screen Display German OSD MENU: The OSD MENU setup allows you to select the language for the on-screen display. Italian The user can either select English, French, Spanish, German or Italian for the OSD language. SUBTITLE SETUP English French...
- Page 13 TV Type The TV TYPE setup allows you to select the system to fit to the color system of the TV to be connected. NTSC - Select this type for NTSC TV PAL - Select this type for PAL TV Multi - Select this type for multi-system TV RATING SETUP Rating...
- Page 14 Load Factory Load Factory allows you to reset all options to factory settings. * This function will not affect the Rating control settings. Screen Saver ON -Screen saver will appear OFF -Screen saver will not appear Note: The DVD player will enable the Screen Saver mode if the unit is inactive for approximately minutes.
- Page 15 Playing MP3 Discs MP3 is a format for storing digital audio. An audio CD-quality song can be compressed into the MP3 format with very little loss of quality, while taking up much less space. CD-R discs that have been encoded in MP3 format can be played on your DVD player. The DVD player plays the songs in the order they were burned on to the disc.
- Page 16 Flat Mode: play the entire disc This mode is always on (default). During the Flat Mode all the data folders with MP3, JPEG & movies will be played in sequence. If the Flat Mode function is off, it will only play the selected folder; other folders are disabled. Repeat: play repetitively Repeat function has 4 options: Off, Single, Folder, All.
- Page 17 Edit Mode Program View Add to Program Notice: Edit Mode/Program View/Add to program functions are all related and can not be implemented during play mode or any other program function. Method: Make sure disc playback is off. Move cursor to Edit Mode function and press OK. After Edit Mode is selected, open the folder and select the songs which will be compiled.
- Page 18 DVD Basics To get the optimum use out of the DVD section, make sure you read this section completely. Regional Coding Both the DVD player and DVDs are coded by region. These regional codes must match in order for the disc to play. If the codes don't match, the disc won't play.
- Page 19 AV1 - Select AV1 to view the DVD player from the MMD7HRM monitor. AUX - Select AUX to view the source that is connected to the AUX input* on the front of the unit. *The AUX input requires the use of AV adapter cable (1/8-to-RCA) supplied by Audiovox.
-
Page 20: Troubleshooting
TROUBLESHOOTING PROBLEM SOLUTION IR sensor inoperative • Verify that the batteries in the remote are fresh. • Verify that the remote sensor eye is not obstructed. • Verify that Master Monitor or Satellite Monitor has been selected correctly. Disc won't play •... -
Page 21: Monitor Specifications
CAUTION 1. Keep the monitor clean and dry. 2. Always seek qualified personnel to perform repairs. Never attempt your own repairs. 3. Do not drop the monitor or expose to strong impacts. 4. Do not expose to direct sunlight for extended periods of time. MONITOR SPECIFICATIONS 1. -
Page 22: 12 Month Limited Warranty
Applies to Movies To Go Mobile Video Products AUDIOVOX ELECTRONICS CORP. (the Company) warrants to the original retail purchaser of this product that should this product or any part thereof, under normal use and conditions, be proven defective in material or workmanship within 12 months from the date of original purchase, such defect(s) will be repaired or replaced with reconditioned product (at the Company's option) without charge for parts and repair labor. - Page 24 For Customer Service Visit Our Website At www.audiovox.com Product Information, Photos, FAQ's Owner's Manuals © 2007 Audiovox Electronics Corp., Hauppauge, NY 11788 128-8281...
- Page 25 MMD7HRPKG Two Specific Vehicle Headrests With 7" LCD Monitors and Built-In DVD Player for Rear Seat Entertainment Installation Guide 128-8280...
-
Page 26: Materials Included In This Package
Damage to air bag wiring can result in personal injury to vehicle occupants. If you have any questions regarding wire routing or installation in avehicle, please contact Audiovox Technical Support at 1-800-225-6074. When connecting power and ground in amobile video installation, insure that the ACC wire is fused at the point where it is connected to the vehicle ACC wiring. -
Page 27: Optional Accessories
5) Audio Interface Box 6) Remote Control (PIN 136-4327) (PIN 136-4632) - (1 pc) - (1 pc) 7) AV Adapter Cable 8) Hardware Package Scews (PIN 112B3227) - (1 pc) (PIN 100-2267) - (16pcs) ffimm =CIJR ffimm ffimm ffimm ffimm 9) 2 Pin DC Power Cable 10) Cigarette Lighter Adaptor Power cable (PIN 112-3667) -(1 pc) - Page 28 MMD7HRPKG SYSTEM OVERVIEW 1) The MMD7HRPKG SYSTEM is a versatile audio / video system with built-in DVD player (MMD7HRM only) which includes two monitors, that can accept an Audio / Video input and independent AUX input. A separate audio output is provided for connecting an optional FM Modulator to the vehicle's radio.
- Page 29 Inner Ring Internal Lock Closed Position 10) Insert disc - D i s c Label Insert disc MMD7HRPKG: MMD7HRM Monitor only. 11) Eject disc Eject disc MMD7HRPKG: MMD7HRM Monitor only.
- Page 30 Headrest Installation Description Choose the headrest cover color to best match your vehicle interior. Headrest cover - - -.....=---. Wrap and cover over headset foam Unzip and remove cover ® Zip new cover in place Hold zipper halves together to facilitate zipping the cover over the headrest foam...
- Page 31 ® ® Push the headrest support inwards or pull Use a screwdriver to loosen the screw from the inner-bracket of the headrest. them outward adjust the distance. Use a screwdriver to tighten the screw after headrest support have been adjusted.
- Page 32 MMD7HRPKG SYSTEM Electronics Installation Guide Monitor Unit c c= 8"""B MMD7HRS Monitor MMD7HRM Monitor MMD7HRM MMD7HRS (Satellite Monitor / M2) (Master Monitor / M1) (Master Monitor) (Satellite Monitor) FIGURE 3 ~----+- Cable 1 : Monitor Pigtail \\\~~-Cable Headrest Cable Peel backing off of double sided tape (4 places)
-
Page 33: Vehicle Preparation
(Refer to the Installation Procedure). The mounting method, and the location will vary from vehicle to vehicle, so this manual will only focus for the installation of the MMD7HRPKG Master and Satellite Monitors in the supplied configuration. The best location for the MMD7HRPKG components is: a. - Page 34 Place the appropriate headrest support tube into the support tube hole. (If needed) c. Hold the MMD7HRPKG Headrest above the seat and insert the two cables into the headrest support tube holes. Make sure that the headrest is in the correct position (Display facing the rear).
- Page 35 8) Verify proper operation of the system. 9) Make sure that no wiring is pinched, or connected improperly during the final installation. MMD7HRPKG WIRING DIAGRAM MMD7HRM Monitor MMD7HRS Monitor Master Monitor Satellite Monitor AUDIO LINE OUT BLUE YELLOW GREEN AUDIO...
- Page 36 For Customer Service Visit Our Website At www.audiovox.com Product Information, Photos, FAQ's Owner's Manuals 2007 Audiovox Electronics Corp., Hauppauge, NY 11788 128-8280 ©...
- Page 37 AUDIO,YOX® ELECTRONICS CORP. Register Online at: WWW.AUDIOVOX.COM Click on Product Registration and Fill Out the Brief Questionnaire...
-
Page 38: Product Registration
PRODUCT REGISTRATION Thank you for purchasing an Audiovox product. We pride ourselves on the quality and reliability of all our electronics products but if you ever need service or have a question, our customer service staff stands ready to help.
Need help?
Do you have a question about the MMD7HRPKG and is the answer not in the manual?
Questions and answers