Becker AR6201 Series Installation And Operation Manual
Ar6201 series
Hide thumbs
Also See for AR6201 Series:
- Installation & operation manual (118 pages) ,
- Installation and operation manual (80 pages) ,
- Operating instructions manual (40 pages)
Table of Contents
Advertisement
Quick Links
Advertisement
Chapters
Table of Contents

Related Manuals for Becker AR6201 Series


Summary of Contents for Becker AR6201 Series
-
Page 1: Installation And Operation
VHF-Transceiver AR6201-(XXX) Installation and Operation Manual DV 14300.03 Issue 2 October 2010 Becker Flugfunkwerk GmbH ● Baden Airpark ● 77836 Rheinmünster ● Germany Telephone +49 (0) 7229 / 305-0 ● Fax +49 (0) 7229 / 305-217 http://www.becker-avionics.com ● e-mail: info@becker-avionics.de... - Page 2 FIRST ISSUE AND CHANGES Issue 1 May 2010 Issue 2 October 2010 LIST OF EFFECTIVE PAGES Page No.: Date: Page No.: Date: Cover Page 10/2010 1-I … 1-II 10/2010 1-1 … 1-10 10/2010 2-I … 2-II 10/2010 2-1 … 2-26 10/2010 3-I …...
-
Page 3: Table Of Contents
AR6201 Table of contents Section GENERAL DESCRIPTION Page 1.1 Introduction 1 1.2 Purpose of equipment 1 1.3 General Notes 1 1.4 Short Description 2 1.5 Variants survey 4 1.6 Technical data 4 1.6.1 Power supply data 4 1.6.2 General data 4 1.6.3 Dimensions & Weight 5 1.6.4 Receiver data 5 1.6.5 Transmitter data 5 ... - Page 4 AR6201 Blank Page 1-II DV 14300.03/.04 Issue 2 10/2010...
-
Page 5: Introduction
AR6201 Section 1 GENERAL Introduction This manual describes the VHF transceiver AR6201-(XXX). The manuals DV 14300.03 (“Installation and Operation”) and DV 14300.04 (“Maintenance and Repair”) contain the following sections. Section DV 14300.03 DV 14300.04 General Installation Operation Theory of operation Maintenance and Repair Illustrated Parts List Modification and Changes... -
Page 6: Short Description
AR6201 Short Description The VHF transceiver is designed as a single block unit for usage in cockpit environment of general aviation aircrafts including helicopters under consideration of performed environmental qualification (refer chapter 1.7) and SW Level (refer chapter 1.6.6). The VHF transceiver is a compact and lightweight single block unit. The dimensions correspond to the standard instrument diameter of 58 mm (2 1/4 inch). - Page 7 AR6201 Squelch Operation There are two kinds of squelch methods implemented, carrier squelch and noise squelch. The carrier squelch is based on received signal strength and adjustable in installation setup; the noise squelch is based on detected noise level and adjustable in pilot setup. Memory channels The VHF transceiver also contains a channel memory device for automatically/manually storage of 99 frequencies.
-
Page 8: Variants Survey
AR6201 Installation Setup Configuration of the installation parameters like mike sensitivity, mike type selection, speaker enable/disable and further parameters is possible via Installation Setup. Service Mode Special factory configuration of the system is possible in Service Mode via a RS422 interface with a proprietary serial data communication protocol. -
Page 9: Dimensions & Weight
AR6201 Vibration as per EUROCAE/RTCA ED-14E/DO-160E Category S (Curve M) + Category U (Curve G) 1.6.3 Dimensions & Weight Front panel 61.2 mm x 61.2 mm Depth of unit 211.4 mm (front plate till end of antenna connector) Mounting (backpanel) standard 58 mm diameter (21/4 inch) Material of Case ALMg... -
Page 10: Software
AR6201 Type of modulation A3E (amplitude modulation) ≥ 70% Modulation capability ≤ 15% Distortion at 70% modulation ≤ 6 dB, 350 Hz to 2500 Hz Modulation bandwidth: Dynamic microphone 1 … 20 mV compressor starting point, adjustable Input balanced, 200 Ω (with compressor) Input range up to 30 dB above compressor starting point. -
Page 11: Environmental Qualification
AR6201 Environmental Qualification The following performance under environmental test conditions have been established in accordance with the procedures set forth in EUROCAE/RTCA Document ED-14E/DO-160E. Condition Section Cat. Description Temperature and Altitude Ground Survival Low Temperature 4.5.1 -55 deg C Short-Time Operating Low -20 deg C Temperature Operating Low Temperature... - Page 12 AR6201 Condition Section Cat. Description Equipment where interference Emission of Radio Frequency 21.0 should be controlled to a Energy tolerable level Pin test waveform A, level 1 Lightning Induced Transients 22.0 A1E3X Cable bundle test waveform E, Susceptibility level 3 Lightning Direct Effects 23.0 Icing...
-
Page 13: Accessories
AR6201 Accessories Connector Kit CK4201-S (soldering version) Article-No.: 0879.304-954 consisting of: 25-pol. cable connector, soldering F Article no. 0725.021-277 Connector housing Article no. 0775.479-277 Antenna plug Article no. 0725.706-277 Label “COMM” Article no. 0711.111-258 Connector Kit CK4201-C (crimp version) Article-No.: 0514.901-954 consisting of: 25-pol. - Page 14 AR6201 Connector Kit CK6200-C (crimp version) Article-No.: 0617.891-954 consisting of: 25-pol. cable connector, crimp F Article no. 0472.921-277 25-pol. cable connector, crimp M Article no. 0891.551-277 2 X Connector housing Article no. 0775.479-277 Antenna plug Article no. 0725.706-277 Label “COMM” Article no.
- Page 15 AR6201 Table of contents Section Installation Page 2.1 General 1 2.2 Testing before Installation 1 2.3 Mechanical Installation 1 2.4 Electrical Interface 3 2.4.1 Connectors and Pin Assignment 3 2.4.2 Inputs / Outputs detailed Description 5 2.5 Installation Wiring 8 2.5.1 Typical Wiring for Single Seater Glider 9 2.5.2 Typical Wiring for Single Seater Glider (5‐pol DIN Jack) 10 2.5.3 Typical Wiring for Twin Seater Motor Glider 11 2.5.4 Typical Wiring for usage of Standard Headsets 12 2.5.5 ...
-
Page 16: Dv 14300.03/.04 Issue 2
AR6201 Blank Page 2-II DV 14300.03/.04 Issue 2 10/2010... -
Page 17: General
AR6201 Section 2 INSTALLATION General The installation of the VHF transceiver depends on the type of aircraft and its equipment. Therefore, only general information can be given in this section. The VHF transceiver is designed as a single block unit for usage in cockpit environment of general aviation aircrafts including helicopters under consideration of performed environmental qualification (refer chapter 1.7) and SW Level (refer chapter 1.6.6). - Page 18 AR6201 Figure 2-1 Mounting dimensions VHF transceiver Figure 2-2 Drilling jig for back-panel mounting Page 2-2 DV 14300.03/.04 Issue 2 10/2010...
-
Page 19: Electrical Interface
AR6201 Electrical Interface 2.4.1 Connectors and Pin Assignment Figure 2-3 Connectors on Back plate Antenna Connector (J3) The antenna connector (Figure 2-3, Position 1) is a BNC type. The antenna port is designed for working with a nominal impedance of 50 Ohm. Grounding Bold (Position 2) The transceiver has a M4 threaded grounding bolt (Figure 2-3, Position 2) allowing a low impedance grounding of the unit. - Page 20 AR6201 Pin No. Pin Name Direction Function P1-9 not connected P1-10 ILL_LO Illumination low input P1-11 P_SUPP Power supply Hot (positive) P1-12 P_SUPP Power supply Hot (positive) P1-13 P_SUPP_GND Power supply Ground (return) P1-14 SPK_LO Speaker ground (return) P1-15 LINE_OUT High Impedance audio output P1-16 AGC_OUT...
-
Page 21: Inputs / Outputs Detailed Description
AR6201 Pin No. AR6201 Pin Name Direction Function J1-13 /SRV_EN Service enable pin ACTIVE state - closed contact to GND J1-14 TX1- Interface 1 OUT- J1-15 RX1- Interface 1 IN- J1-16 not connected J1-17 not connected J1-18 not connected J1-19 not connected J1-20 (/GPI) - Page 22 AR6201 Two dynamic microphones (of the same type) may be connected in parallel. It is highly recommended to mount the jacks isolated from aircraft frame in order to avoid ground loops. Speaker Connection Pin No. AR6201 Pin Name Direction Function P1-1 SPK_HI Speaker output signal...
- Page 23 AR6201 The sensitivity can be adjusted in the installation setup from 1 to 8 V. The input impedance of this input is 10 kΩ. /PTT (Press to talk) Pin No. AR6201 Pin Name Direction Function P1-17 /PTT Press To Talk key input ACTIVE state - closed contact to GND The transceiver will go to transmit operation, if this input is connected to ground.
-
Page 24: Installation Wiring
AR6201 *) Don’t care means that setting is ignored and has no influence to the device behavior. **) If STD MIKE is selected only Standard Microphone Input is active. If DYN MIKE is selected only Dynamic Microphone Input is active. If BOTH MIKES is selected Standard Microphone Input and Dynamic Microphone Input are active and will be mixed. -
Page 25: Typical Wiring For Single Seater Glider
AR6201 2.5.1 Typical Wiring for Single Seater Glider AR6201-( ) ANTENNA Frequency Exchange (Remote Flip-Flop) optional /EXT_SO D_GND /MIKE_SW D_GND Pow er Supply AWG20 P_SUPP 14V/28V P_SUPP 7.5 A PWR_EVAL Sw itched Supply P_SUPP_GND Pow er Supply AWG20 P_SUPP_GND Ground ILL_HI ILL_LO SPK_HI... -
Page 26: Typical Wiring For Single Seater Glider (5-Pol Din Jack)
AR6201 2.5.2 Typical Wiring for Single Seater Glider (5-pol DIN Jack) AR6201-( ) ANTENNA Frequency Exchange (Remote Flip-Flop) optional /EXT_SO D_GND /MIKE_SW D_GND Pow er Supply AWG20 P_SUPP 14V/28V P_SUPP 7.5 A PWR_EVAL Pow er Supply AWG20 P_SUPP_GND Ground P_SUPP_GND ILL_HI ILL_LO SPK_HI... -
Page 27: Typical Wiring For Twin Seater Motor Glider
AR6201 2.5.3 Typical Wiring for Twin Seater Motor Glider AR6201-( ) ANTENNA Frequency Exchange (Remote Flip-Flop) optional /EXT_SO D_GND Standard Mike Speaker Off /MIKE_SW Dynamic Mike D_GND Speaker On Pow er Supply AWG20 P_SUPP 14V/28V P_SUPP 7.5 A PWR_EVAL Pow er Supply AWG20 P_SUPP_GND Ground... -
Page 28: Typical Wiring For Usage Of Standard Headsets
AR6201 2.5.4 Typical Wiring for usage of Standard Headsets AR6201-( ) ANTENNA Frequency Exchange (Remote Flip-Flop) /EXT_SO D_GND Speaker Off /MIKE_SW Speaker On D_GND Pow er Supply AWG20 P_SUPP 14V/28V P_SUPP 7.5 A PWR_EVAL Pow er Supply AWG20 P_SUPP_GND Ground P_SUPP_GND ILL_HI Dimming Control 14V/28V... -
Page 29: Typical Wiring For Aircrafts With Intercom System (Unbalanced)
AR6201 2.5.5 Typical Wiring for Aircrafts with Intercom System (Unbalanced) AR6201-( ) ANTENNA /EXT_SO D_GND /MIKE_SW D_GND Pow er Supply AWG20 P_SUPP 14V/28V P_SUPP 7.5 A PWR_EVAL Pow er Supply AWG20 P_SUPP_GND Ground P_SUPP_GND ILL_HI Dimming Control 14V/28V ILL_LO SPK_HI SPK_LO AGC_OUT /PTT... -
Page 30: Typical Wiring For Aircrafts With Intercom System (Balanced)
AR6201 2.5.6 Typical Wiring for Aircrafts with Intercom System (Balanced) AR6201-( ) ANTENNA /EXT_SO D_GND /MIKE_SW D_GND Pow er Supply AWG20 P_SUPP 14V/28V P_SUPP 7.5 A PWR_EVAL Pow er Supply AWG20 P_SUPP_GND Ground P_SUPP_GND ILL_HI Dimming Control 14V/28V ILL_LO SPK_HI SPK_LO AGC_OUT /PTT... -
Page 31: Location Of Internal Automatic Fuse
AR6201 Location of internal automatic fuse The internal automatic fuse is to be reseted by means of a matching plastic tool (may be self made). Figure 2-10 Location of internal automatic fuse Installation Setup 2.7.1 Entering Installation Setup The installation setup is meant to enable the ground technicians to set the equipment configuration and must not be used in flight. -
Page 32: Leaving Installation Setup
AR6201 2.7.2 Leaving Installation Setup The installation setup can be left just by switching off the transceiver. All changes done up to that time are stored automatically. 2.7.3 Page Up / Page Down in the Installation Setup The installation setup consists of several pages. By pressing “↕/SCN”... - Page 33 AR6201 Display Contents Description One of the three following options may be selected for the dimming input: NONE: The illumination for LCD and push-buttons will be controlled via the rotary encoder on the transceiver itself. pilot can change the dimming in the pilots menu (refer chapter 3.12.2).
- Page 34 AR6201 Display Contents Description By changing the option to “YES” (turn rotary knob) and pressing the “STO” push-button all stored frequencies will be deleted. If the supply voltage drops below the adjustable threshold (10 … 33 V DC) the display indicates the message “LOW BATT”.
- Page 35 AR6201 Display Contents Description The sensitivity of the Auxiliary Audio Input (Pin P1-4 / Pin P1-21) can be adjusted in the range 1.0 V to 8.0 V by turning the rotary knob. Note: This page is only displayed if ENABLE_AUX_IN is activated. One of the five following options may be selected: HW SELECT: The state of the input /MIKE_SW (Pin J1-24) switch...
- Page 36 AR6201 Display Contents Description The sensitivity of Standard Microphone Input can be adjusted in range from 10 mV to 1000 mV by turning the rotary knob. The factory setting is 110 mV. Note: The microphone sensitivity shall be adjusted to Note: achieve a correct modulation by keeping the cockpit This page is only displayed if...
- Page 37 AR6201 Display Contents Description The Scan Hold Time is adjustable in range of 1 to 20 seconds. The factory setting is 1 second It is recommended not modifying this parameter. The sidetone attenuation is adjustable in range 0 … 12 dB by turning the rotary knob. This attenuation is related to the intercom volume.
-
Page 38: Typical Settings In Installation Setup
AR6201 Typical Settings in Installation Setup 2.8.1 Single Seater Glider Typical Installation Wiring Figure 2-4, Figure 2-5 Installation Setup: ENABLE Activated SPEAKER Installation Setup: MIKE TYPE DYNAMIC Remarks Permanent crossed IC sign , because VOX is disabled 2.8.2 Twin Seater Motor Glider Typical Installation Wiring Figure 2-6 Installation Setup: ENABLE... -
Page 39: Retrofitting An Ar4201 With An Ar6201
AR6201 Retrofitting an AR4201 with an AR6201 In most cases an AR4201 may be retrofitted by an AR6201 without any problems. However in some cases a problem may appear, because not all pins are full compatible. 2.9.1 Pin Compatibility AR6201 AR4201 AR4201 AR6201... -
Page 40: Dynamic Microphone Input
AR6201 P1-18 MIKE STD. Standard MIKE_STD_HI Standard microphone input, microphone input, high side, high side, unbalanced unbalanced P1-19 CPIN coding pin CPIN coding pin (removed pin) (removed pin) P1-20 TEMS2 Ground for Not connected Temperature sensor P1-21 GNDDATA Ground AF_AUX_IN_LO Ground P1-22 RS232 TXD... -
Page 41: Temperature Sensor
AR6201 MIKE_DYN_HI Dynamic Mike MIKE_DYN_LO MIKE_STD_HI MIKE_STD_LO 2.9.3 Temperature Sensor The AR6201 does not have a temperature sensor input. But a temperature sensor connected between pin P1-8 and pin P1-20 (from previous installation) will not negatively affect the operation of the transceiver. 2.9.4 RS-232 Interface The AR6201 does not have a RS-232 interface for remote control. -
Page 42: Testing After Installation
AR6201 2.10 Testing after Installation 2.10.1 Ground test with engine shut down After installation of the unit, measure the antenna tuning using a VHF reflection-coefficient meter (voltage standing wave meter). The VSWR (voltage standing wave ratio) over the complete frequency range of the unit shall be within 3:1. - Page 43 AR6201 Table of contents Section OPERATION Page 3.1 Safety instructions 1 3.2 Controls and Indicators 1 3.2.1 Controls 2 3.2.2 Symbols shown on Display 2 3.3 Start–up 3 3.4 Channel Spacing Mode 4 3.5 Receive and Transmit Operation 5 3.5.1 Receive Operation 5 3.5.2 Transmit Operation 5 3.6 Operation Modes 6 3.6.1 Standard Mode 6 3.6.2 ...
- Page 44 AR6201 Blank Page 3-II DV 14300.03/.04 Issue 2 10/2010...
-
Page 45: Operation
AR6201 Section 3 OPERATION Safety instructions The following instructions must be followed for safe operation of the VHF transceiver: Switch OFF the unit before starting or shutting down engines. A speech test is to be performed before startup and it should be noted that if the speech test is carried out close to the ground station the results may be positive even if the antenna cable is broken or short-circuited. -
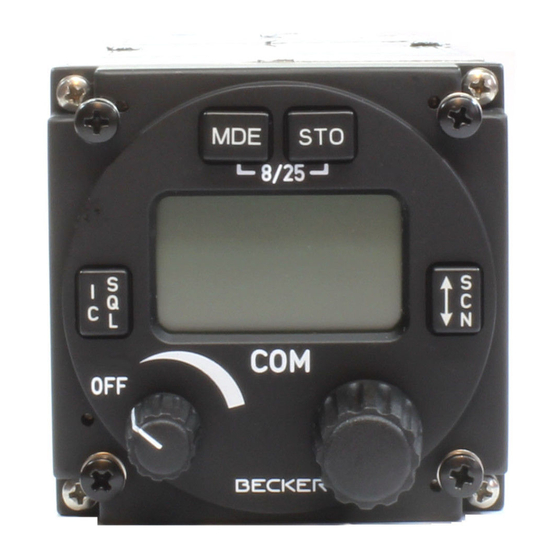
Page 46: Controls
AR6201 3.2.1 Controls Symbol Description Main Function IC/SQL ”Short press” during normal operation toggles squelch ON/OFF state. (Intercom/Squelch) “Long press” during normal operation activates IC menu. “Short press” during normal operation changes the frequency selection mode. (Mode) “Long press” during normal operation activates the pilots menu. -
Page 47: Start-Up
AR6201 Symbol Meaning The transceiver performs a storage operation Start–up CAUTION Do not switch ON the VHF transceiver when engines are being started or shut down. Note: Excessive pulses on the DC bus of the aircraft may cause damage on electrical circuits of any installed instrument. -
Page 48: Channel Spacing Mode
AR6201 Channel Spacing Mode The channel spacing in which the transceiver shall work can be toggled by pressing by pressing “STO” and “MDE” keys simultaneously for at least 2 seconds. 8.33 kHz channel spacing (left) / 25 kHz channel spacing (right) In the 25 kHz Mode only 5 digits will be shown. -
Page 49: Receive And Transmit Operation
AR6201 Operating Frequency Channel Spacing Displayed Frequency Displayed Frequency (MHz) (kHz) in 8.33+25 kHz mixed in 25 kHz Mode Mode 118.1000 8.33 118.105 etc. etc. etc. etc. 136.9750 136.975 136.97 136.9750 8.33 136.980 136.9833 8.33 136.985 136.9916 8.33 136.990 Receive and Transmit Operation 3.5.1 Receive Operation If PTT key is not pressed, the transceiver stays in receive operation. -
Page 50: Operation Modes
AR6201 Note: Transmit operation will automatically be terminated (return to receive operation) after 120 seconds of continuous transmitting even if PTT is still pressed. In this case “STUCK PTT” will be indicated (refer chapter 3.13). For initiating a new transmission, PTT line needs first to become inactive. -
Page 51: Channel Mode
AR6201 In direct tune mode the active frequency is indicated in the top line. The battery voltage is indicated in the bottom line. The active frequency can be set directly by pushing and turning the rotary encoder. The changes became active immediately. Changing the active frequency is possible only when the transceiver is not transmitting. -
Page 52: Scan Mode
AR6201 3.6.4 Scan Mode The Scan mode can be entered from all frequency selection modes by a long press of “↕/SCN” key. The Scan mode can be left by a short press of the “MDE” key. After leaving scan mode, device will enter the standard mode. -
Page 53: Storage Function
AR6201 Squelch On (left) / Squelch Off (right) If the squelch function is active (on), noisy signals will be muted. The threshold for the squelch can be adjusted in the pilots menu. Storage Function The transceiver has two kind of storage functions implemented: - Manual storing of frequencies - Automatically storing of frequencies 3.8.1... -
Page 54: Auxiliary Audio Input
AR6201 channels CH02, CH03, …. CH09. By this algorithm the last 9 used active frequencies are always stored. The automatically stored frequencies can be recalled in channel mode. Auxiliary Audio Input The transceiver has an auxiliary audio input. This auxiliary audio input can generally be enabled or disabled in the installation setup. -
Page 55: Vox & Speaker Operation
AR6201 Intercom operation can be activated by external intercom switch independent of VOX or speaker status (enabled/disabled). The external intercom switch has priority. Speaker output is switched off during intercom operation. 3.11 VOX & Speaker Operation Depending on wiring and installation setup, the speaker may be enabled always or the speaker is enabled/disabled by an external switch. -
Page 56: 3.12.2 Pilots Menu
AR6201 By turning the rotary encoder the intercom VOX threshold can be changed. -30 means that VOX is very sensitive. A very silent signal already activates the intercom operation. +10 means that VOX is quite insensitive. Only a loud signal activates the intercom operation. Note: For a VOX threshold setting of -15 a good VOX behavior should be achieved in most aircrafts. -
Page 57: Warning And Failure Indications
AR6201 By a short press of the push button of the rotary encoder the next page Squelch is displayed. The active frequency is indicated in the top line of the display. On the bottom line is indicated ”SQUELCH” with bar graph and value. By turning the rotary encoder the squelch threshold can be changed from 6 to 26. - Page 58 AR6201 Display Contents Description The transceiver has detected an internal failure during normal operation. Depending on failure reason, the device may be still operable with degraded performance or not operable at all. Possible reasons for indication: Appearance about every 5 seconds. - Out of specified environmental conditions - HW or SW failure inside the transceiver.
Need help?
Do you have a question about the AR6201 Series and is the answer not in the manual?
Questions and answers